Productinformatie
Deze online handleiding is van toepassing op de volgende producten:
Via deze link kom je op de productpagina. Daar vind je de gedetailleerde specificaties, CE-markeringcertificaten enz.
-
550-31303-201 | Sense3, alu signal white coated
-
550-31303-211 | Sense3, alu black brushed
-
550-31303-221 | Sense3, alu natural grey brushed
-
550-31303-241 | Sense3, alu age gold brushed
-
550-39001 | Pleisterframe, EU-inbouwdoos, 12,5 mm
-
550-39002 | Pleisterframe, EU-inbouwdoos, 9,5 mm
Beschrijving
MOTIV Sense3 is een verfijnd toetsenpaneel met uiterst flexibele functionaliteit. Het heeft een hoogwaardige metalen afwerking en een minimalistisch zwart display aan de bovenkant. Het is een elegante aanvulling voor je interieur.
Afmetingen
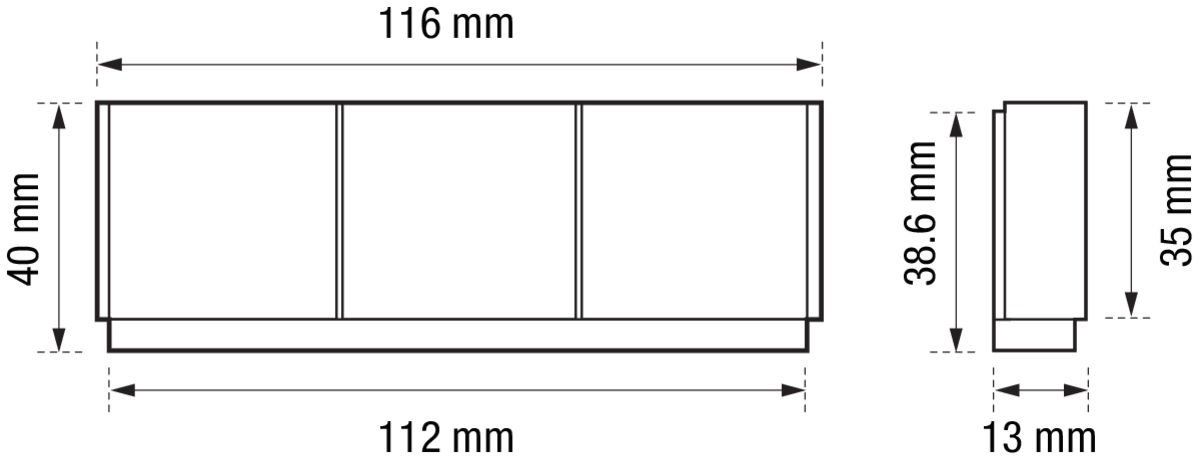
Bediening
Interactie
Het toetsenpaneel heeft verschillende opties voor proactieve maar subtiele interactie, gebaseerd op radardetectie. Vanop afstand kunnen de aanpasbare leds oplichten om je te verwelkomen. Als je dichtbij komt, wordt het display aan de bovenkant geactiveerd. Voor gebruiksgemak toont het display aan de bovenkant:
-
icoon
-
korte naam van een actie
-
status
Bediening
Sense3 heeft drie aanraakgevoelige toetsen. Je kunt deze toetsen op twee manieren gebruiken:
-
Kort en lang drukken
-
Swipen
Je kunt het gedrag naar wens programmeren.
Bijvoorbeeld: kort en lang drukken voor een dimkanaal
|
Toets |
Gedrag |
|---|---|
|
Kort drukken |
Schakelt het gedimde lichttoestel AAN of UIT. Afhankelijk van de geheugenmodus van het dimkanaal gaat de status AAN tot 100% van de lichtouput of tot de vorige dimwaarde. |
|
Lang drukken |
Start de cyclus op- of neerdimmen van een dimkanaal, afhankelijk van de vorige richting. |
|
Loslaten |
Laat de cyclus op- of neerdimmen stoppen op een bepaald percentage. |
Voorbeeld 2: kort en lang drukken voor een motorkanaal
|
Toets |
Gedrag |
|---|---|
|
Kort drukken |
Schakelt de motor respectievelijk naar de volgende statussen: oplopen– stop – aflopen - stop. |
|
Lang drukken |
Start de cyclus oplopen of aflopen van een motorkanaal, afhankelijk van de richting voor de laatste stop. |
|
Loslaten |
Laat de cyclus oplopen of aflopen stoppen op een bepaald percentage. |
Swipegedrag
Wanneer je op het toetsenpaneel naar links of rechts swipet, kun je door pagina's met meer acties of routines bladeren. Elke pagina bevat de programmering van drie toetsen. Je kunt tot drie pagina's programmeren.
Ondersteunde functies
Alle Niko Home Control acties en routines worden ondersteund, inclusief verlichting, raambekleding, HVAC, audio en meer.
Gebruiksinterface van de thermostaat
Dankzij de geïntegreerde temperatuur- en vochtigheidssensor ondersteunt Sense3 ook klimaat- en ventilatiebediening in multizone om je energie-efficiëntie en comfort te verhogen.
Wanneer de temperatuursensor een zone met verwarming/koeling aanstuurt, kan je de setpoints of programma's bekijken en aansturen in de Niko Home app, op de Digital black of het touchscreen.
Voor elke zone kan je de standaardwaarden van deze voorkeursinstellingen en programma's wijzigen in de Niko Home app of in de Niko Home Control programmeersoftware.
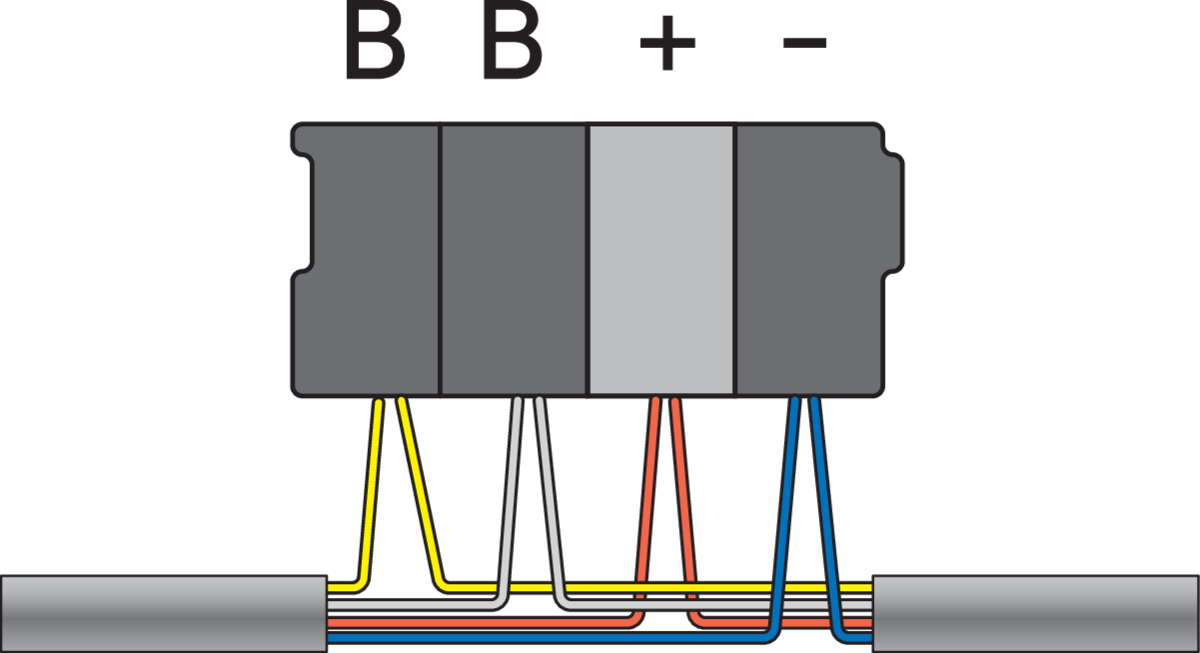
Bedrading
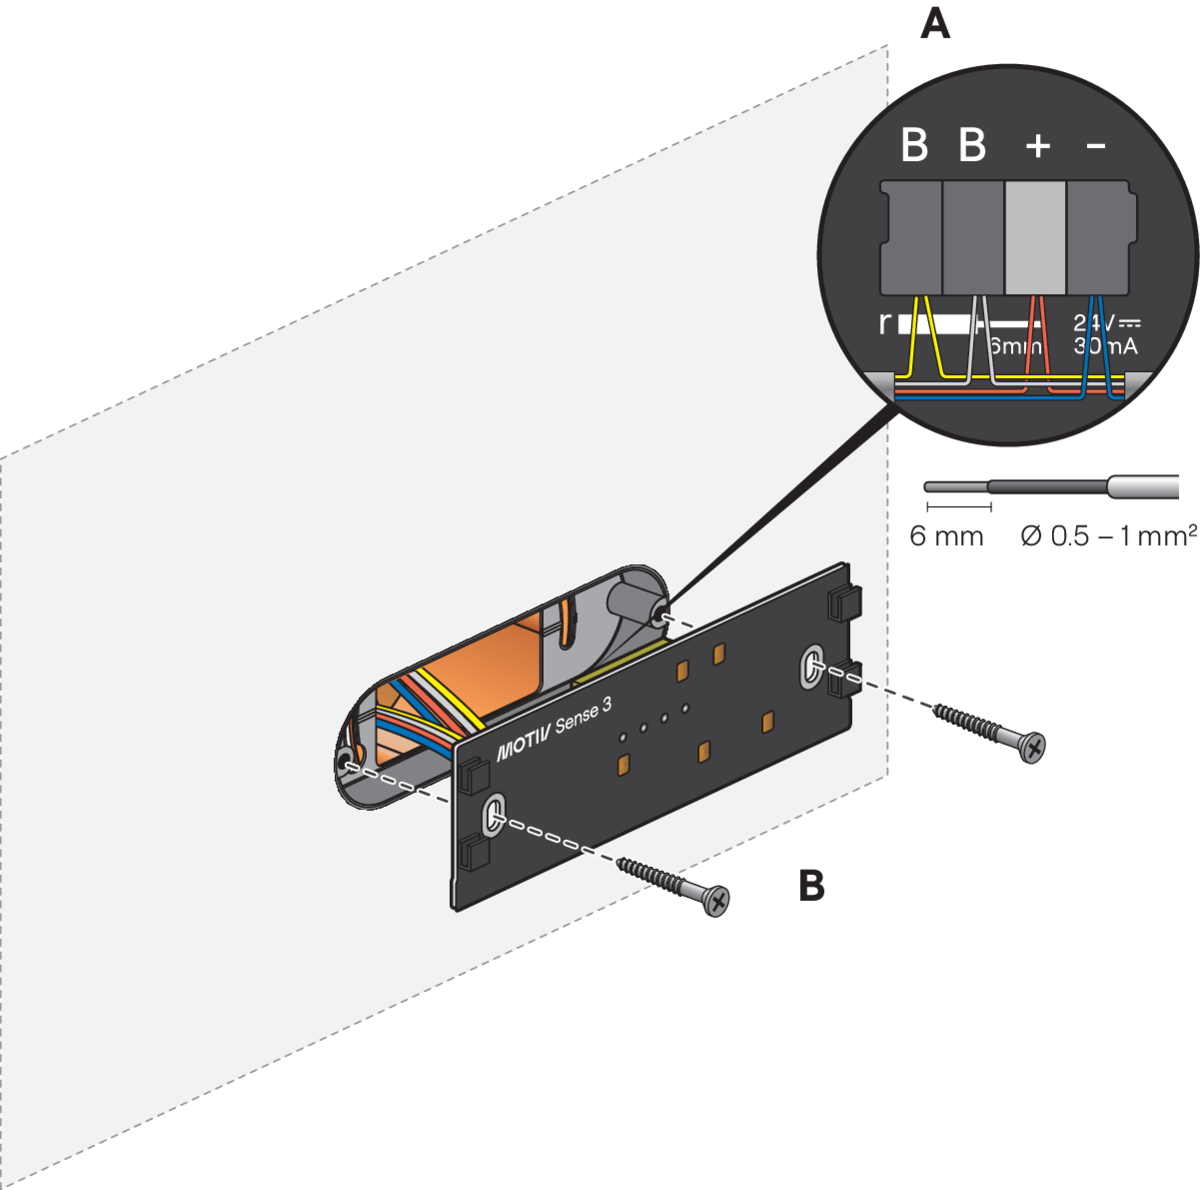
Sense3 is uitgerust met vier connectoren om buscommunicatie en aparte 24 V-voeding mogelijk te maken. Elke connector heeft vier insteekklemmen om te kunnen doorlussen. Hieronder vind je het bekabelingsschema:
Plaatsing
Plaatsing van de toetsen
Wanneer je meerdere toetsenpanelen naast elkaar installeert, moet je minsten 1,5 cm ruimte laten:

Installatie bij gebruik van de temperatuur- of vochtigheidssensoren
-
Om de verwarmings-/koelingszone te regelen, dient de kamertemperatuur nauwkeurig gemeten te kunnen worden door het elimineren van zoveel mogelijk factoren die de thermostaat kunnen belemmeren om de temperatuurregeling nauwkeurig uit te voeren.
-
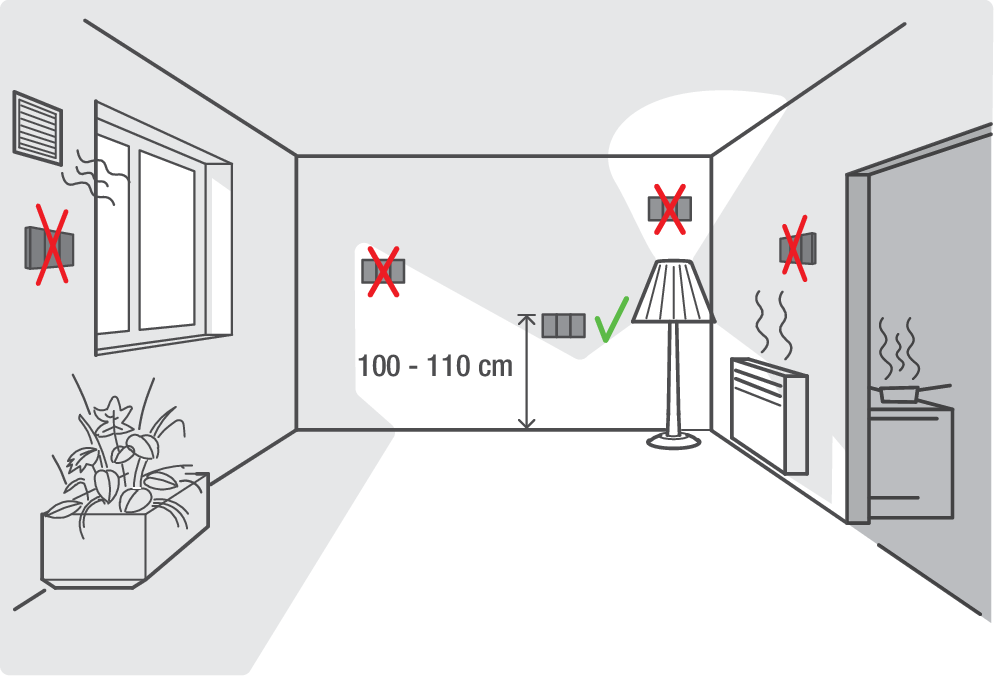
Monteer het toetsenpaneel bij gebruik als een thermostaat NIET:
-
in direct zonlicht
-
op een muur die rechtstreeks in contact staat met de buitenlucht
-
achter een gordijn.
-
in de onmiddellijke omgeving van een verwarmingsbron (kachel, verwarming, enz.) of een elektrisch toestel dat warmte kan afgeven (tv, computer, enz.)
-
-
We raden aan om het toetsenpaneel op een hoogte tussen 110 en 116 cm te installeren.
-
Vermijd luchtcirculatie achter het toetsenpaneel. Gebruik een luchtdichte wandmontagedoos of vul de gaten in de inbouwdoos of buskabelleiding zo nodig met PU-schuim.
-
Geef de temperatuursensor voldoende tijd om te acclimatiseren, zodat hij de juiste bedrijfstemperatuur bereikt om nauwkeurig te kunnen meten.
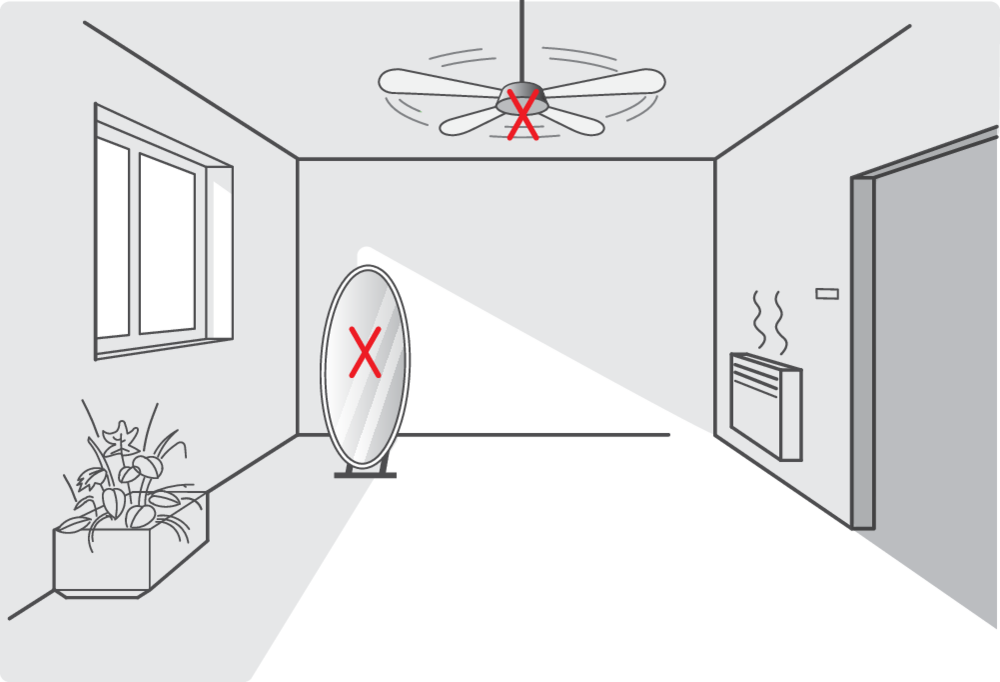
Aanbevelingen voor de radar
Het gedrag van de radarsignalen hangt af van de materialen waarop ze terechtkomen.

Zet het toetsenpaneel niet in de buurt van spiegels, metalen oppervlakken of draaiende ventilatoren omdat de radarsignalen teruggekaatst worden en onvoorspelbaar zullen reageren.
Installatie
Weet dat voorbereiding van de muur met een MOTIV pleisterframe (apart te bestellen) noodzakelijk is om Sense3 te kunnen installeren.
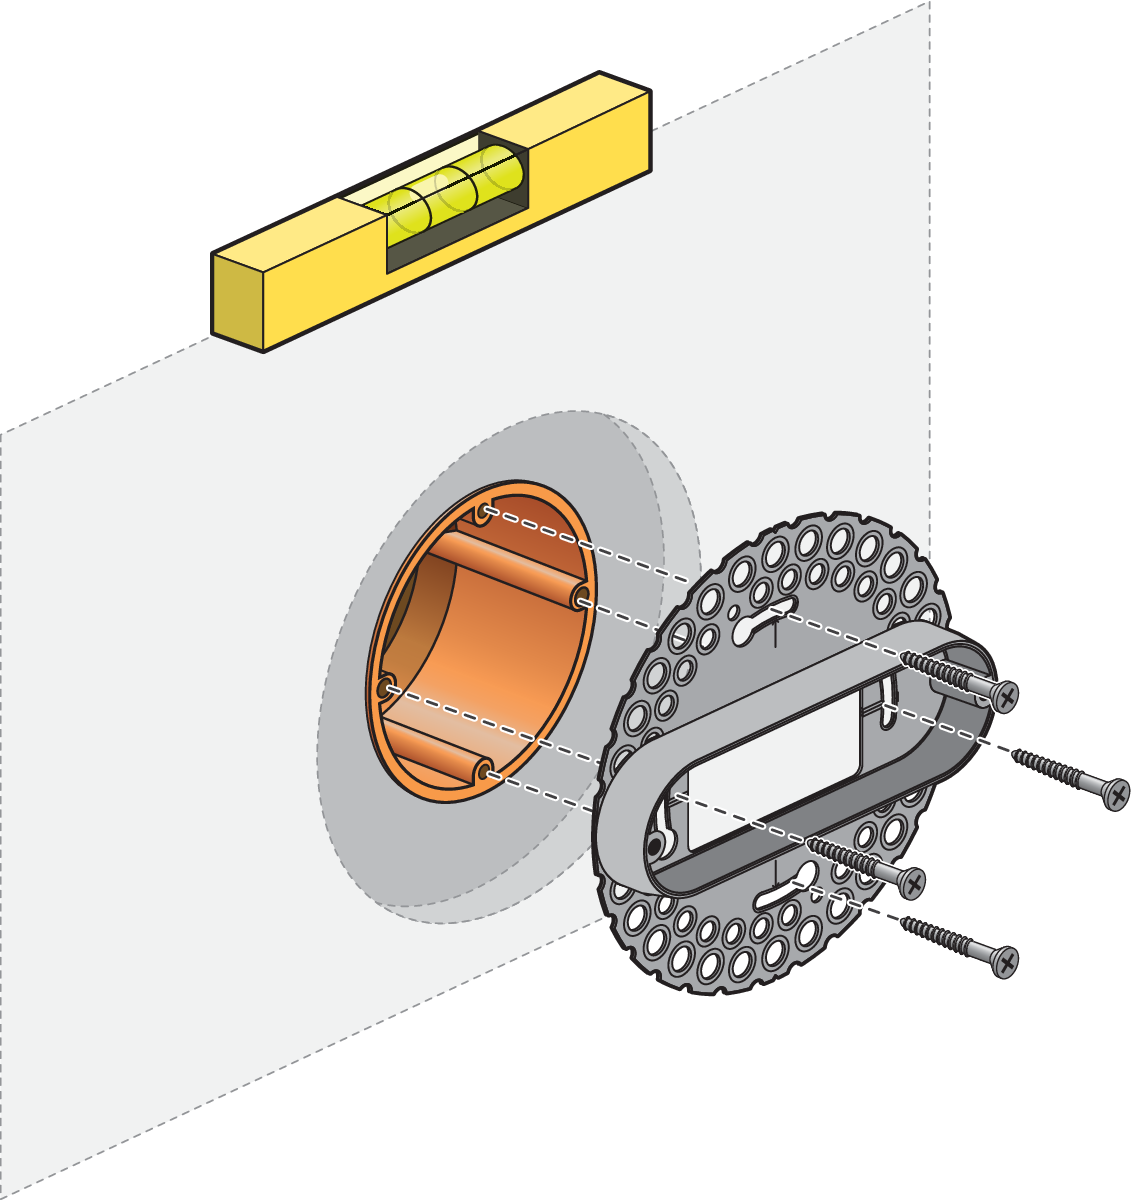
Stap 1
Installeer de inbouwdoos verzonken in de muur. De uitsparing moet dezelfde diepte A en afmeting B hebben als het gekozen pleisterframe.
Het is belangrijk om het pleisterframe gelijk te maken met de uiteindelijke afwerking van de muur om geen ruimte te laten tussen het toetsenpaneel en de afgewerkte muur.
Houd voor bakstenen muren rekening met de dikte van het pleisterwerk dat erop zal worden aangebracht. De beschermkap mag niet voorbij het bepleisterde oppervlak komen.

Stap 2
Bevestig het pleisterframe aan de muur.
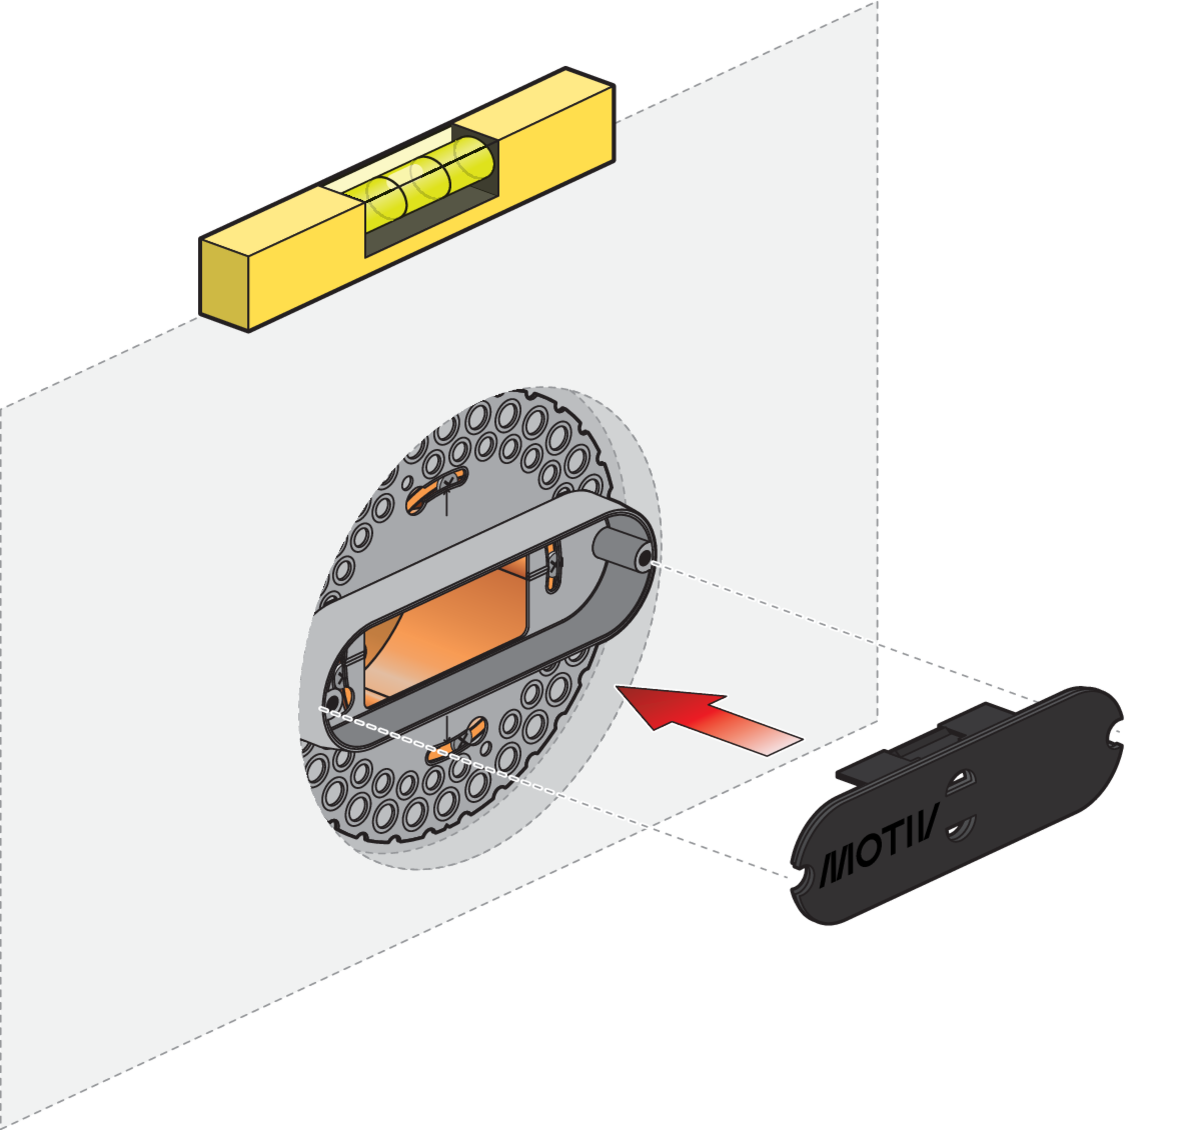
Stap 3
Plaats de beschermkap op het pleisterframe en breng het pleisterwerk aan.
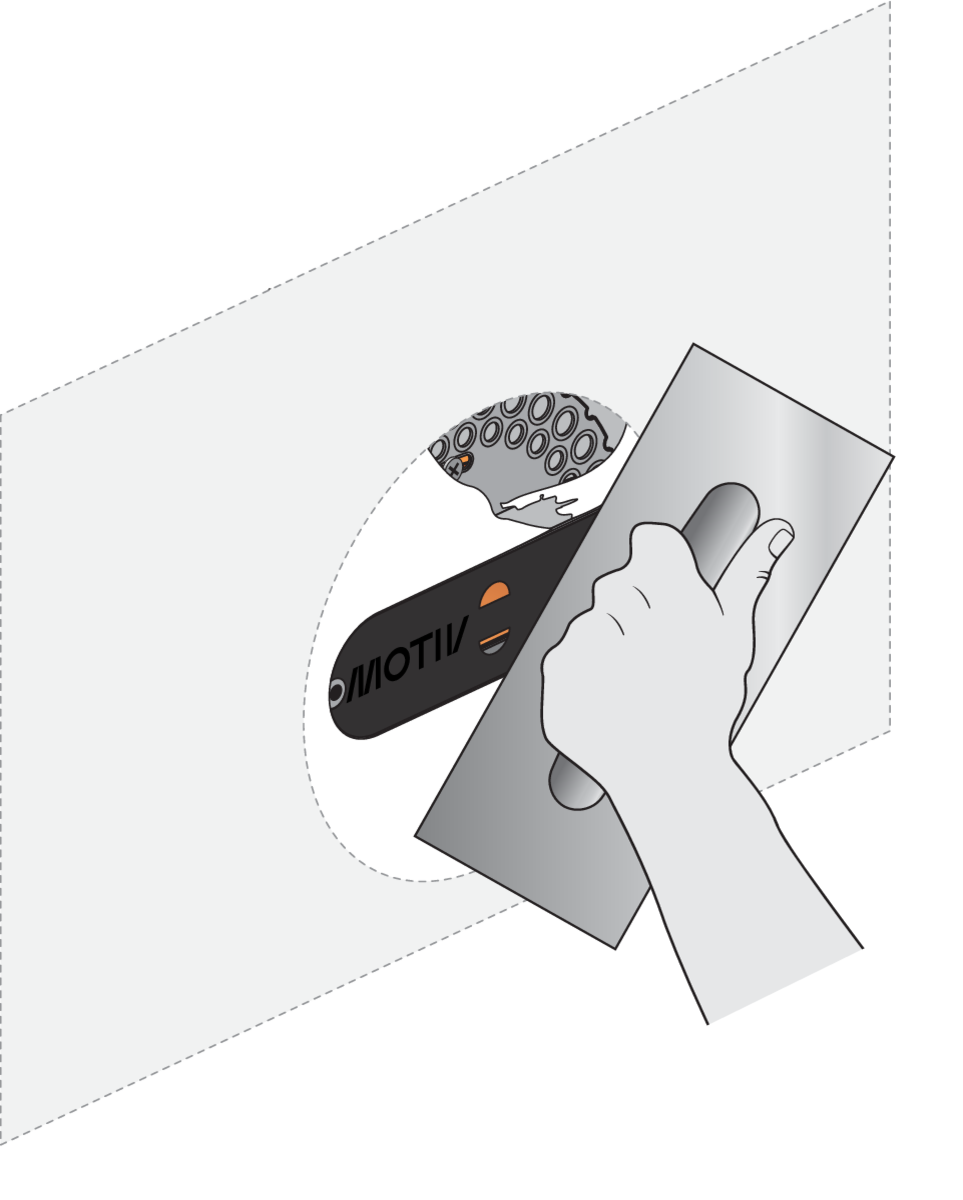
Stap 4:
Verwijder de beschermkap met een punttang voordat je de muur gaat verven.
Tip: Snijd de randen eerst met een mes uit voordat je de beschermkap verwijdert om het pleisterwerk niet te beschadigen.
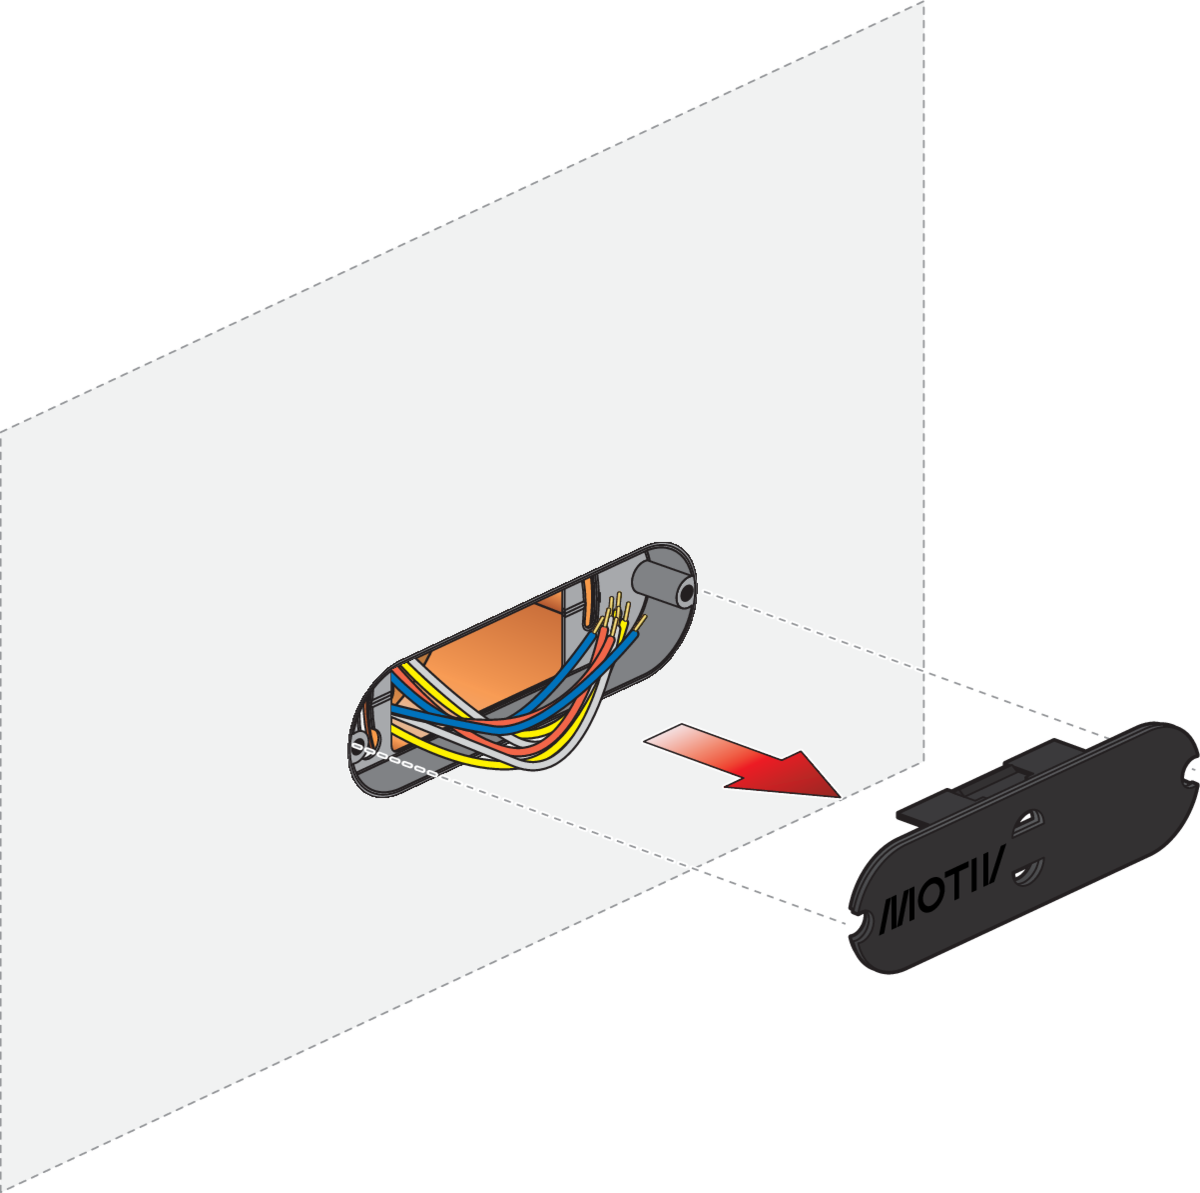
Stap 5
A.
Verbind de draden volgens het aansluitschema. Je kunt de connectoren losmaken van de printplaat om het aansluiten van de bedrading te vergemakkelijken.
B.
Bevestig de printplaat op de muur. De klem aangeduid met 'B' werkt als de Niko Home Control busbekabelingsinterface (niet-gepolariseerd, vrije topologie):
Stap 6
A.
Verwijder de beschermfolie van de printplaat.
B.
Klik het toetsenpaneel vast op de printplaat.
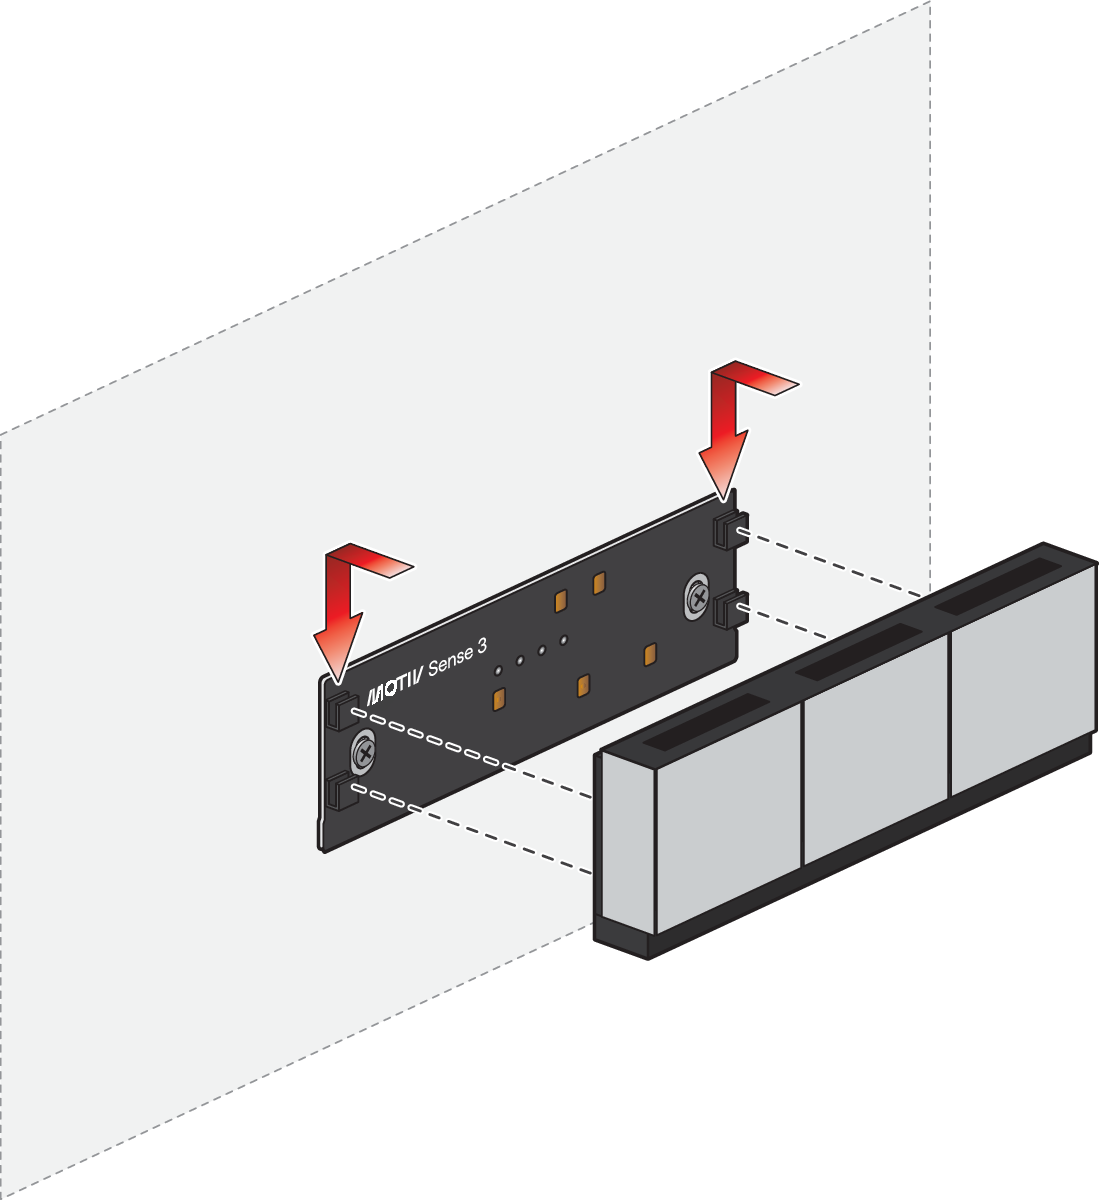
Ga tijdens de installatie voorzichtig met het toetsenbord om. Druk niet te hard op het bovenste display; te veel druk kan het beschadigen.
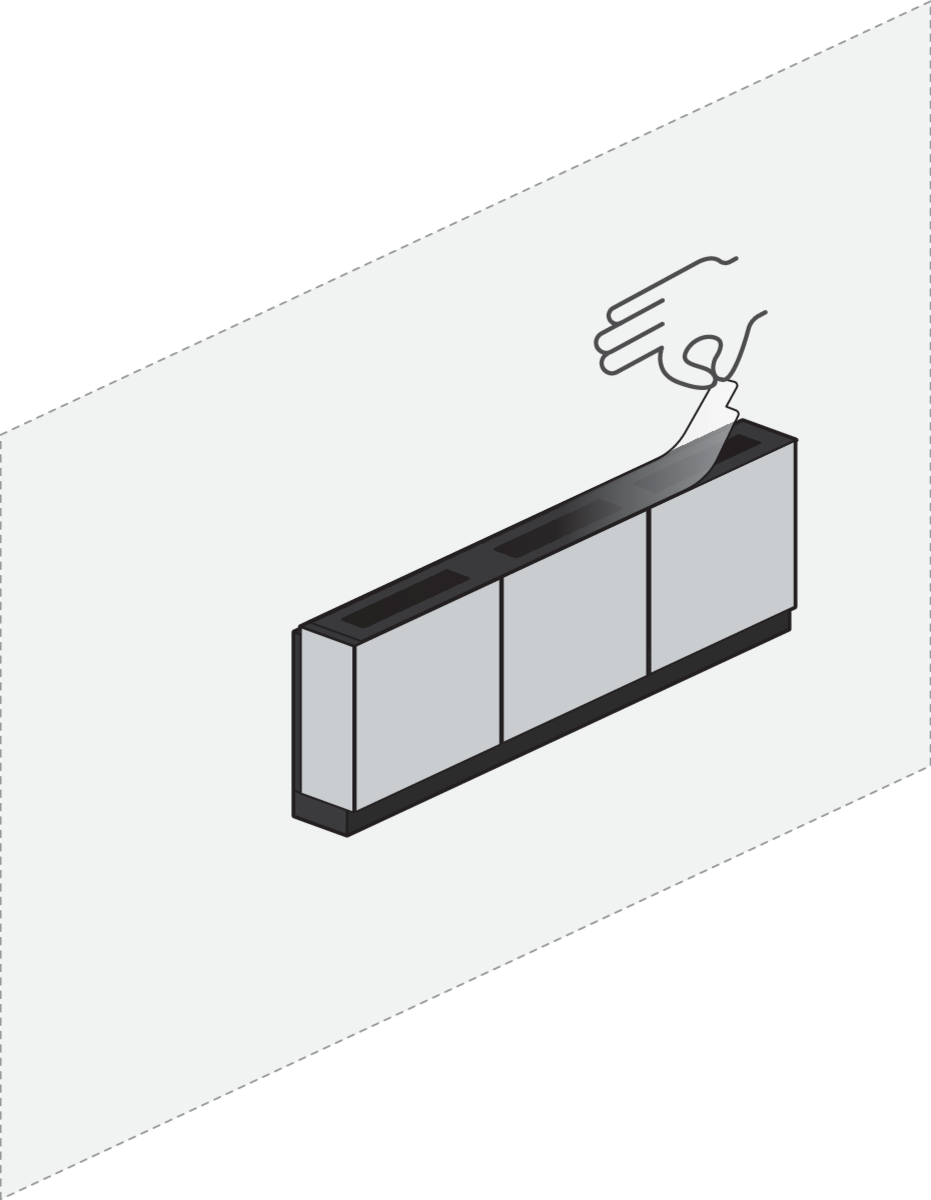
C.
Verwijder de beschermfolie van het display aan de bovenkant.
Programmeren
Functie van de toets
Stel de functie van de toets in met de Niko Home Control programmeersoftware (versie 2.26.4 of recenter). Ga dan als volgt te werk:
-
Voeg een toestel toe - zie https://guide.niko.eu/en/smnhc2/lv/creating-a-control-or-a-device
-
Stel de parameters in - zie https://guide.niko.eu/en/smnhc2/lv/Sense3
-
Voeg basisacties en routines toe.
-
Adresseer het toestel - zie https://guide.niko.eu/en/smnhc2/lv/addressing-controls-and-devices en https://guide.niko.eu/en/smnhc2/lv/addressing-methods-for-controls-and-devices
Gedrag bij naderen
Je kunt het toetsenpaneel programmeren op basis van radardetectie om het te laten reageren op naderende gebruikers. Er zijn vier mogelijke instellingen:
-
Altijd aan
-
Altijd uit
-
Dichtbij (100 cm)
-
Op afstand (250 cm)
Je kunt dit gedrag instellen via de software.
Temperatuur- en vochtigheidssensor
De temperatuursensor kan geprogrammeerd worden als een input voor aansturing in multizone (verwarming/koeling en ventilatie) om je energie-efficiëntie te verhogen en algemeen comfort te behouden.
Verder kunnen de temperatuurwaarden gebruikt worden als een input in een voorwaarde. De vochtigheidswaarden kunnen ook gebruikt worden. Voeg hiervoor een (of beide) waarde(s) toe aan de 'IF'-voorwaarde.
Je kunt de temperatuur-/vochtigheidswaarde in de Niko Home app of op de Digital black zien:
|
Niko Home app |
Je kunt de gemeten temperatuur en/of vochtigheid zichtbaar maken in het tabblad 'Klimaat', zonder een routine voor klimaatregeling.
|
|
Digital black |
Je kunt de gemeten temperatuur en/of vochtigheid zichtbaar maken op de Digital black.
|
Gedrag van de feedbackled
Configureer het gedrag van de feedbackled voor een basisactie in de Niko Home Control programmeersoftware. Voor de geactiveerde en gedeactiveerde status kan het worden ingesteld op:
-
Verschillende intensiteiten: uit, zacht, medium of helder
-
Verschillende kleuren: warm white of elke RGB-kleur
Onderhoud
Gebruik een zachte droge of licht vochtige doek om het toetsenpaneel te reinigen. Gebruik geen detergenten of reinigingsmiddelen.