Productinformatie
Deze online handleiding is van toepassing op de volgende producten:
Via deze link kom je op de productpagina. Daar vind je de gedetailleerde specificaties, CE-markeringcertificaten enz.
-
550-32103-241 | Touch10, alu aged gold brushed
-
550-32103-201 | Touch10, alu signal white coated
-
550-32103-211 | Touch10, alu black brushed
-
550-32103-221 | Touch10, natural grey brushed
Beschrijving
MOTIV Touch10 is een geavanceerd touchscreen met ingebouwd toetsenpaneel. Het geeft je de mogelijkheid om het volledige gebouw vanaf één plek te monitoren en aan te sturen: verlichting, raambekleding, toegangscontrole, energie, HVAC, audio en meer. Met de drie aanraakgevoelige toetsen kun je een actie of routine met één tik activeren.
Afmetingen
Voorkant
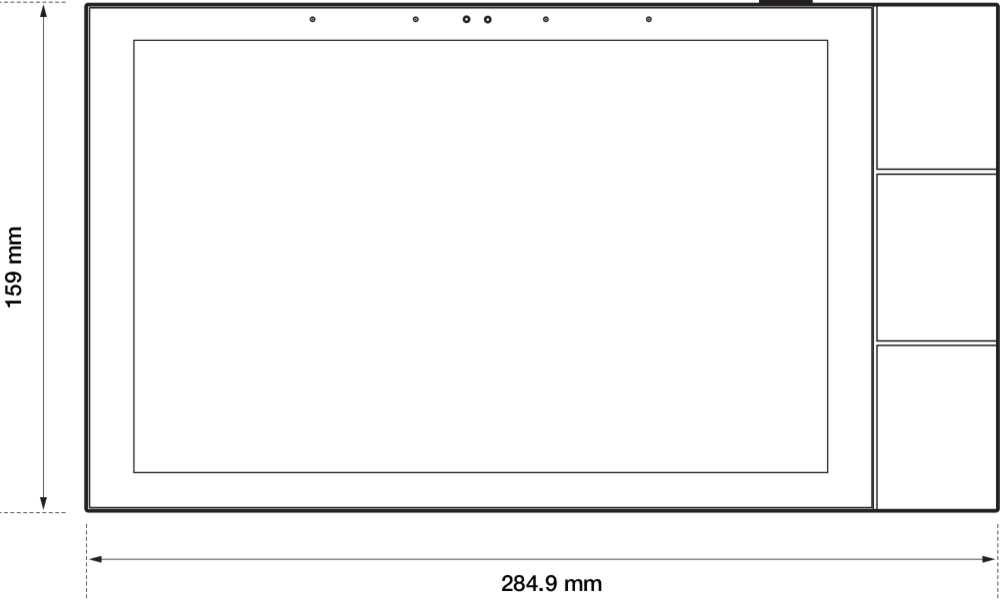
Links

Bediening
Toetsenpaneel
MOTIV Touch10 heeft een ingebouwd toetsenpaneel. Met de drie aanraakgevoelige toetsen kun je een actie of routine met één tik activeren. Wijs de gewenste actie of routine toe aan de toets via de gebruikersinterface op het touchscreen.
Bijvoorbeeld: kort en lang drukken voor een dimkanaal
|
Toets |
Gedrag |
|---|---|
|
Kort drukken |
Schakelt het gedimde lichttoestel AAN of UIT. Afhankelijk van de geheugenmodus van het dimkanaal gaat de status AAN tot 100% van de lichtouput of tot de vorige dimwaarde. |
|
Lang drukken |
Start de cyclus op- of neerdimmen van een dimkanaal, afhankelijk van de vorige richting. |
|
Loslaten |
Laat de cyclus op- of neerdimmen stoppen op een bepaald percentage. |
Voorbeeld 2: kort en lang drukken voor een motorkanaal
|
Toets |
Gedrag |
|---|---|
|
Kort drukken |
Schakelt de motor respectievelijk naar de volgende statussen: oplopen– stop – aflopen - stop. |
|
Lang drukken |
Start de cyclus oplopen of aflopen van een motorkanaal, afhankelijk van de richting voor de laatste stop. |
|
Loslaten |
Laat de cyclus oplopen of aflopen stoppen op een bepaald percentage. |
Radar
Het touchscreen heeft verschillende opties voor proactieve maar subtiele interactie, gebaseerd op radardetectie. Vanop afstand kan het de algemene status tonen om je te verwelkomen. Als je dichtbij komt, krijg je toegang tot het gedetailleerde dashboard.
Hoofdnavigatie
Via de menustructuur onderaan kan je navigeren tussen:
-
Muziek (als je audiosysteem zich in dezelfde ruimte bevindt als het touchscreen en gekoppeld is aan Niko Home Control via de programmeersoftware)
-
Thermostaat (als je thermostaat zich in dezelfde ruimte bevindt als het touchscreen en gekoppeld is aan Niko Home Control via de programmeersoftware)
-
Favorieten
-
Ruimtes
-
Energie
-
Toegang
-
Meldingen
De gebruiker bepaalt zelf welke functionaliteiten worden weergegeven via het keuzemenu > Instellingen > Hoofdnavigatie.
Weergave-instellingen
De gebruiker beslist zelf welke ruimtes, bedieningen, favorieten en widgets getoond worden op elk touchscreen. Zo worden enkel diegene getoond die relevant zijn voor dat bedieningspunt.
Om de inhoud van een bepaald scherm te bewerken, veeg je helemaal naar rechts en tik je op de weergave-instellingentegel. Je kunt op elk afzonderlijk touchscreen een pincode instellen om deze weergave-instellingen te beveiligen.
Ondersteunde functies
Alle Niko Home Control functies worden ondersteund, inclusief:
-
Eenvoudig bedienen van geschakelde, gedimde, instelbaar wit en in kleur verstelbare verlichting
-
Bekijken en regelen van de temperatuur in verschillende zones in je woning
-
Controleren van elektrisch gestuurde rolluiken, jaloezieën, zonwering en gordijnen
-
Opvolgen en optimaliseren van je energieproductie, -verbruik en -opslag
-
Aansturen van een brede waaier van partnersystemen, zoals laadpalen, audiospelers en HVAC-systemen
-
Beantwoorden van inkomende oproepen en controleren van gemiste oproepen van je toegangscontrolesyteem, in geval van verbinding met een Niko Home Control videobuitenpost
-
Bekijken en beheren van je Niko Home Control meldingen
Plaatsing
Installatiehoogte
We raden een minimale installatiehoogte van 150 cm aan.
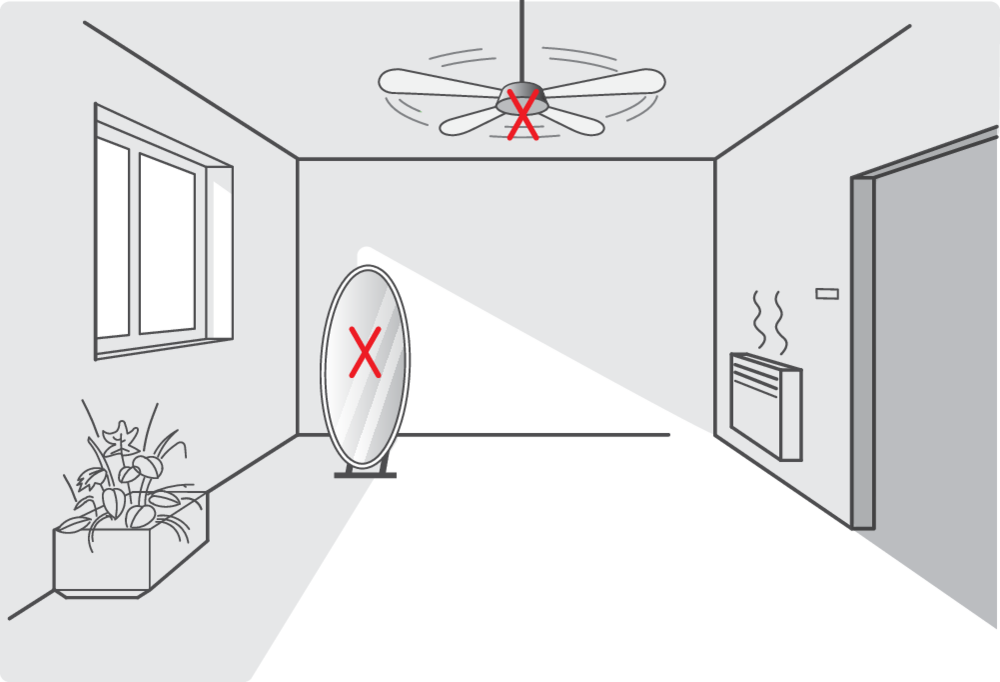
Aanbevelingen voor de radar
Het gedrag van de radarsignalen hangt af van de materialen waarop ze terechtkomen.

Zet het touchscreen niet in de buurt van spiegels, metalen oppervlakken of draaiende ventilatoren omdat de radarsignalen teruggekaatst worden en onvoorspelbaar zullen reageren.
Installatie
Gebruik alleen de meegeleverde schroeven bij de accessoires. Andere schroeven kunnen schade veroorzaken.
We raden aan om, naast smartphones en/of tablets, minstens één touchscreen te voorzien in elke installatie omdat een bekabeld toestel nu eenmaal betrouwbaarder is dan een mobiel toestel.
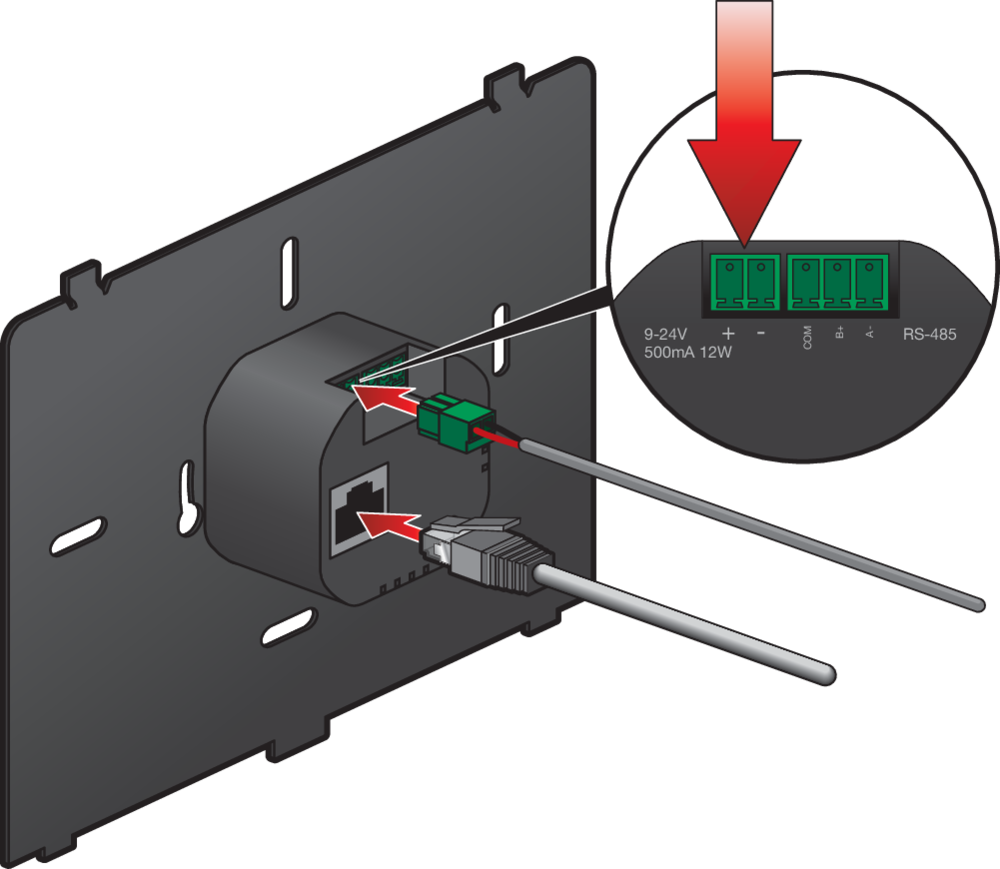
Stap 1
Weet dat RS-485 niet wordt gebruikt.
Verbind de kabels:
-
24 Vdc (optioneel, alleen als het vermogen niet door PoE via de twisted pair-kabel wordt geleverd)
-
Twisted pair-kabel (UTP, FTP of STP)
Stap 2
Draai de eventueel aanwezige schroeven uit de inbouwdoos. Gebruik alleen de schroeven die meegeleverd zijn met dit product.
Bevestig de montagebeugel aan de muur en/of de inbouwdoos. Bepaal de positie van de boorgaten op basis van de onderstaande illustratie:
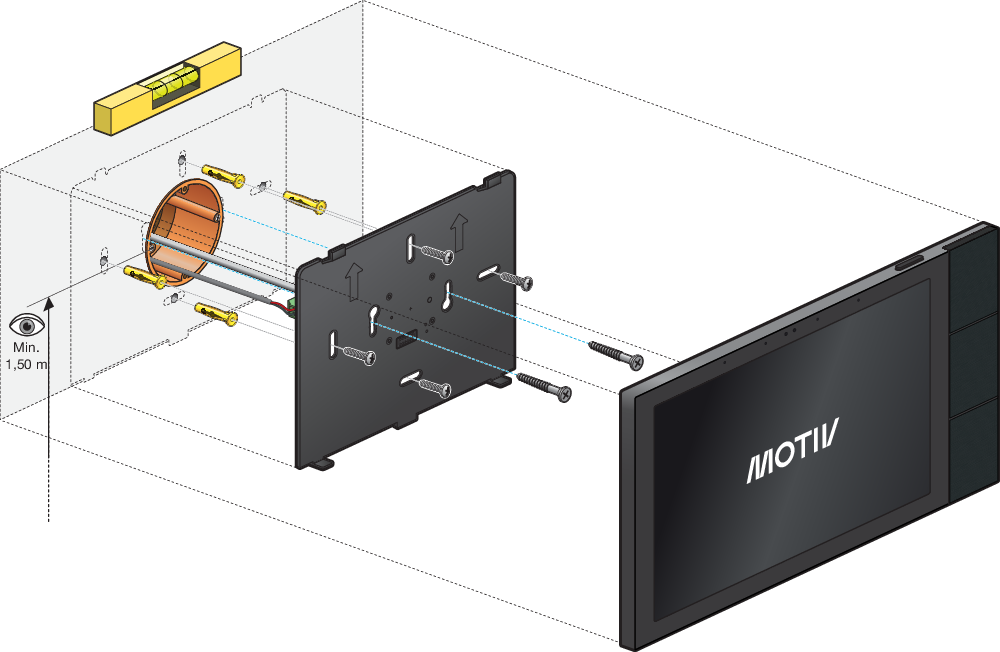
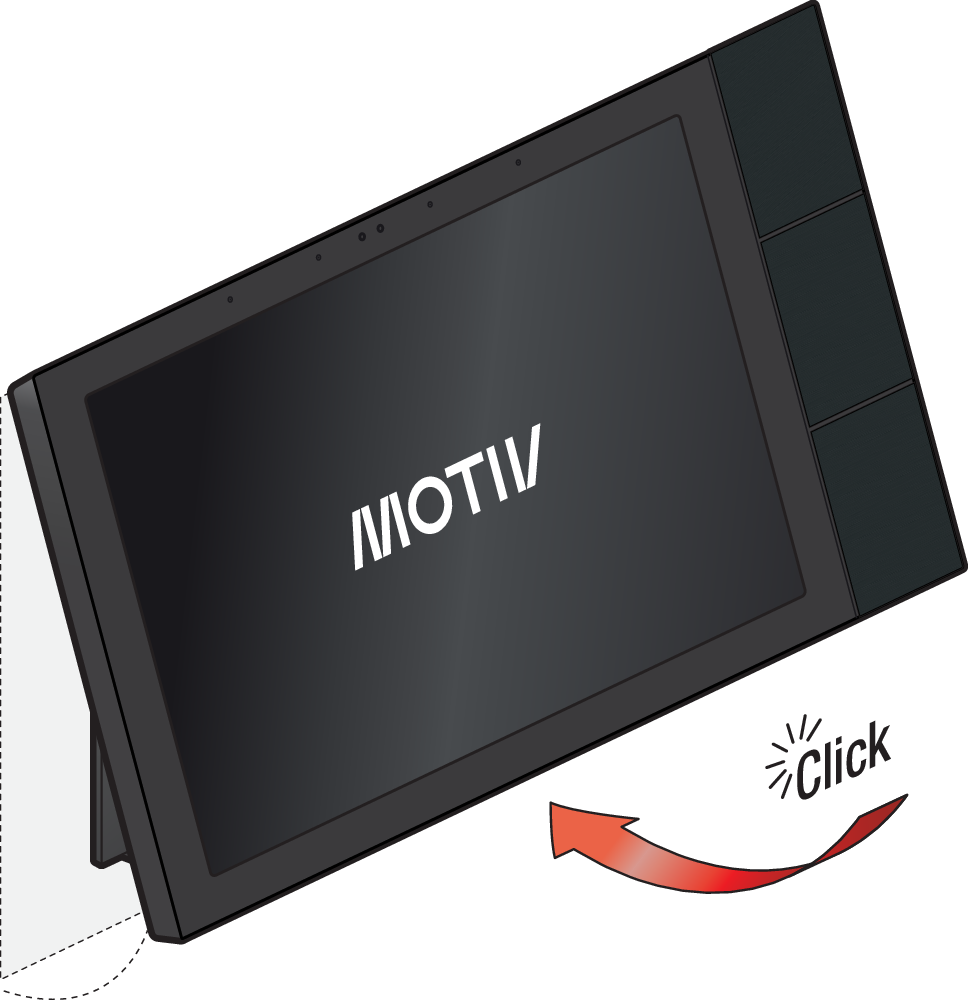
Stap 3
Hang het touchscreen aan de montagebeugel.
a.
Houd het touchscreen schuin, zodat de bovenkant van de beugel in de uitsparingen van het touchscreen past.
b.
Plaats het touchscreen tegen de beugel, zodat het vastklikt met de magneet.
Stap 4
Optioneel: Draai de antidiefstalschroeven vast met de schroevendraaier die bij het product is geleverd.

Onboarding
Stap 1
Alle Niko Home Control IP-toestellen moeten hetzelfde IP-subnet (bijv. 192.168.0.xxx) hebben om communicatie mogelijk te maken.
Zorg ervoor dat het touchscreen verbonden is met hetzelfde netwerk als de connected controller.
Stap 2
Gebruik de Niko Home Control programmeersoftware (versie 2.26.4 of recenter):
-
Voeg het toestel toe.
-
Adresseer het toestel. Ga in het scherm Adresseren naar het tabblad Touchscreens en volg de instructies op het scherm. Voer tijdens het adresseren de code in die je op het touchscreen ziet.
Weet dat dit touchscreen niet langer ondersteuning biedt voor profielen die ingesteld zijn in de programmeersoftware. Alle weergave-instellingen voor elk individueel touchscreen worden ingesteld op het touchscreen, zie Bediening.
Onderhoud en probleemoplossing
Upgrades (online)
Na de onboarding controleert het touchscreen één keer per 24 uur of er upgrades zijn. Hiervoor is een actieve internetverbinding noodzakelijk. Upgrades worden automatisch gedownload en geïnstalleerd zodra ze beschikbaar zijn.
Je kunt automatische upgrades uitschakelen in de programmeersoftware (via Dashboard > Algemene instellingen) of de Niko Home app (via Algemene info > Installatie info). In dat geval moet je elke upgrade bevestigen.
Upgrades (offline)
Als je installatie niet verbonden is met het internet, kun je je touchscreen upgraden via de USB-poort.
Zorg ervoor dat je touchscreen ingeschakeld is voordat je begint. Het touchscreen mag niet via de USB-poort worden gevoed.
-
Verbind het touchscreen en je pc met een USB-kabel. Het touchscreen verschijnt in de verkenner als een USB-opslagapparaat.
-
Download de software van het touchscreen via de website.
-
Kopieer het gedownloade bestand naar het touchscreen (USB-opslagapparaat).
-
Maak de USB-kabel los als het downloaden voltooid is. Het is belangrijk om de kabel niet te laten insteken.
-
Houd de bovenste knop 5 seconden ingedrukt om je toestel opnieuw op te starten. De upgrade wordt automatisch geïnstalleerd.
Het touchscreen onderhouden
Gebruik een zachte droge of licht vochtige doek om het touchscreen te reinigen. Gebruik geen detergenten of reinigingsmiddelen.
Probleemoplossing
|
Probleem |
Oorzaak |
Voorgestelde oplossing |
|---|---|---|
|
Er verschijnt niets op het scherm |
Touchscreen is niet ingeschakeld |
Controleer de voeding van het touchscreen. |
|
Je kunt de installatie niet bedienen |
Intern probleem met het touchscreen |
Houd de bovenste knop 5 seconden ingedrukt om je toestel opnieuw op te starten. |
|
Geen toegang tot instellingen (andere functies werken nog steeds)
|
Pincode is ingesteld maar je bent de code kwijt |
Zet het touchscreen terug naar de fabrieksinstellingen. |
|
Het scherm staat aan maar de volgende boodschap verschijnt: 'Controleer de verbinding' |
Verbindingsfout |
Controleer of netwerkcommunicatie mogelijk is tussen het touchscreen en de controller of hub. Beide moeten met hetzelfde netwerk verbonden zijn. |
|
Het scherm staat aan maar de volgende boodschap verschijnt: 'Dit apparaat moet eerst worden geüpgraded voordat je het in je installatie kunt gebruiken' |
Touchscreensoftware is verouderd |
Verbind je installatie met het internet om het touchscreen te upgraden. Als het touchscreen geen verbinding kan maken met het internet dien je het te upgraden door de offline upgradeprocedure te volgen. |
|
Het scherm staat aan maar de volgende boodschap verschijnt: 'Je installatie moet worden geüpgraded voordat je dit toestel gebruiken' |
Niko Home Control is verouderd |
Gebruik de programmeersoftware om je installatie te upgraden, zie: https://guide.niko.eu/en/rnnhc/lv/how-to-install-the-latest-version-of-niko-home-con |
Fabrieksinstellingen terugzetten
Alle instellingen en data gaan verloren na het terugzetten naar de fabrieksinstellingen. Je moet onboarden en opnieuw instellen via de programmeersoftware.
|
Stap |
Resultaat |
|---|---|
|
Op het touchscreen zie je het bericht 'Controleer de verbinding'. |
|
De pop-up om terug te zetten naar de fabrieksinstellingen verschijnt. |
|
De fabrieksinstellingen worden teruggezet. Alle instellingen en data gaan verloren. |