Wat kun je doen met Abus en Niko Home Control?
Door de contacten in je deuren, toegangspoorten en ramen te verbinden met Niko Home Control, kun je controleren of ze open/gesloten zijn via de Niko Home app op een tablet of smartphone, het touchscreen en/of de Digital black.
We raden de volgende opties aan om deze verbinding nog beter te gebruiken:
-
Krijg een melding als een deur geopend wordt wanneer je afwezig bent; zie Meldingen aanmaken
-
Schakel de verlichting automatisch aan, wanneer je de deur opent; zie Routine op maat
-
Stop tijdelijk de verwarming/koeling wanneer een raam geopend is; zie Een voorwaarde aanmaken
Wat heb je nodig?
Vereisten voor Niko
Je Niko Home Control installatie voldoet aan de volgende vereisten:
-
Je installatie heeft een draadloze slimme hub of een connected controller II.
-
Je installatie is geconfigureerd met de meest recente programmeersoftware.
Afhankelijk van de basismodules van je Niko Home Control installatie dien je de volgende extra producten te installeren:
|
|
Vereiste extra producten |
Referentienummers |
|---|---|---|
|
Connected controller |
Digitale potentiaalvrije sensormodule met één vrije ingang per signaal dat je in Niko Home Control wilt gebruiken Als het uitgangscontact op het systeem van het andere merk niet potentiaalvrij is, heb je een extra potentiaalvrije contactmodule nodig (bijv. Finder 22.32.0.230.1xx0 voor 230 V aansluitingen, Finder 22.32.0.012.1xx0 voor 12 V DC aansluitingen, Finder 22.32.0.024.1xx0 voor 24 V DC aansluitingen) |
|
|
Connected controller met een draadloze bridge |
Geconnecteerde (tweevoudige) schakelaar met één vrije ingang (E) per signaal dat je in Niko Home Control wilt gebruiken Als het uitgangscontact op het systeem van het andere merk geen 230 V is, heb je een extra 230 V contactmodule nodig (bijv. Finder 22.32.0.230.1xx0 voor potentiaalvrije aansluitingen, Finder 22.32.0.012.1xx0 voor 12 V DC aansluitingen, Finder 22.32.0.024.1xx0 voor 24 V DC aansluitingen) De geconnecteerde (tweevoudige) schakelaar kan op een DIN-rail geplaatst worden met behulp van een modulaire houder (bv. Legrand 412950) |
|
|
Draadloze slimme hub |
Geconnecteerde (tweevoudige) schakelaar met één vrije ingang (E) per signaal dat je in Niko Home Control wilt gebruiken Als het uitgangscontact op het systeem van het andere merk geen 230 V is, heb je een extra 230 V contactmodule nodig (bijv. Finder 22.32.0.230.1xx0 voor potentiaalvrije aansluitingen, Finder 22.32.0.012.1xx0 voor 12 V DC aansluitingen, Finder 22.32.0.024.1xx0 voor 24 V DC aansluitingen) De geconnecteerde (tweevoudige) schakelaar kan op een DIN-rail geplaatst worden met behulp van een modulaire houder (bv. Legrand 412950) |
Vereisten voor Abus
Your system meets the following requirements:
-
It has a potential-free or 12/24 V DC or 230 V AC output contact that provides information about the status of the door, gate or window.
-
It is compatible with the Niko module (see Niko requirements).
Je systeem is een van de volgende Abus-producten*:
|
|
Potentiaalvrij contact |
Verbreekcontact |
Maakcontact |
|---|---|---|---|
|
Openingsmelder |
|
|
|
*Ga naar de website van de leverancier voor gedetailleerde specificaties en de nieuwste producten.
Bekabelingsschema's
De sensormodule aansluiten
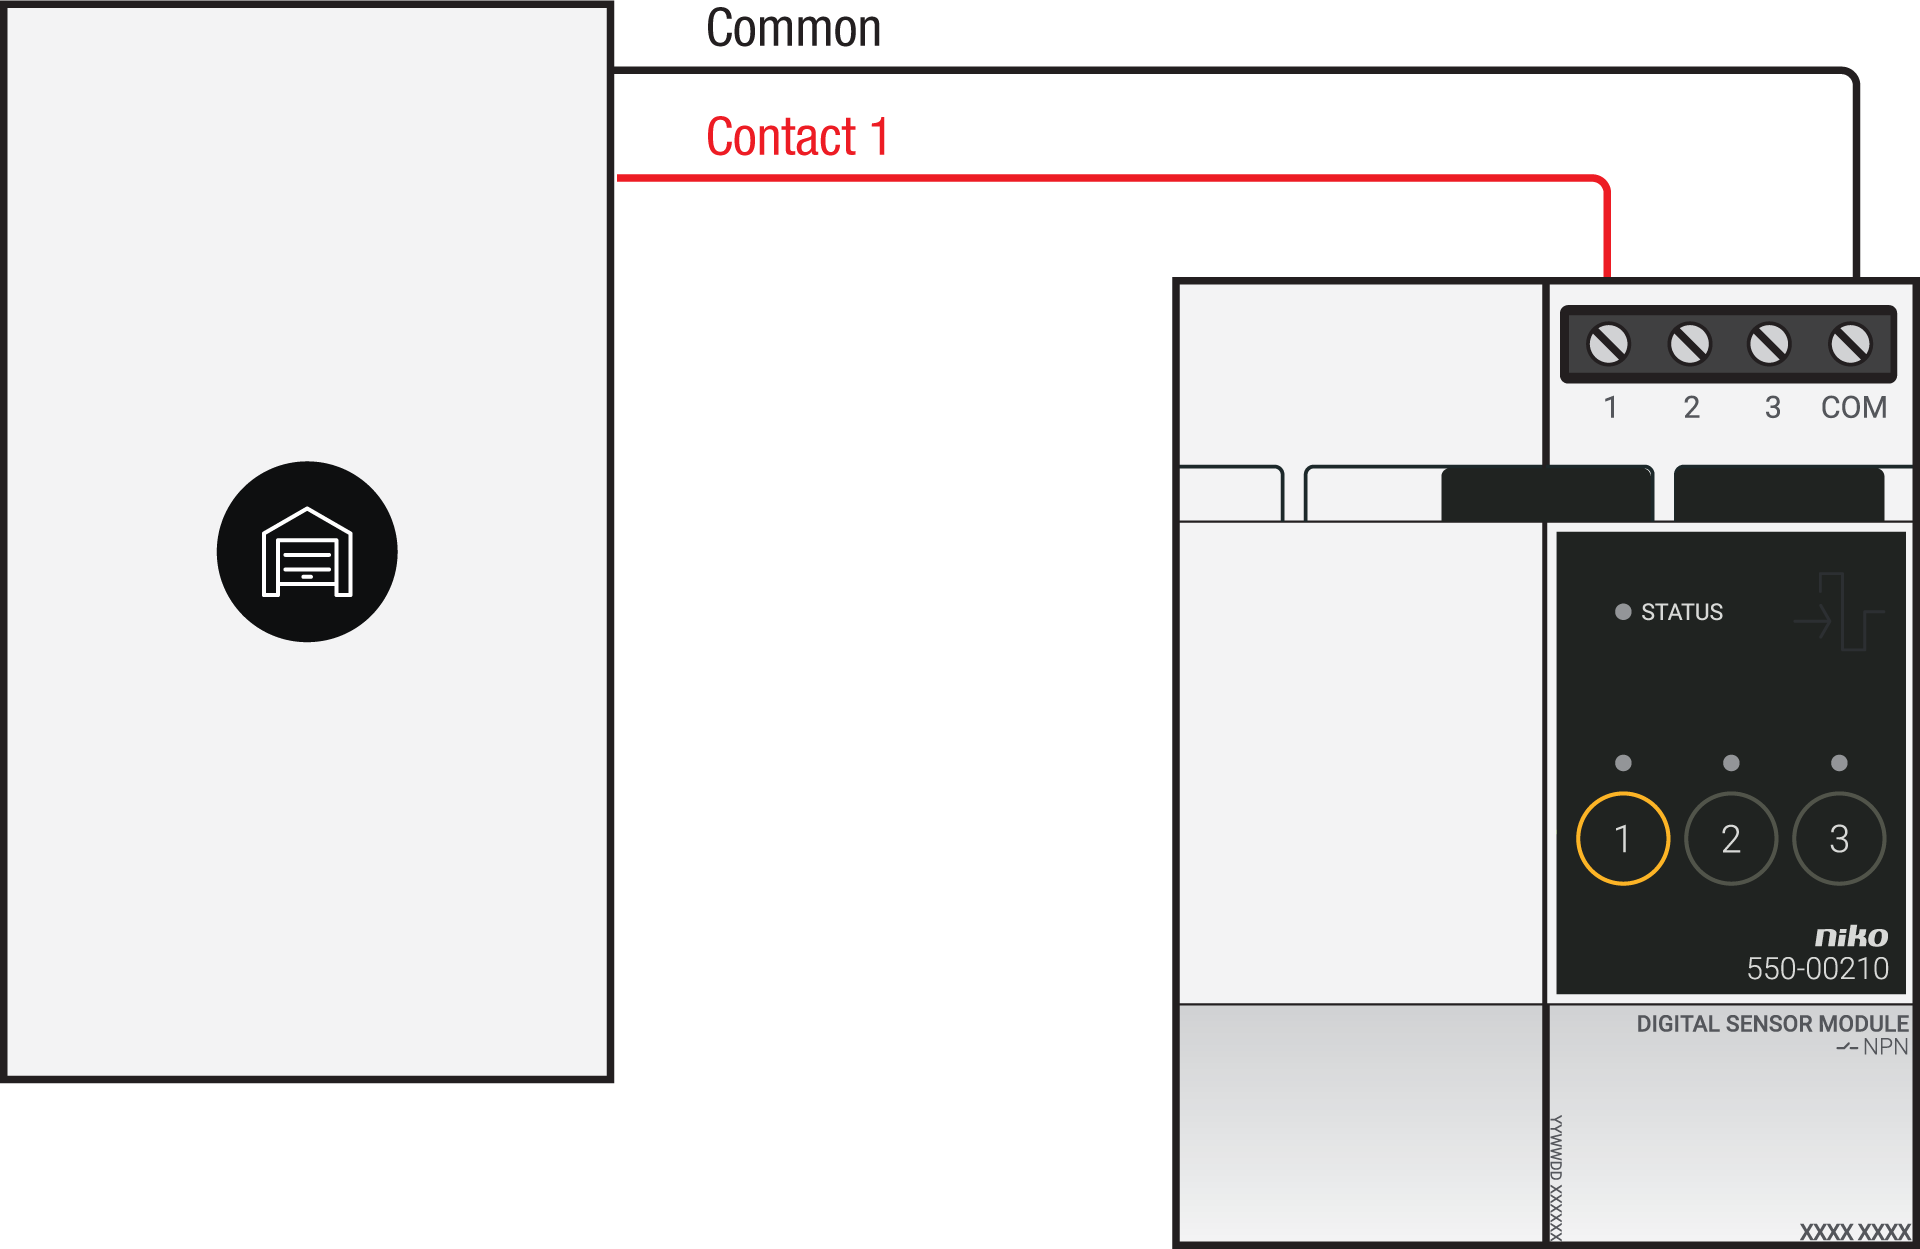
Via potential-free output contact
Connect contact 1 on the Niko sensor module to the output on the third-party system, as shown in the wiring diagram.
|
|
Common |
Contact 1 |
|---|---|---|
|
Abus-detector |
Pin 1 |
Pin 2 |
Via 230 V or 12/24 V output contact
If your door/window status contacts are not potential-free, you additionally need an appropriate potential-free contact module.
Connect contact 1 on the Niko sensor module to the output on the third-party system, as shown in the wiring diagram.
|
230 V output contact |
12/24 V output contact |
|---|---|
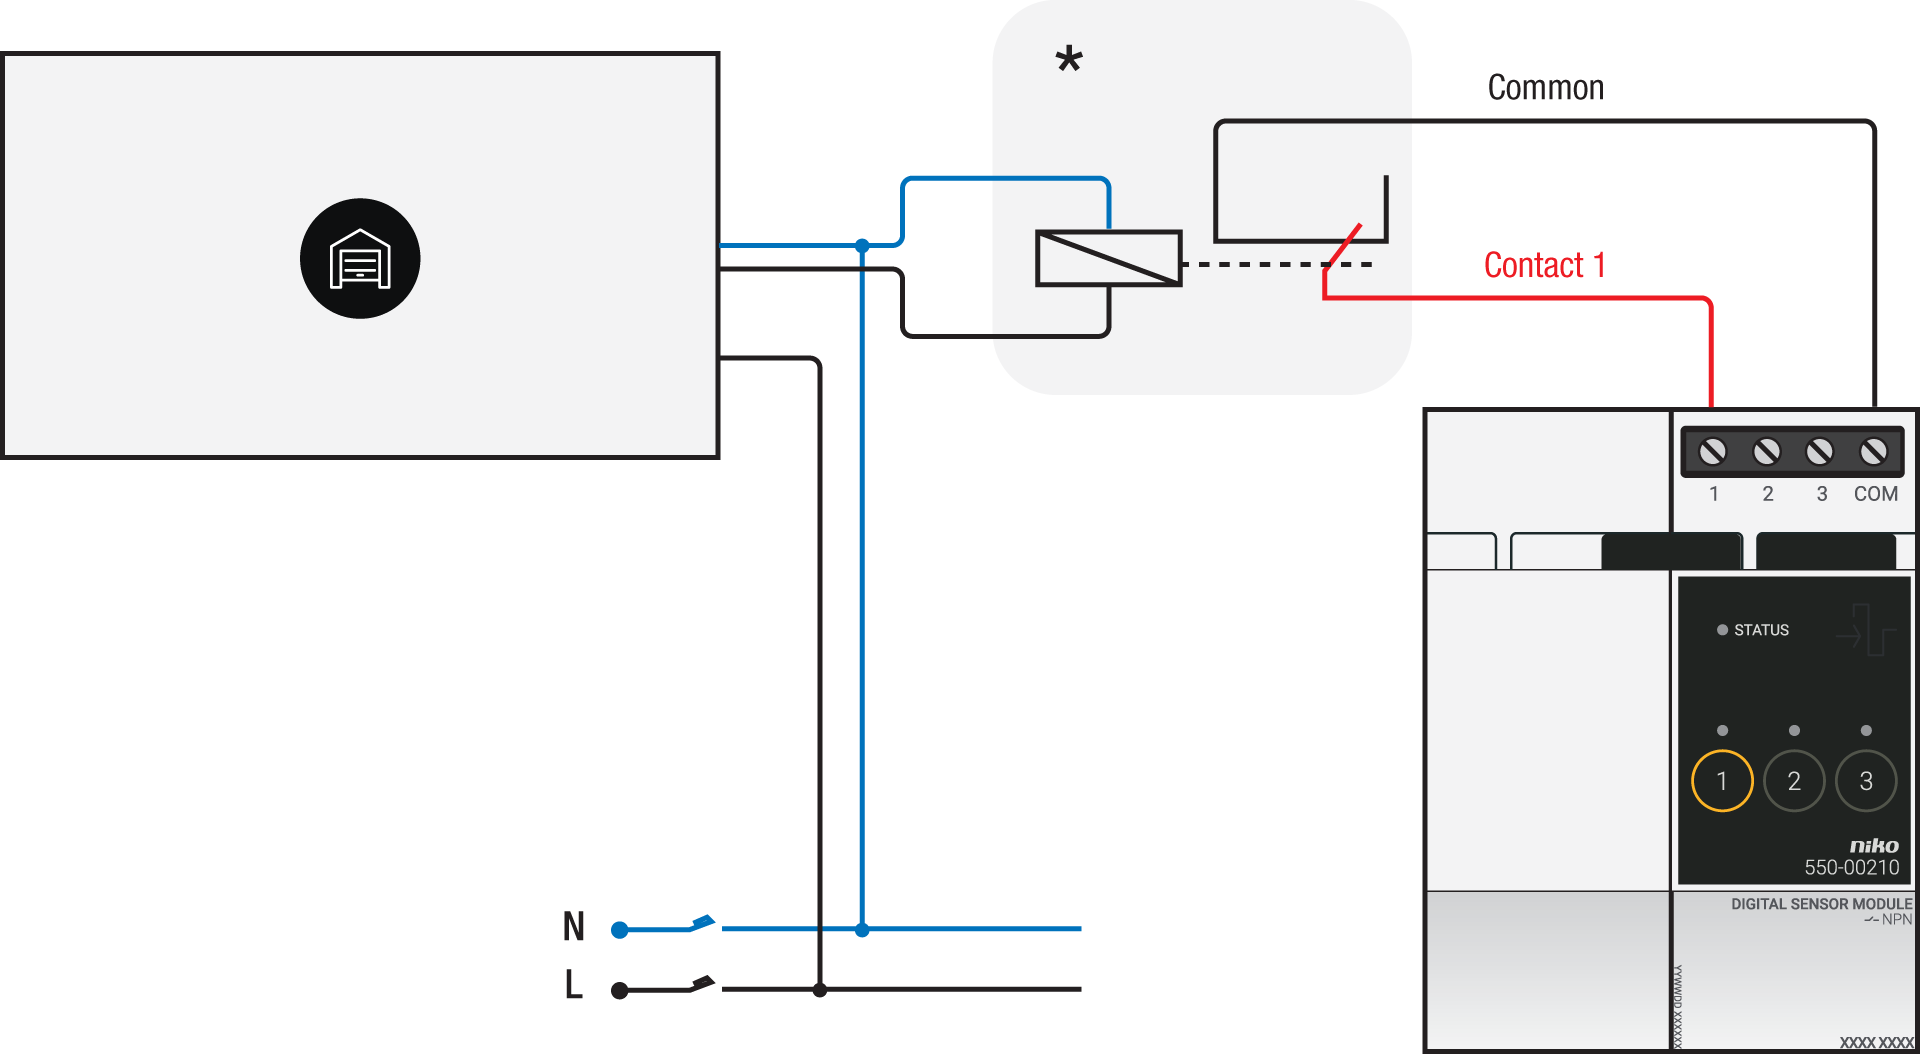
*230 V to potential-free contact module (e.g. Finder 22.32.0.230.1xx0) |
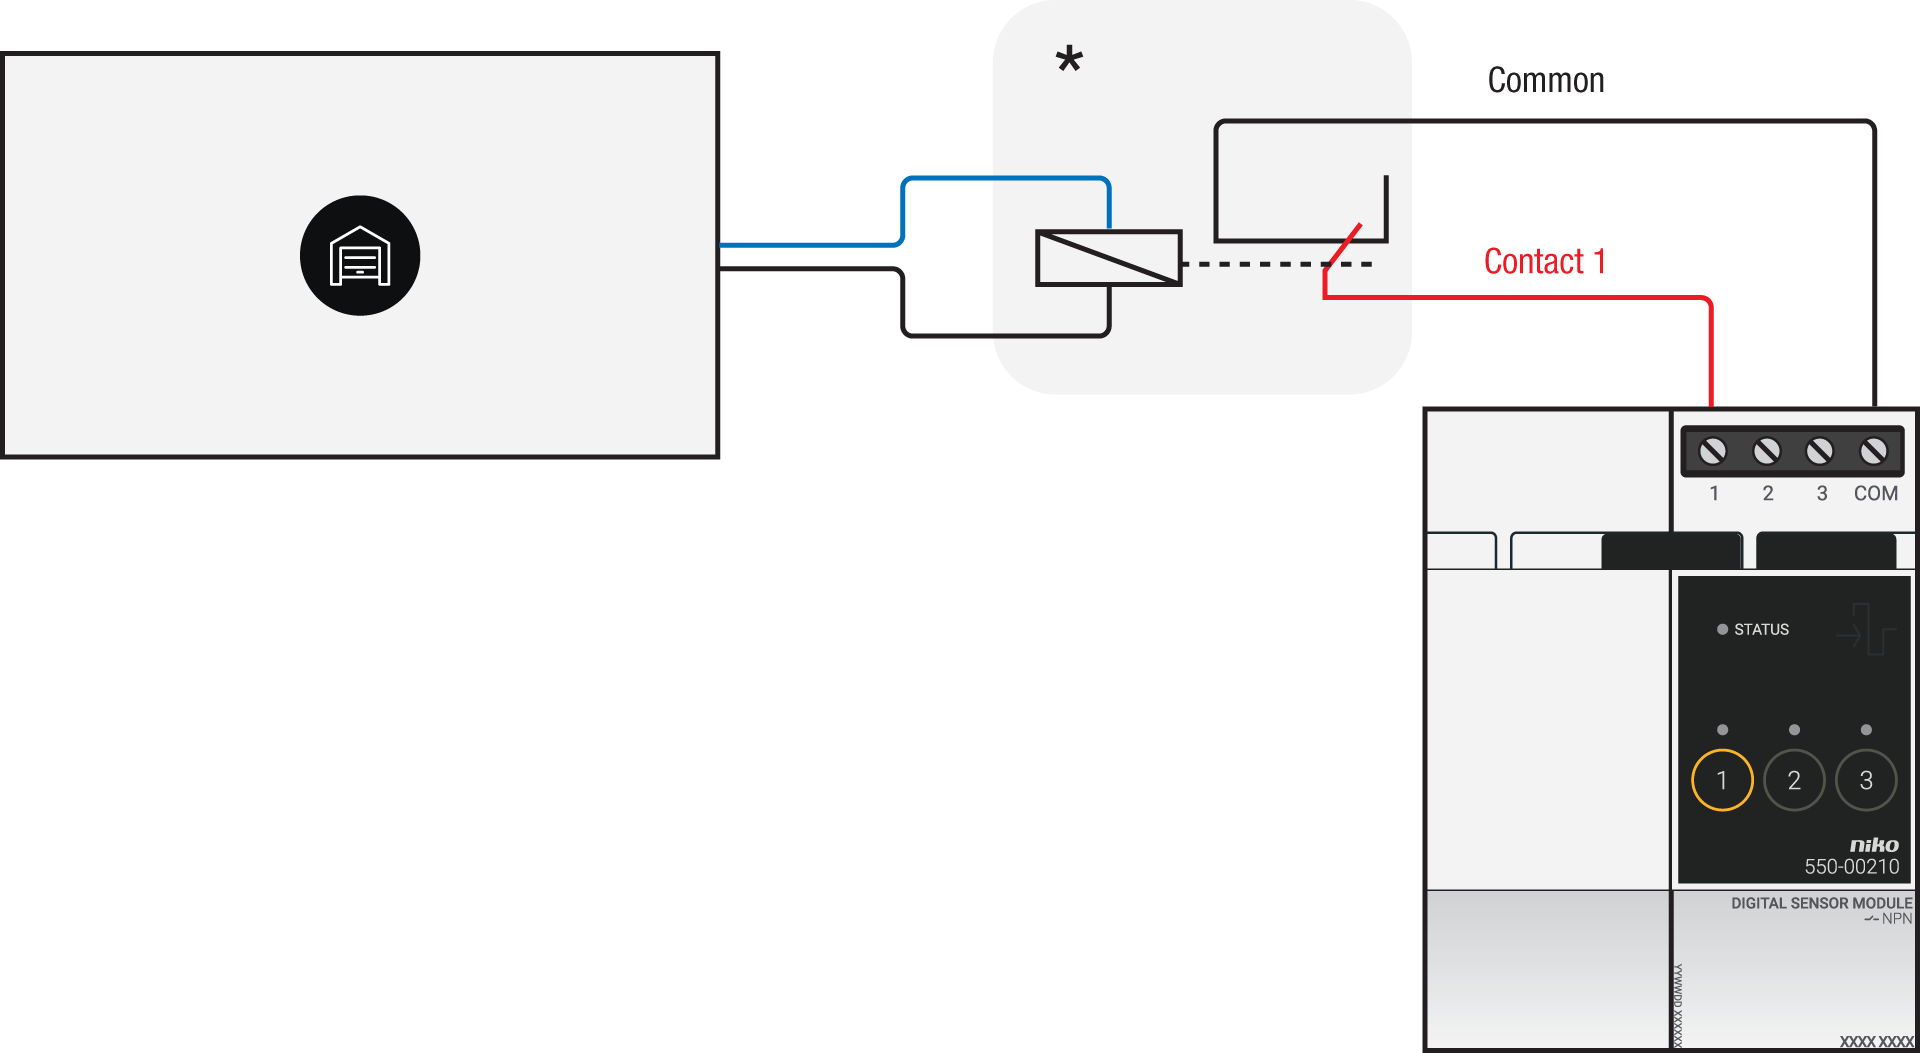
*12 V to potential-free contact module (e.g. Finder 22.32.0.012.1xx0) or 24 V to potential-free contact module (e.g. Finder 22.32.0.024.1xx0) |
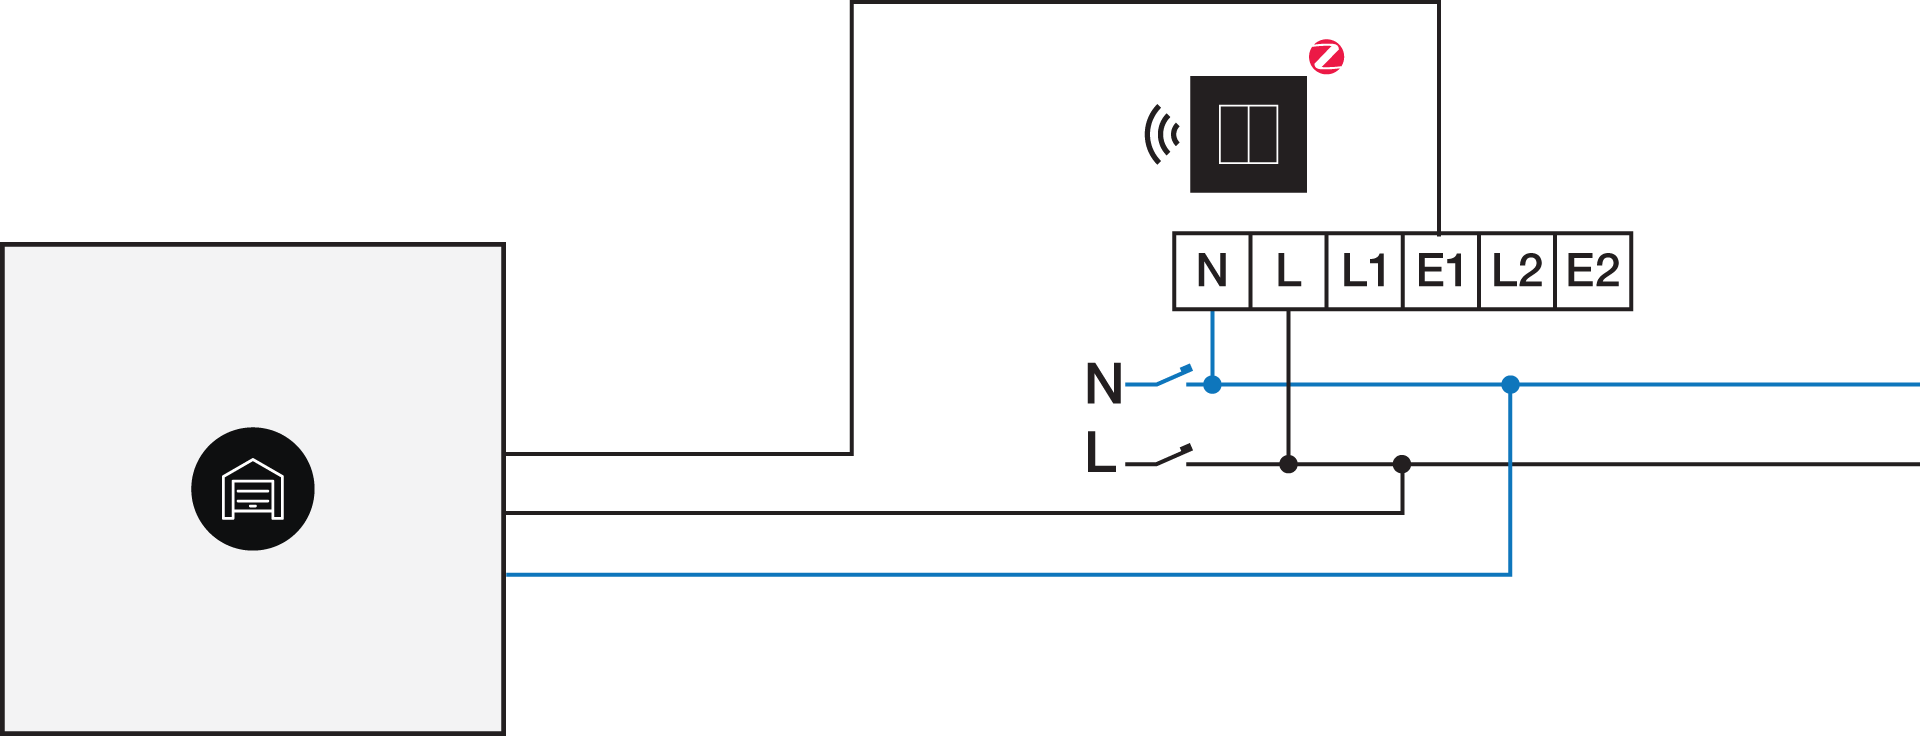
De geconnecteerde schakelaar aansluiten
Via potential-free output contact
If your door/window status contacts are not 230 V, you additionally need an appropriate potential-free contact module.
Connect contact 1 on the Niko connected switch to the output on the third-party system, as shown in the wiring diagram.
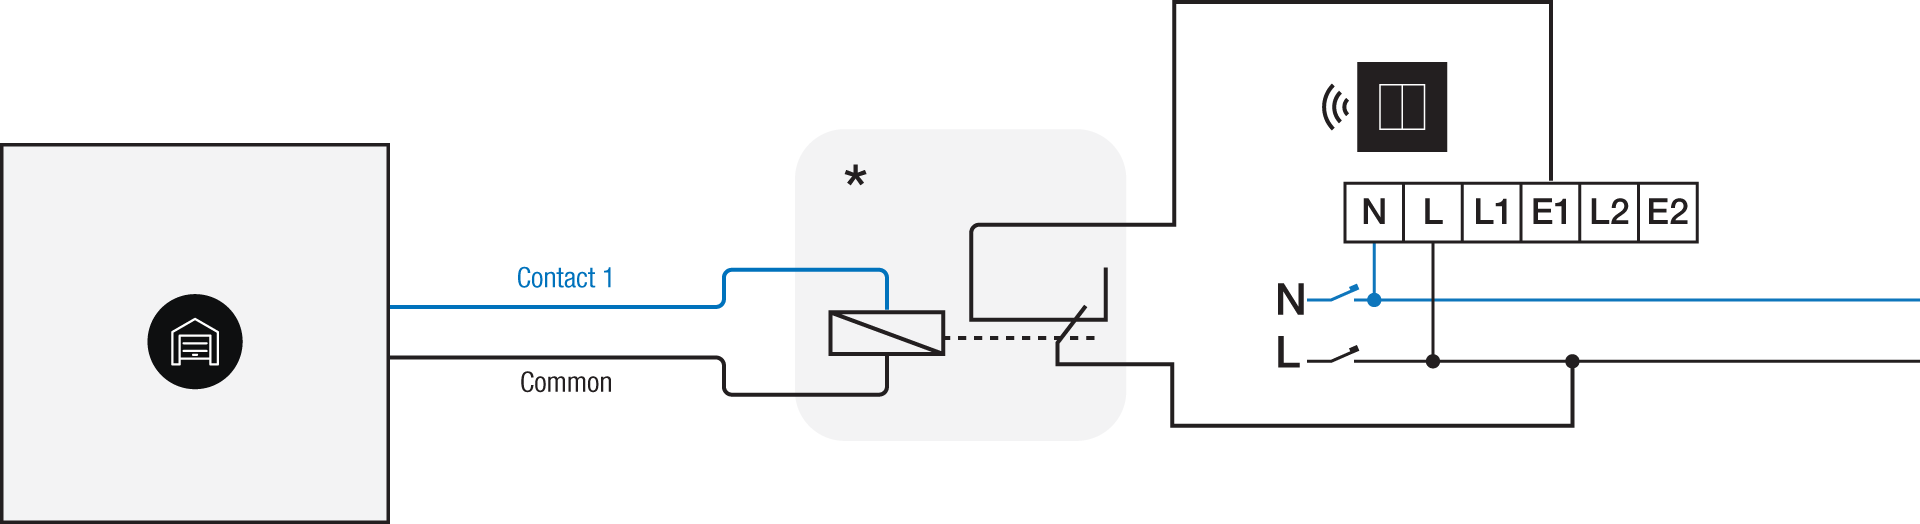
*230 V to potential-free contact module (e.g. Finder 22.32.0.230.1xx0)
|
|
Common |
Contact 1 |
|---|---|---|
|
Abus-detector |
Pin 1 |
Pin 2 |
Via 230 V or 12/24 V output contact
If your door/window status contacts are not 230 V, you additionally need an appropriate contact module.
Connect contact 1 on the Niko connected switch to the output on the third-party system, as shown in the wiring diagram.
|
230 V output contact |
12/24 V output contact |
|---|---|
|
*12 V to 230 V contact module (e.g. Finder 22.32.0.012.1xx0) or 24 V to 230 V contact module (e.g. Finder 22.32.0.024.1xx0) |
Programmeren
Check if your door or window contact is normally open or normally closed. Adjust the feedback text accordingly.
Configure the potential-free sensor module or connected switch and use its signal to show the status of the door or window via the Niko Home Control programming software.
In case of bus wiring
-
Create a connection to external system.
-
Create a player status:
-
In the behaviour, select the connection to external system.
-
In the parameters, you can enter the text that will be displayed as feedback.
-
In case of traditional wiring
-
Assign the push-button extension to the extension button input (E1) of the connected switch.
-
Set the operating mode of the push-button extension on “push-button mode”.
-
Create a virtual device.
-
Link a basic action between the push-button extension and the virtual device.
-
Create a player status.
-
In the behaviour, select the virtual device.
-
In the parameters, you can enter the text that will be displayed as feedback.
-