
Product information
This online manual is applicable to the following product(s):
This link takes you to the product page. There, you will find detailed specifications, certificates of CE-marking, etc.
-
550-13053 | Thermostat, base, Niko Home Control
-
100-59053 | Finishing set for thermostat, Niko Home Control, cream
-
101-59053 | Finishing set for thermostat, Niko Home Control, white
-
102-59053 | Finishing set for thermostat, Niko Home Control, light grey
-
121-59053 | Finishing set for thermostat, Niko Home Control, sterling coated
-
122-59053 | Finishing set for thermostat, Niko Home Control, anthracite coated
-
123-59053 | Finishing set for thermostat, Niko Home Control, bronze coated
-
124-59053 | Finishing set for thermostat, Niko Home Control, dark brown coated
-
154-59053 | Finishing set for thermostat, Niko Home Control, white coated
-
157-59053 | Finishing set for thermostat, Niko Home Control, champagne coated
-
161-59053 | Finishing set for thermostat, Niko Home Control, black coated
-
200-59053 | Finishing set for thermostat, Niko Home Control, piano black coated
-
220-59053 | Finishing set for thermostat, Niko Home Control, blue grey coated
-
221-59053 | Finishing set for thermostat, Niko Home Control, gold coated
Description
This thermostat ensures the optimal temperature in any room fitted with a floor-heating system, radiator, heating or cooling unit. It controls the heating and/or cooling in the room where it is mounted.
You can save considerable energy when you use the thermostat with advanced features in Niko Home Control, such as an all-off routine, calendar-based actions, energy insights and the integration of several partner systems like inverters, EV chargers and heat pumps.
The narrow display always shows just what you need to fine-tune or override your programmed temperature settings. The thermostat is designed to elegantly fit into the same faceplates as other Niko controls. The thermostat features an easy click-on mechanism for wall-mounted bus wiring controls and is available in various Niko finishings.
You can combine multiple thermostats and push buttons with comfort sensors to measure the temperature in different rooms in your home, up to twenty per installation.
Overview
The thermostat features an easy click-on mechanism for wall-mounted bus wiring controls. The following articles are required to install:
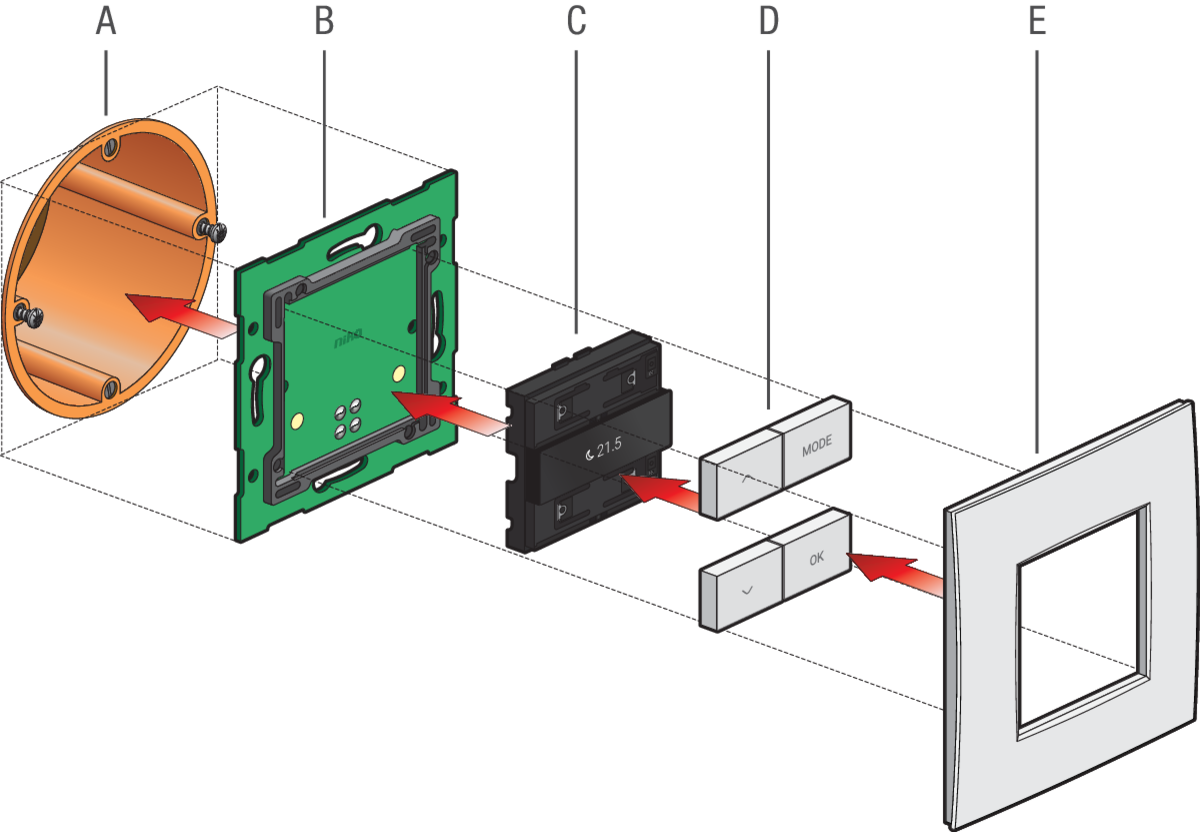
A. Flush-mounting box (not a Niko product)
B. Wall-mounted printed circuit board (550-14110 or 550-141x6 or 550-14106 or 550-140xx)
C. Thermostat base (550-13053)
D. Finishing set for thermostat (xxx-59053)
E. Faceplate
System overview
The thermostat is used in combination with other Niko Home Control products. One of the following options is required:
-
heating or cooling module
-
HVAC universal interface
-
HVAC starter kit and optional HVAC interface extensions
-
threefold or sixfold switching module (for switching electric heating)
Installation
Be aware of the following installation limit: per Niko Home Control installation you can use a maximum 20 thermostats and push buttons that are set as a temperature sensor.
Position
The thermostat can be mounted in any room fitted with a floor-heating system, radiator, heating unit and/or cooling unit. It controls the heating or cooling for the room in which it is mounted.
The thermostat only functions properly when the temperature within the room can be measured accurately. Eliminate as many factors as you can that may inhibit the thermostat’s ability to accurately control the room temperature.
DO NOT mount the thermostat:
-
in direct sunlight.
-
on an exterior wall.
-
within the immediate vicinity of a heat generating source (heater, radiator, etc.) or electrical equipment that may radiate heat (TV, computer, etc.).
-
behind a curtain.

Step 1
Mind the orientation of the thermostat: the spring contacts should be located at the bottom.
Mount the thermostat by pressing the connection unit onto a Niko Home Control wall-mounted printed circuit board until it clicks into place.
It will automatically connect to the Niko Home Control bus through two spring contacts.
Step 2
Mount the faceplate on the printed circuit board via the SnapFit mechanism.
Onboarding
Use the Niko Home Control programming software to assign a basic action or a routine to the thermostat. Fore more information about climate control routines, please consult https://guide.niko.eu/en/smnhc2/lv/climate-control.