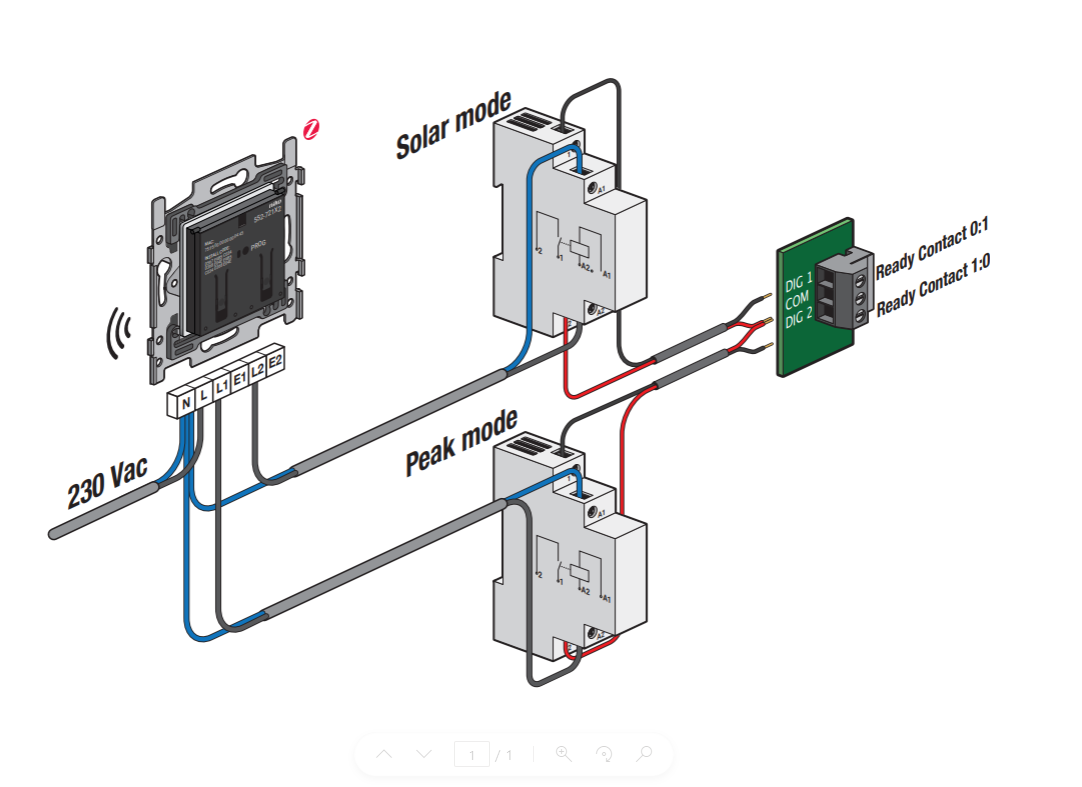
Use case
Your customer has solar panels and a heat pump that provides heating and/or produces hot water.
In the case of an electricity excess, your customer wants to put it to good use.
Via the solar mode you want to translate excess electricity into the best suited programme/operation of the heat pump by use of the SG ready contacts on the heatpump.
Starting point
You have connected the SG ready contacts of the heat pump to your Niko Home Control installation.
More information about connecting the contacts can be found on this page in the User manual Niko Home Control II manual.
Click below on the method of connection you used to scroll to the corresponding configuration procedure:
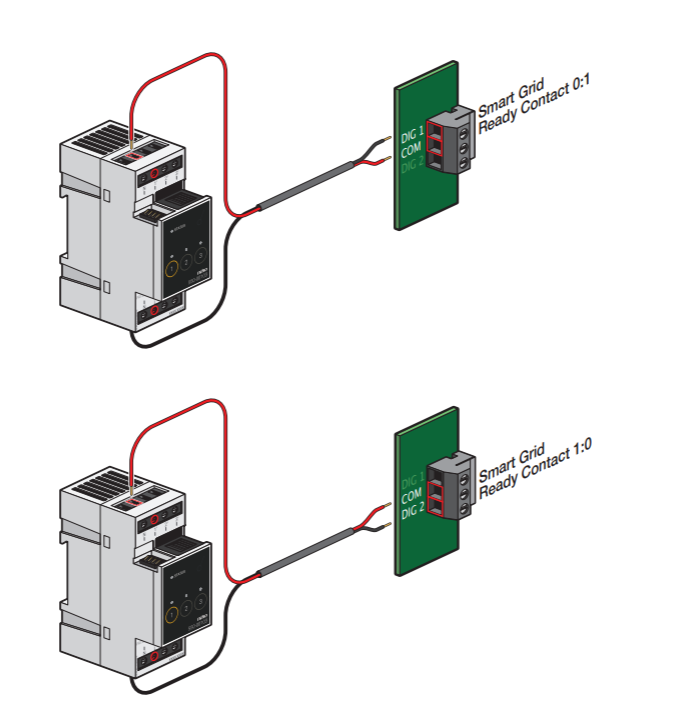
Procedure via switching module
Creating the controls and devices
-
Create each contact.
In this example, we will control 2 contacts
Create Contact 1 as 'Other switched device' player (OUT1)
Create Contact 2 as 'Other switched device' player (OUT2) -
Create virtual device 1 (VIRT1)
-
Create a virtual device 2 (VIRT2)
This virtual device will make it possible to set a reactivation delay (a virtual flag which we will use to set a waiting time after boost mode is turned off before it can be activated again)

Creating the action(s) and routine(s)
-
Create the routine Solar mode (ROUT1).
Configure the following behaviour:
Select devices that should be activated in solar mode=
VIRT1 | Max. Power Consumption: 2500W | Latest Start Time: False | Minimum Duration: 1h

Creating the condition
To combine the information from the solar mode and the virtual device 2 (used to create a reactivation delay), we create a condition.
The result of this condition (THEN & ELSE) will take care of controlling the heat pump via the Niko Home Control contacts connected to the SG-ready connections of that heat pump.
-
Create a condition (COND1):
IF
VIRT1= True AND VIRT2= False
THEN
OUT1: Value = on
OUT2: Value = on
ELSE
OUT1: Value = off
OUT2: Value = off
VIRT 2 Value = True
VIRT 2 Value = False Delay = 30m

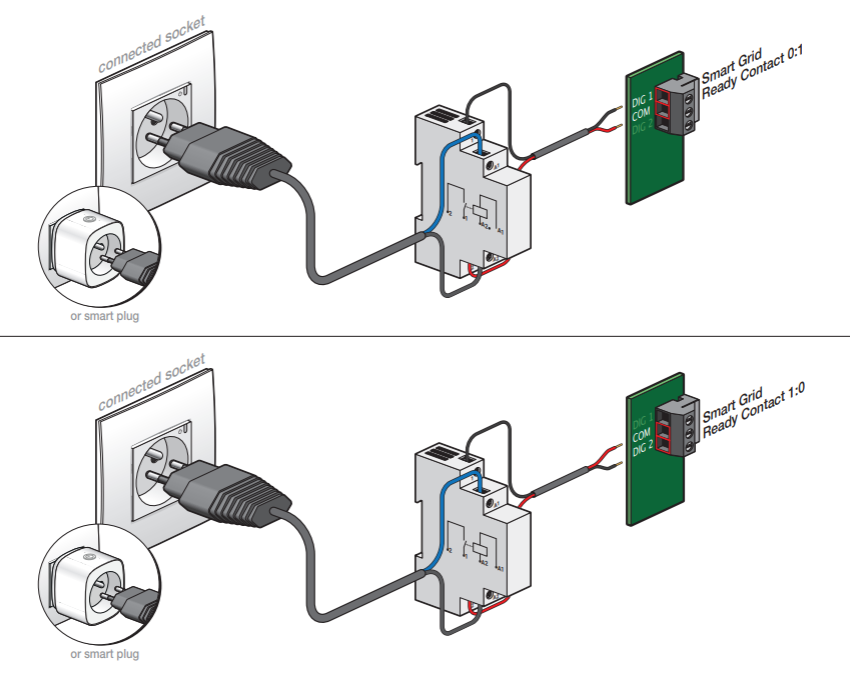
Procedure via connected sockets or smart plugs
Creating the controls and devices
-
Create each socket.
In this example, we will control 2 sockets:
Create socket 1 as 'Connected Socket Outlet' or 'Smart plug' player (SOCK 1)
Create socket 2 as 'Connected Socket Outlet' or 'Smart plug' player (SOCK 2) -
Create virtual device 1 (VIRT1)
-
Create a virtual device 2 (VIRT2)
This virtual device will make it possible to set a reactivation delay (a virtual flag which we will use to set a waiting time after boost mode is turned off before it can be activated again)

Creating the action(s) and routine(s)
-
Create the routine Solar mode (ROUT1).
Configure the following behaviour:
Select devices that should be activated in solar mode=
VIRT1 | Max. Power Consumption: 2500W | Latest Start Time: False | Minimum Duration: 1h

Creating the condition
To combine the information from the solar mode and the virtual device 2 (used to create a reactivation delay), we create a condition.
The result of this condition (THEN & ELSE) will take care of controlling the heat pump via the Niko Home Control sockets connected to the SG-ready connections of that heat pump.
-
Create a condition (COND1):
IF
VIRT1= True AND VIRT2= False
THEN
SOCK 1: Value = on
SOCK 2: Value = on
ELSE
SOCK 1: Value = off
SOCK 2: Value = off
VIRT 2 Value = True
VIRT 2 Value = False Delay = 30m

Procedure via connected double switch
Creating the controls and devices
-
Create the device(s).
In this example, we will control 2 contacts of a Connected double switch, Zigbee.
Add a 'Connected double switch, Zigbee' -
Rename the Lights
Rename 'Light' to Contact 1 (CONT1)
Rename 'Light 1' to Contact 2 (CONT2) -
Remove the basic actions between the lights and the switch.
Remove basic action 'Light'
Remove basic action 'Light 1' -
Create virtual device 1 (VIRT1)
-
Create a virtual device 2 (VIRT2)
This virtual device will make it possible to set a reactivation delay (a virtual flag which we will use to set a waiting time after boost mode is turned off before it can be activated again)

Creating the action(s) and routine(s)
-
Create the routine Solar mode (ROUT1).
Configure the following behaviour:
Select devices that should be activated in solar mode=
VIRT1 | Max. Power Consumption: 2500W | Latest Start Time: False | Minimum Duration: 1h

Creating the condition
To combine the information from the solar mode and the virtual device 2 (used to create a reactivation delay), we create a condition.
The result of this condition (THEN & ELSE) will take care of controlling the heat pump via the Niko Home Control contacts connected to the SG-ready connections of that heat pump.
-
Create a condition (COND1):
IF
VIRT1= True AND VIRT2= False
THEN
CONT1: Value = on
CONT2: Value = on
ELSE
CONT1: Value = off
CONT2: Value = off
VIRT 2 Value = True
VIRT 2 Value = False Delay = 30m

Examples
via switching module
Click here to download the programming example.
(FPE_031_220_01.nhc2 file).
via connected sockets or smart plugs
Click here to download the programming example.
(FPE_031_220_02.nhc2 file).
via connected double switch
Click here to download the programming example.
(FPE_031_220_03.nhc2 file).