Product information
This online manual is applicable to the following product(s):
This link takes you to the product page. There, you will find detailed specifications, certificates of CE-marking, etc.
-
550-32103-241 | Touch10, alu aged gold brushed
-
550-32103-201 | Touch10, alu signal white coated
-
550-32103-211 | Touch10, alu black brushed
-
550-32103-221 | Touch10, natural grey brushed
Description
MOTIV Touch10 is a sophisticated touchscreen with built-in keypad. It allows you to monitor and control the entire building from a central location: lighting, window coverings, access control, energy, HVAC, audio and more. With the three touch-sensitive keys, you can activate any action or routine with a single tap.
Dimensions
Front
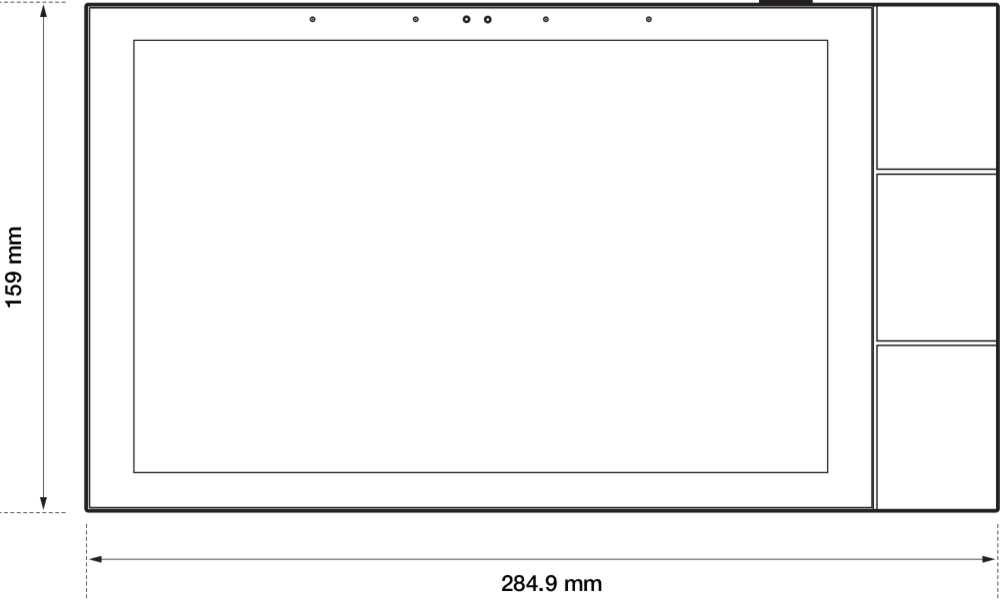
Left

Operation
Keypad
MOTIV Touch10 has a built-in keypad. With the three touch-sensitive keys, you can activate any action or routine with a single tap. Assign the desired action or routine to the key via the user interface on the touchscreen.
Example: short and long press for a dimming channel
|
Button |
Behaviour |
|---|---|
|
Short press |
Toggles the dimmed light device ON or OFF. Depending on the memory mode of the dimmer channel, the ON state amounts to 100% of the light output or equals the previous dimming value. |
|
Long press |
Starts the dim-up or dim-down cycle of a dimmer channel, depending on the previous direction. |
|
Release |
Stops the dim-up or dim-down cycle at a certain intermediate dimming percentage. |
Example 2: short and long press behaviour for a motor channel
|
Button |
Behaviour |
|---|---|
|
Short press |
Switches the motor to the following states respectively: run-up – stop – run-down - stop. |
|
Long press |
Starts the run-up or run-down cycle of a motor channel, depending on the previous running direction before the last stop. |
|
Release |
Stops the run-up or run-down cycle at a certain intermediate percentage. |
Radar
The touchscreen provides several options for proactive but subtle interaction, based on radar detection. From a distance, it can display the high-level status to welcome you. When nearby, you get access to the detailed dashboard.
Main navigation
The menu structure on the bottom of the screen allows you to navigate between:
-
Music (if your audio system is in the same room as the touchscreen and linked to Niko Home Control via the programming software)
-
Thermostat (if your thermostat is in the same room as the touchscreen and linked to Niko Home Control via the programming software)
-
Favourites
-
Rooms
-
Energy
-
Access
-
Notifications
The user decides which of these functionalities are shown, via the hamburger icon > Settings > Main navigation.
View settings
The user decides which rooms, controls, favourites and widgets are shown on each touchscreen. Only the ones that are relevant to that control point are shown.
To edit the content of a specific screen, swipe all the way to the right and tap the view settings tile. You can set a PIN on each individual touchscreen to protect these view settings.
Supported features
All Niko Home Control features are supported, including:
-
Easy control of switched, dimmed, tunable white and colour-adjustable lighting
-
Monitoring and controlling the temperature in different zones within your home
-
Moving motorised shutters, blinds, shades and curtains
-
Monitoring and optimising your energy production, consumption and storage
-
Controlling a wide range of partner systems, such as car chargers, audio players and HVAC systems
-
Answering incoming calls and checking missed calls of your access control system, when connected to a Niko Home Control external video unit
-
Viewing and managing your Niko Home Control notifications
Placement
Installation height
We recommend a minimum installation height of 150 cm.
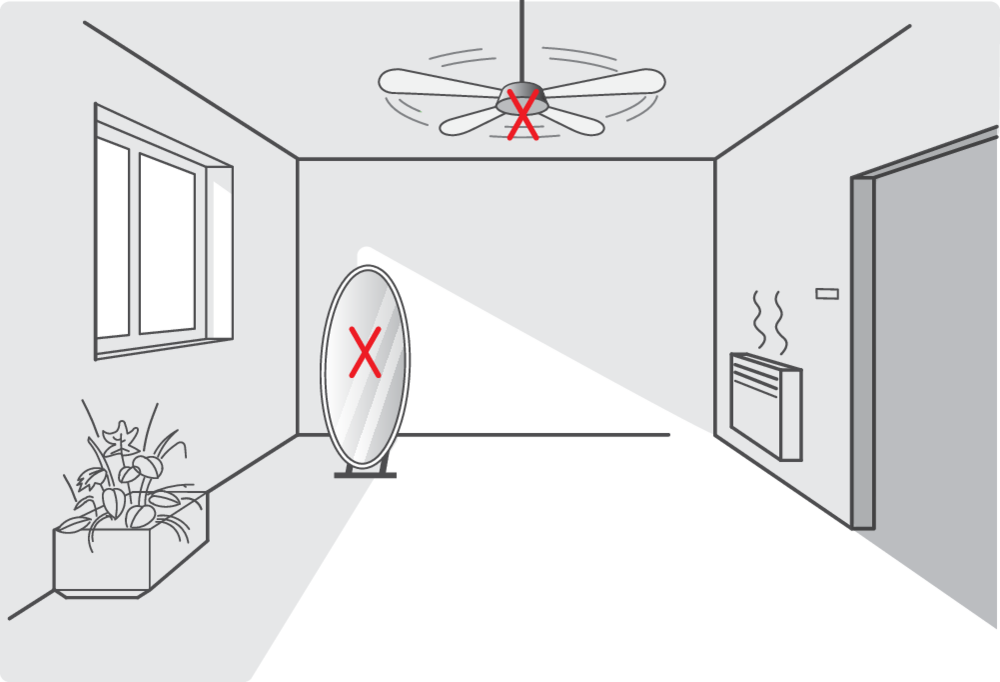
Radar considerations
The radar signals behave differently depending on the materials they encounter:

Do not place the touchscreen in the vicinity of mirrors or metal surfaces or revolving fans as the radar signals will bounce of them and behave unexpectedly:
Installation
Use only the screws provided with the accessories. Using other screws may cause damage.
We recommend providing at least one touchscreen in each installation, in addition on smartphones and/or tablets, since a wired device is always more reliable than a mobile one.
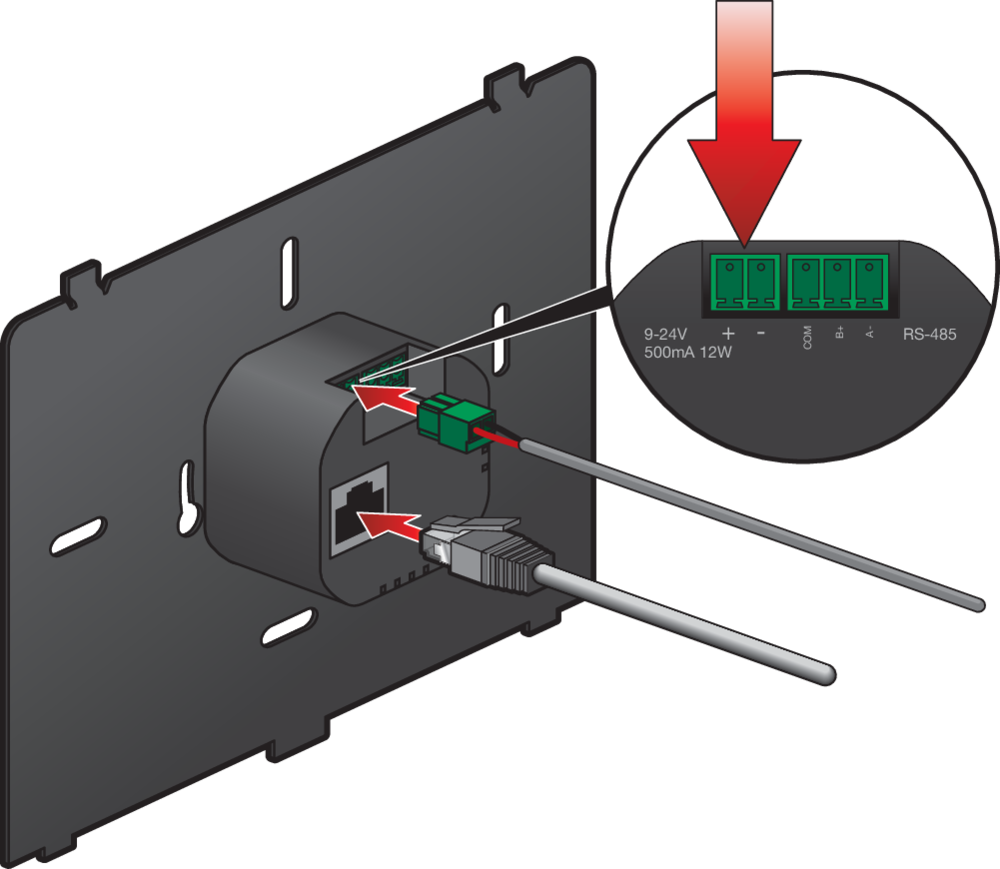
Step 1
Note that RS-485 is not used.
Connect the wires:
-
24 Vdc (optional, only if power is not supplied by PoE via the twisted pair cable)
-
Twisted pair cable (UTP, FTP or STP)
Step 2
Remove the screws from the flush-mounting box, if they are present. Only use the screws that are enclosed with this product.
Mount the installation bracket to the wall and/or the flush mounting box. Determine the position of the drill holes, based on the illustration below:
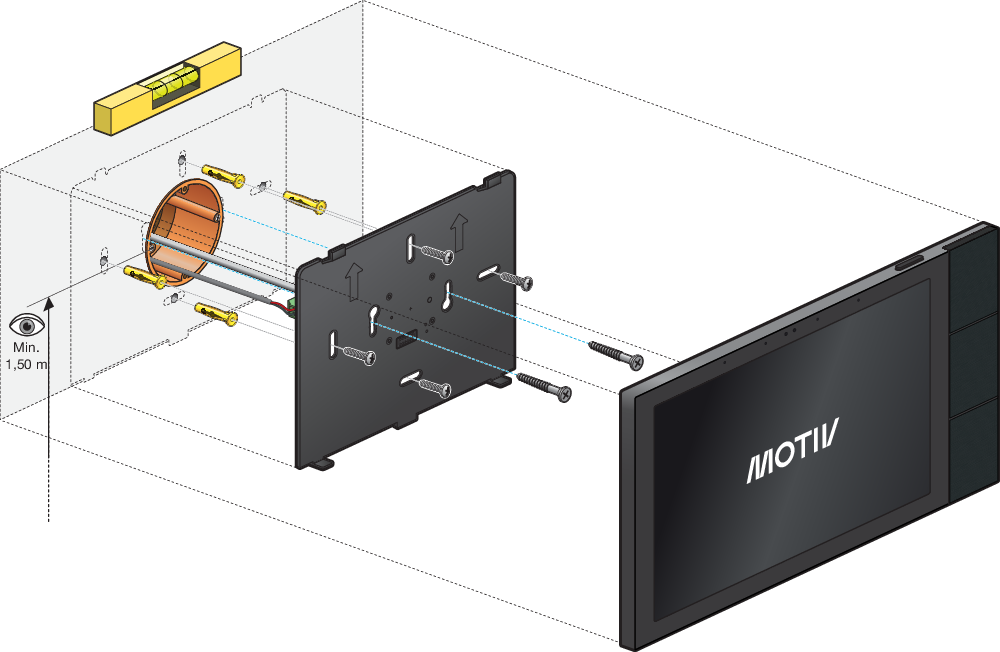
Step 3
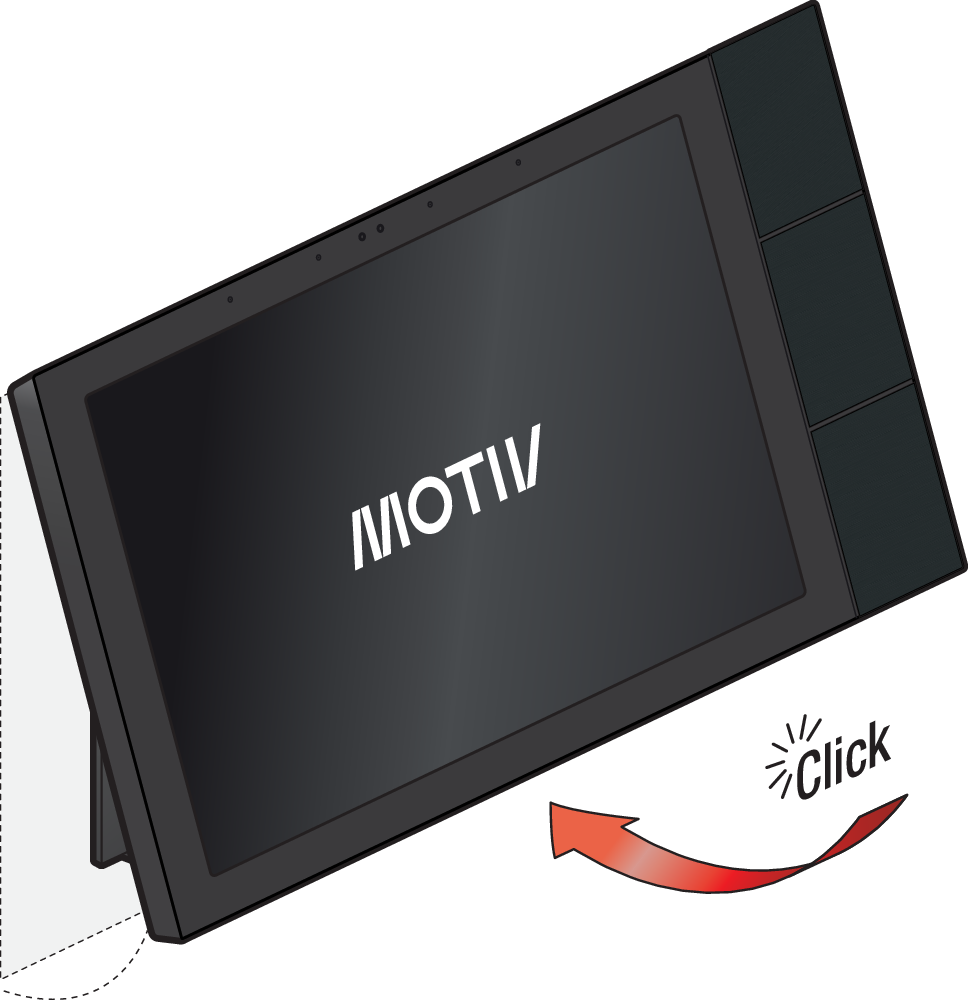
Hang the touchscreen on the installation bracket.
a.
Hold the touchscreen at an angle so that the top of the bracket fits into the recesses in the touchscreen.
b.
Place the touchscreen against the bracket so that it clicks into place with the magnet.
Step 4
Optional: Secure the anti-theft screws with the screwdriver provided with the product.

Onboarding
Step 1
All Niko Home Control IP devices must be in the same IP subnet (e.g. 192.168.0.xxx) to guarantee communication.
Make sure that the touchscreen is connected to the same network as the connected controller.
Step 2
Use the Niko Home Control programming software (version 2.26.4 or newer):
-
Add the device.
-
Address the device. In the Addressing screen, go to the tab Touchscreens and follow the on-screen instructions. During the addressing process, enter the code that is displayed on the touchscreen.
Please note that this touchscreen no longer supports profiles that are configured in the programming software. All view settings for each individual touchscreen are set on the touchscreen itself, see Operation.
Maintenance and troubleshooting
Upgrades (online)
After onboarding, the touchscreen checks for upgrades once per 24 hours. An active internet connection is required. Upgrades will be downloaded and installed automatically when available.
You can disable automatic upgrades in the programming software (via Dashboard > Global settings) or Niko Home app (via General info > Installation info). In that case, you have to confirm each upgrade.
Upgrades (offline)
If your installation is not connected to the internet, you can upgrade your touchscreen via the USB port.
Before you start, make sure your touchscreen is powered. The touchscreen should not be powered via the USB port.
-
Connect a USB cable between the touchscreen and your PC. The touchscreen will appear in the explorer as a USB storage device.
-
Download the touchscreen software from the website.
-
Copy the downloaded file to the touchscreen (USB storage device).
-
When the copy is finished, unplug the USB cable. It is important not to leave the cable plugged in.
-
Press and hold the top button for 5 seconds to reboot your device. The upgrade will be installed automatically.
Touchscreen maintenance
Use a soft dry or slightly damp cloth to clean the touchscreen. Do not use detergents or other cleaning agents.
Troubleshooting
|
Problem |
Cause |
Proposed solution |
|---|---|---|
|
Nothing is displayed on the screen |
Touchscreen not powered |
Check the power supply of the touchscreen. |
|
You cannot operate the installation |
Internal touchscreen issue |
Press and hold the top button for 5 seconds to reboot your device. |
|
No access to settings (other functions still work)
|
PIN is set, but the code has been lost |
Factory reset the touchscreen. |
|
The screen is on, but the following message appears: “Please check your connection” |
Connection error |
Check whether network communication is possible between the touchscreen and the controller or hub. Both must be connected to the same network. |
|
The screen is on, but the following message appears: “This device needs to be upgraded before it can be used in your installation” |
Touchscreen software is out of date |
Connect your installation to the internet to upgrade the touchscreen. If the touchscreen cannot be connected to the internet, upgrade it by following the offline upgrade procedure. |
|
The screen is on, but the following message appears: “Your installation needs to be upgraded before this device can be used” |
Niko Home Control is out of date |
Use the programming software to upgrade your installation, see:https://guide.niko.eu/en/rnnhc/lv/how-to-install-the-latest-version-of-niko-home-con |
Factory reset
All settings and data will be lost after a factory reset. You will need to onboard and reconfigure using the programming software.
|
Step |
Result |
|---|---|
|
The message “Please check your connection” appears on the touchscreen. |
|
The factory reset pop-up will appear. |
|
The factory reset will be performed. All settings and data will be lost. |