
Produktinformation
Denne online manual gælder for følgende produkt(er):
Dette link fører dig til produktsiden. Der finder du detaljerede specifikationer, certifikater for CE-godkendelse osv.
-
550-20103 | Touchskærm for Niko Home Control
Beskrivelse
Denne touchskærm giver dig mulighed for at styre hele Niko Home Control II installationen fra en central placering i din bolig. Denne fornyede bruger interface har brugervenlige widgets og foretrukne tryk, der kan betjenes med et enkelt tryk.
Med sit elegante og rene design passer denne 10” touchskærm nemt ind i dit interiør. Touchskærmen har en indbygget lyssensor og tilpasser derfor skærmens lysstyrke til det omgivende lys. Du kan også skifte mellem et lyst og mørkt tema i brugerinterfacet.
Denne touchskærm er bygget med avancerede teknologier, der leverer en sikker og fremtidssikret softwareløsning. Der bliver også leveret sikkerhedsopdateringer, så længe dette produkt sælges og i fem år derefter.
Denne nye touchskærm (550-20103) erstatter helt forgængeren (550-20102). I en eksisterende Niko Home Control installation kan den både erstatte og supplere den forrige touchskærm.
Dimensioner
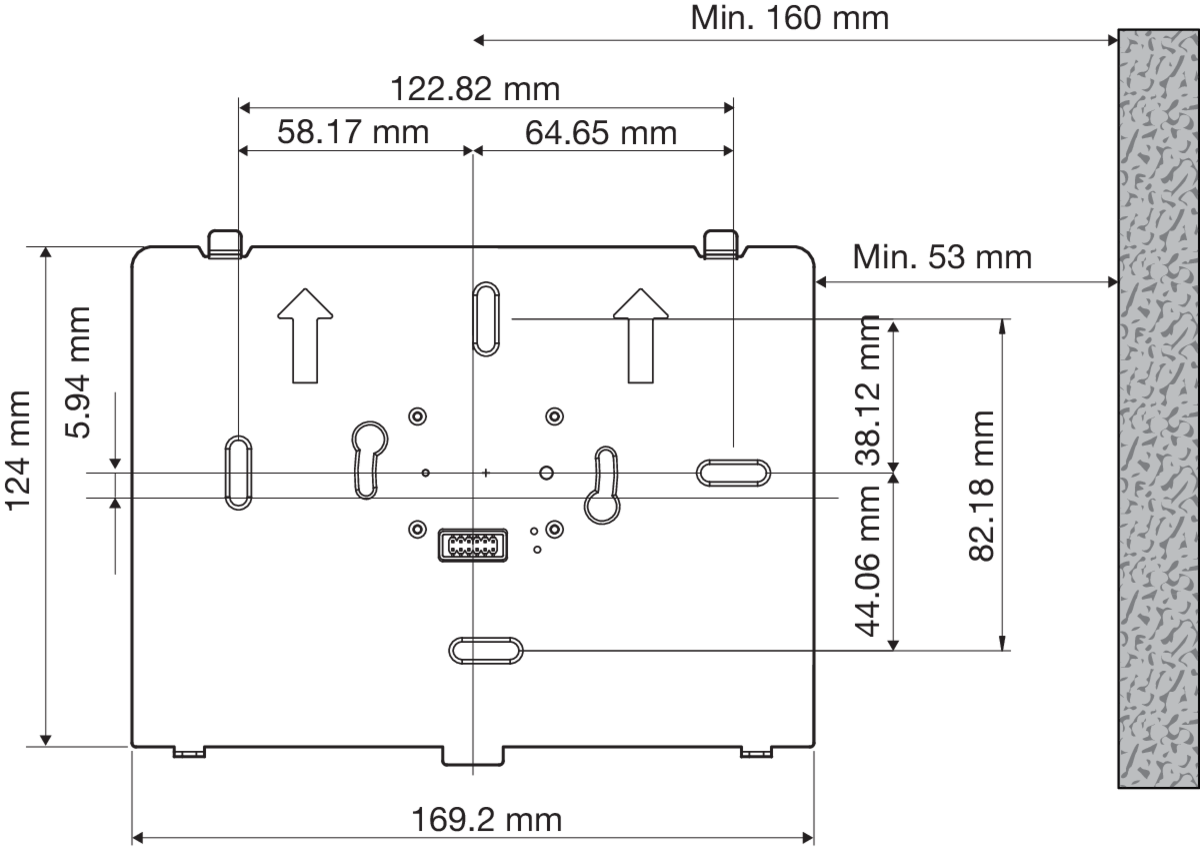
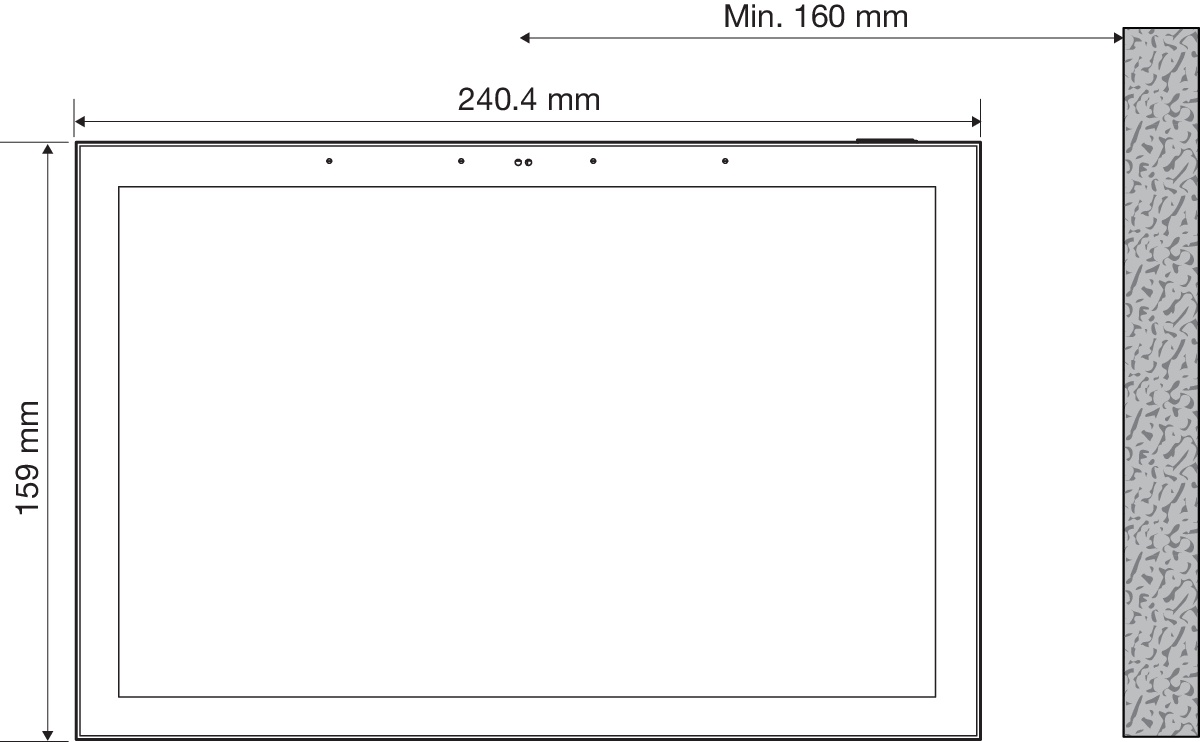
Funktion
Hovednavigation
Menustrukturen nederst på skærmen giver mulighed for at navigere mellem:
-
Musik (hvis dit lydsystem er i samme rum som touchskærmen og forbundet med Niko Home Control via programmeringssoftwaren)
-
Termostat (hvis din termostat er i samme rum som touchskærmen og forbundet med Niko Home Control via programmeringssoftwaren)
-
Foretrukne
-
Rum
-
Energi
-
Adgang
-
Notifikationer
brugeren bestemmer, hvilke af disse funktionaliteter, der skal vises, via hamburger-ikonet > Indstillinger > Hovednavigation.
Se indstillinger
Brugeren bestemmer hvilke rum, betjeninger, foretrukne og widgets, der vises på hver touchskærm. Kun dem, der er relevante for dette betjeningspunkt, vises.
For at redigere indholdet af en bestemt skærm skal du stryge helt til højre og trykke på feltet med visningsindstillinger. Du kan indstille en pinkode på hver enkelt touchskærm for at beskytte disse visningsindstillinger.
Understøttede funktioner
Alle Niko Home Control funktioner understøttes, inklusiv:
-
Nem betjening af kontaktstyret, dæmpet, tunable white og farvejusterbar belysning
-
Overvågning og styring af temperatur i forskellige zoner i din bolig
-
Betjening af motoriserede skodder, solafskærmning, persienner og gardiner
-
Overvågning og optimering af din energiproduktion, forbrug og lagring
-
Betjening af en lang række partnersystemer, som f.eks. biloplader, lydkomponenter og HVAC systemer
-
Modtage indkommende opkald og tjekke ubesvarede opkald fra dit adgangskontrolsystem, når det er forbundet med en Niko Home Control videodørtelefon
-
se og administrere dine Niko Home Control notifikationer
Installation
Vi anbefaler at anbringe mindst en touchskærm i hver installation som supplement til smartphones og/eller tablets, fordi en kablet enhed altid er mere pålidelig end en mobil.
Trin 1
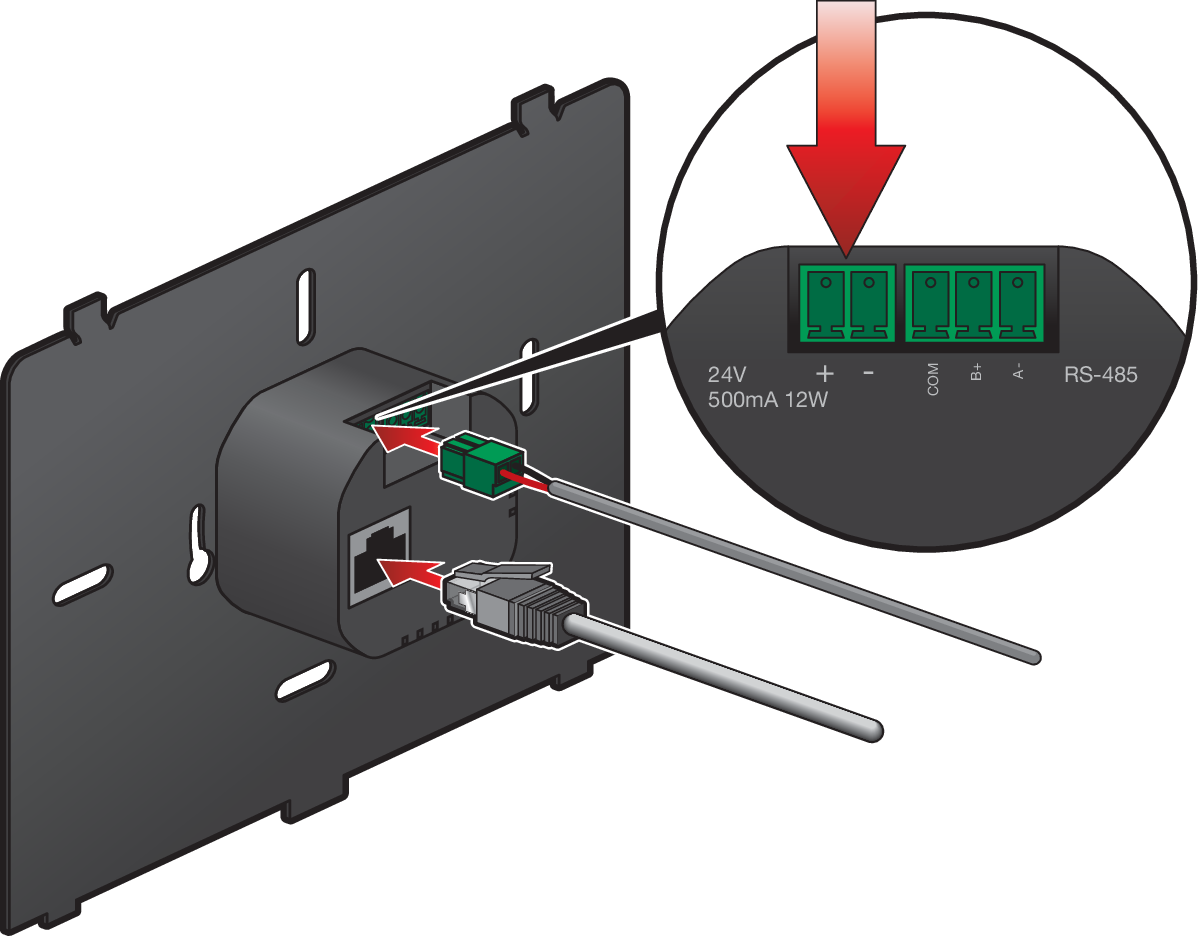
Bemærk, at der ikke er anvendt RS-485.
Tilslutning af lederne:
-
24 Vdc (valgfrit, kun hvis strømmen ikke leveres via PoE via det parsnoede kabel)
-
Parsnoet kabel (UTP, FTP eller STP)
Trin 2
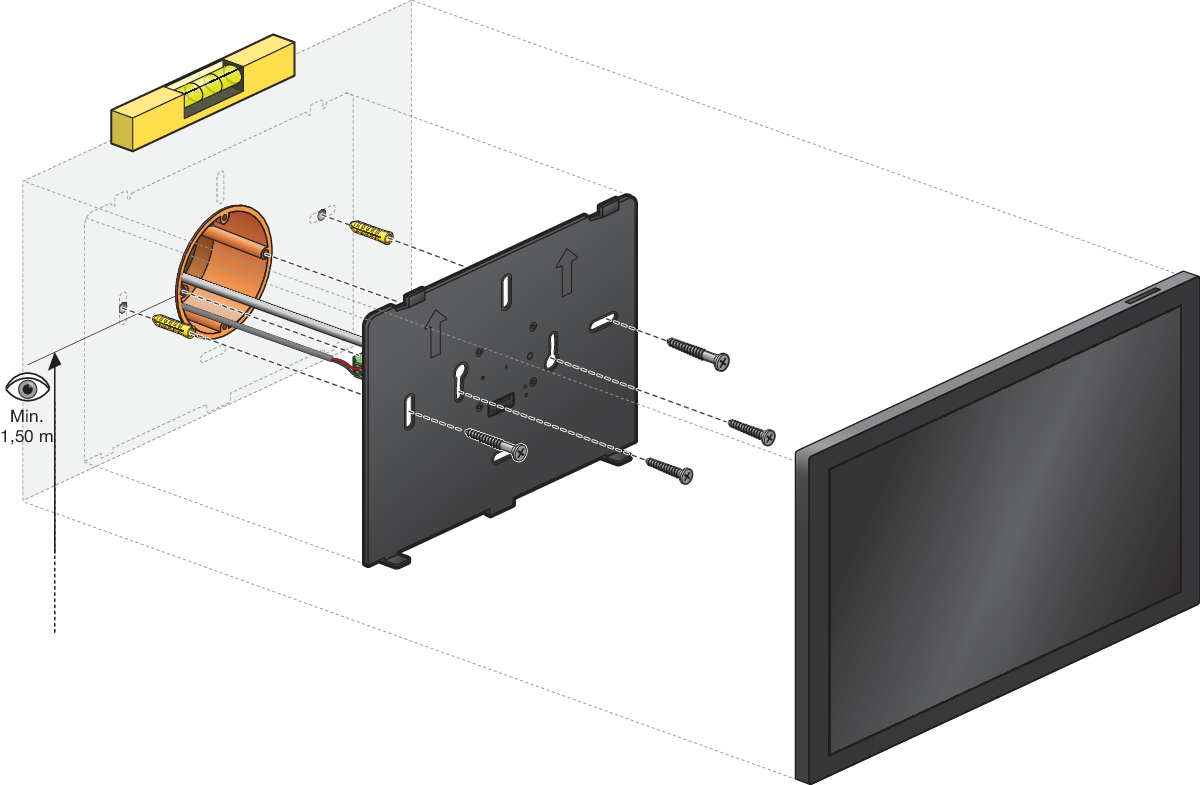
Fjern skruerne fra europadåsen, hvis der er nogen. Brug kun de skruer, der følger med dette produkt.
Monter installationsbeslaget på væggen og/eller europadåsen. Bestem placeringen af borehullerne, baseret på nedenstående illustration:
Trin 3
Hæng touchskærmen på installationbeslaget.
a.
Hold touchskærmen i en vinkle, således at toppen af beslaget går ind i fordybningerne i touchskærmen.
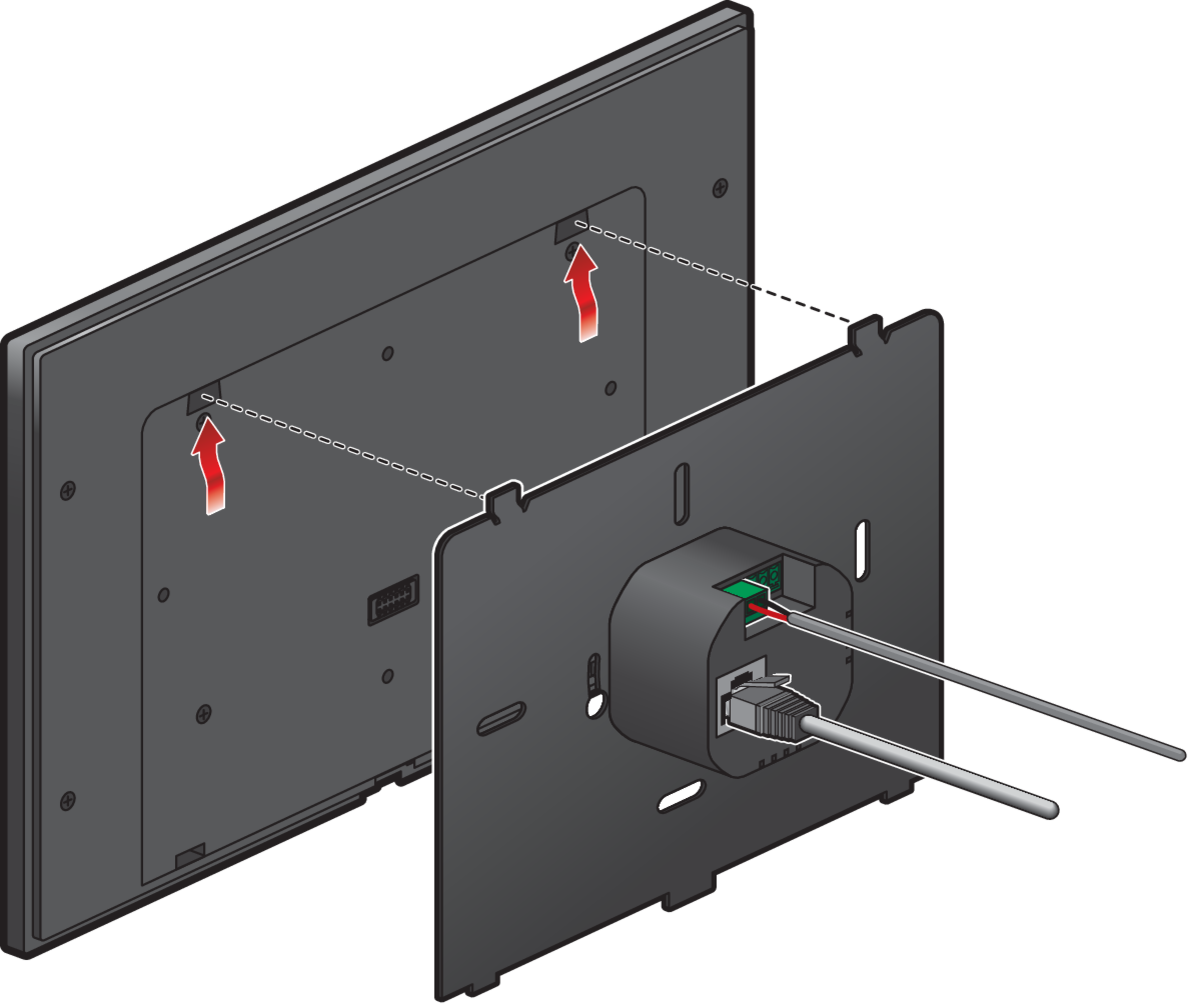
b.
Placer touchskærm ind mod beslaget, så det klikker på plads med magneten.
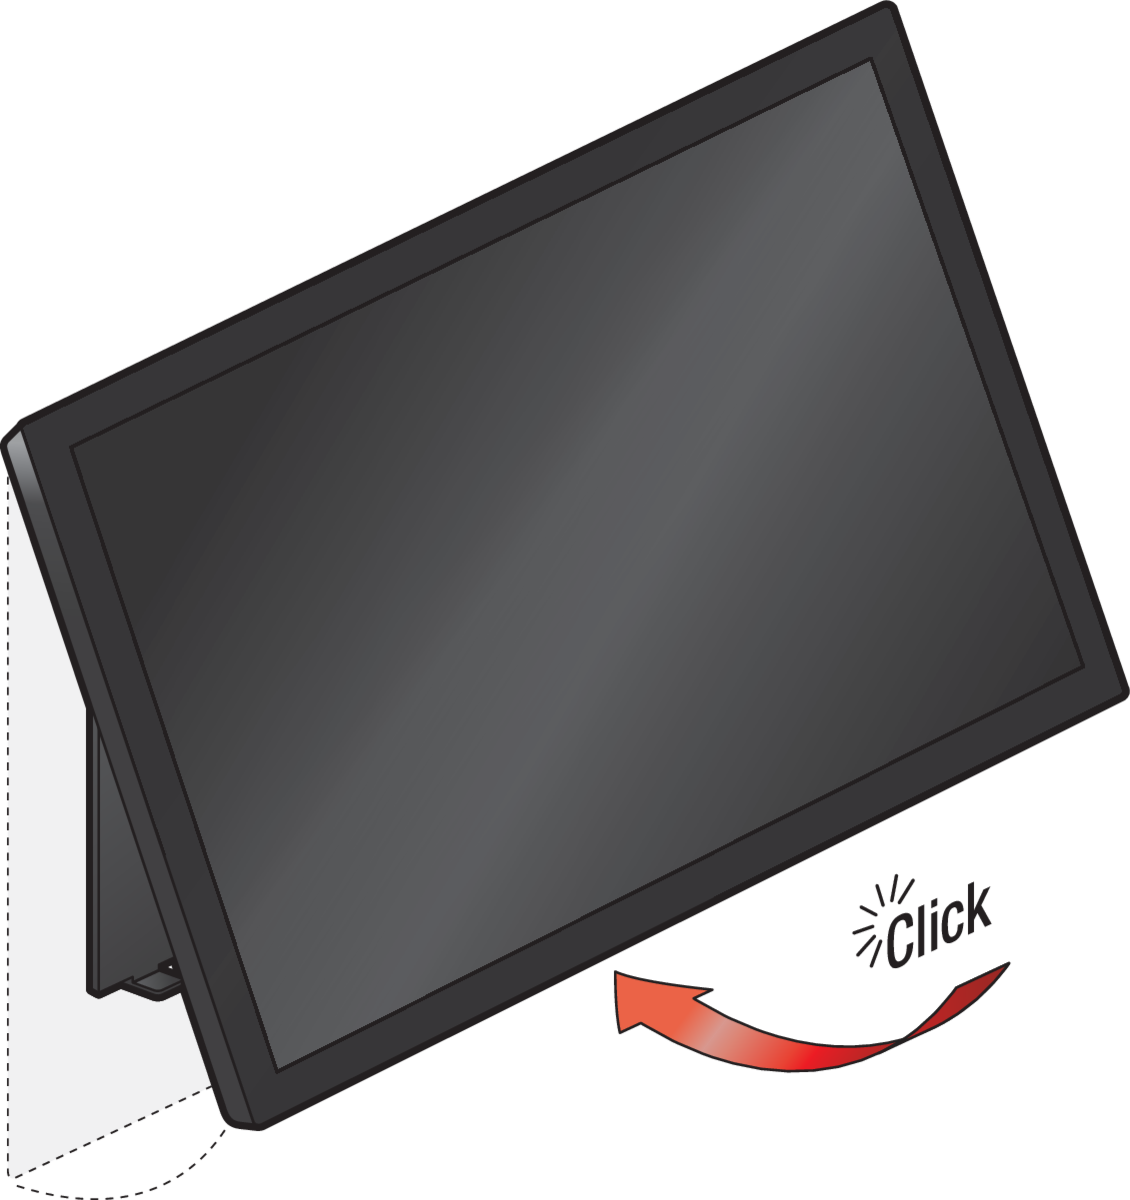
Trin 4
Valgfrit: Fastgør tyverisikringsskruerne med den skruetrækker, der følger med produktet.
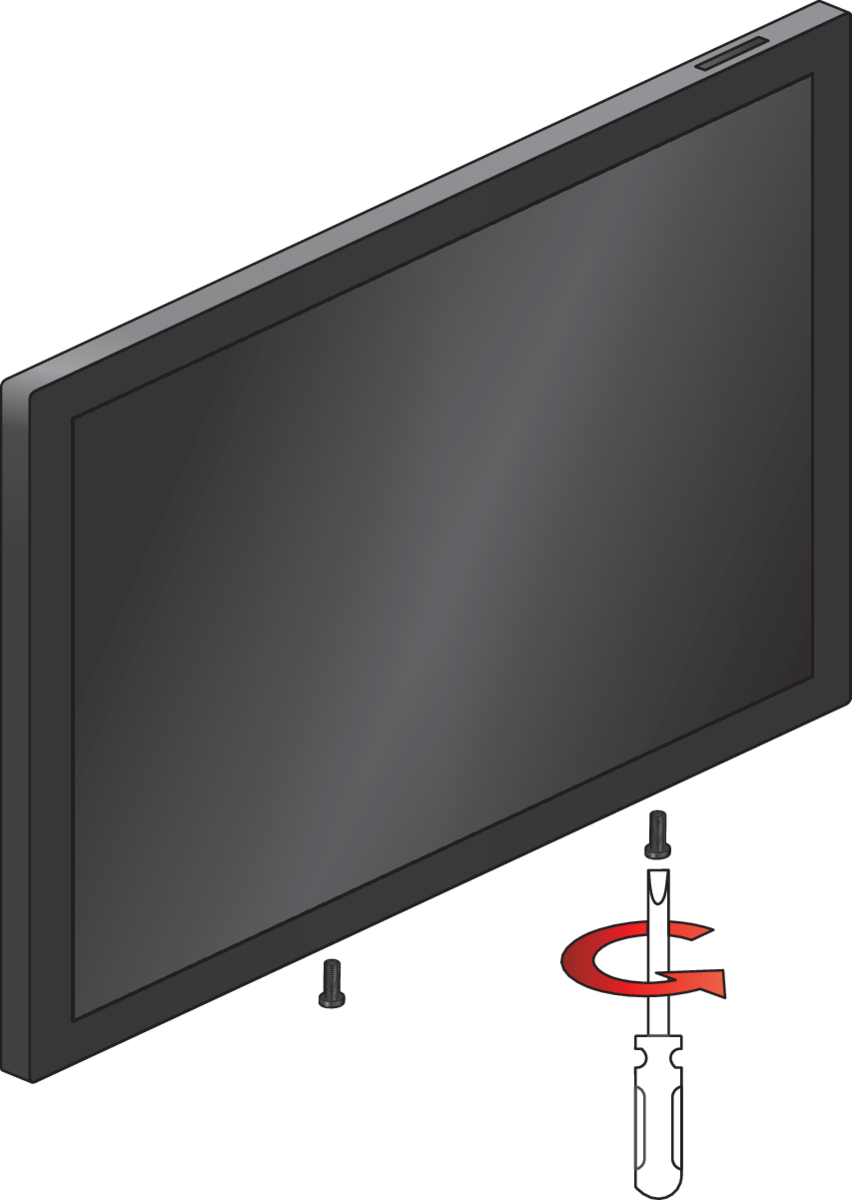
Introduktion
Trin 1
Alle Niko Home Control IP-enheder skal være i det samme IP-undernet (f.eks. 192.168.0.xxx) for at sikre kommunikation.
Sørg for at touchskærmen er tilsluttet på det samme netværk som controlleren.
Trin 2
Brug Niko Home Control programmeringssoftwaren (version 2.26.1 eller nyere):
-
Tilføj enheden.
-
Adresser enheden. I Adresseringsskærmen gå til fanen Touchskærme, og følg instruktionerne på skærmen. Indtast den kode, der vises på touchskærmen, under adresseringen.
Vær opmærksom på, at denne touchskærm ikke længere understøtter profiler, der er konfigurerede i programmeringssoftwaren. Alle visningsindstillinger på hver individuel touchskærm indstilles på selve touchskærmen, se Drift.
Vedligeholdelse og fejlfinding
Opdateringer (online)
Efter introduktionen søger touchskærmen efter opdateringer én gang i døgnet. Der kræves en aktiv internetforbindelse. Opgraderinger vil blive downloadet og installeret automatisk, når de er tilgængelige.
Du kan deaktivere automatiske opdateringer i programmeringssoftwaren (via Oversigt > Globale indstillinger) eller Niko Home appen (via Generel info > Installationsinfo). I så fald skal du bekræfte hver opdatering.
Opdateringer (offline)
Hvis din installation ikke er forbundet til internettet, kan du opdatere din touchskærm via USB-porten.
Sørg for at der er strøm til din touchskærm, før du starter. Touchskærmen skal ikke have strømtilførsel via USB-porten.
-
Tilslut et USB-kabel mellem touchskærmen og din PC. Touchskærmen vises i stifinder som en USB-lagerenhed.
-
Download touchscreen-softwaren fra hjemmesiden:
-
For touchscreen 2 og 3 skal du udpakke den downloadede fil og læse filen »readme.txt« for yderligere instruktioner. Du kan også læse vejledningen » Sådan installerer du den nyeste version af Niko Home Control II«.
-
For Touchscreen 4 skal du kopiere den downloadede fil til touchskærmen (USB-lagringsenhed).
-
Tryk og hold det øverste tryk i 5 sekunder for at genstarte din enhed. Opdateringen bliver automatisk installeret.
Vedligeholdelse af touchskærmen
Brug en blød, tør eller let fugtig klud til at rengøre touchskærmen. Brug ikke vaskemiddel eller andre rengøringsmidler.
Fejlfinding
|
Problem |
Årsag |
Løsningsforslag |
|---|---|---|
|
Intet vises på skærmen |
Ingen strømforsyning til touchskærm |
Kontroller strømforsyningen til touchskærmen. |
|
Du kan ikke betjene installationen |
Internt problem i touchskærm |
Tryk og hold det øverste tryk i 5 sekunder for at genstarte din enhed. |
|
Ingen adgang til indstillinger (andre funktioner virker stadig)
|
PIN-koden er indstillet, men koden er gået tabt |
Nulstil touchskærmen til fabriksindstillinger. |
|
Skærmen er tændt, men følgende besked vises: “Kontroller din forbindelse” |
Tilslutningsfejl |
Kontroller, om netværkskommunikation er mulig mellem touchskærmen og controlleren eller hub'en. Begge skal være forbundet med samme netværk. |
|
Skærmen er tændt, men følgende besked vises: “Denne enhed skal opdateres, før den kan bruges i din installation” |
Touchskærmens software er forældet |
Tilslut din installation til internettet for at opdatere touchskærmen. Hvis touchskærmen ikke kan tilsluttes internettet, kan du opdatere den ved at følge proceduren for offline opdatering. |
|
Skærmen er tændt, men følgende besked vises: “Din installation skal opdateres, før denne enhed kan bruges” |
Niko Home Control er forældet |
Brug programmeringssoftwaren til at opdatere din installation, se: https://guide.niko.eu/en/rnnhc/lv/how-to-install-the-latest-version-of-niko-home-control-ii |
Tilbage til fabriksindstillinger
Alle indstillinger og data vil gå tabt efter en fabriksnulstilling. Du bliver nødt til at introducere og konfigurere igen med programmeringssoftwaren.
|
Trin |
Resultat |
|---|---|
|
Meddelelsen "Tjek venligst din forbindelse" vises på touchskærmen. |
|
Pop-op-vinduet for fabriksnulstilling vises. |
|
Fabriksnulstillingen vil blive udført. Alle indstillinger og data vil gå tabt. |