| Sv translation | |||||||||||||||||||||||||||||||||||||||||||||||||||||||||||||||||||||||||||||||||||||||||||||||||||||||||||||||||||||||||||||||||||||||||||||||||||||||||||||||||||||||||||||||||||||||||||||||||||||||||||||||||||||||||||||||||||||||||||||||||||||||||||||||||||||||||||||||||||||||||||||
|---|---|---|---|---|---|---|---|---|---|---|---|---|---|---|---|---|---|---|---|---|---|---|---|---|---|---|---|---|---|---|---|---|---|---|---|---|---|---|---|---|---|---|---|---|---|---|---|---|---|---|---|---|---|---|---|---|---|---|---|---|---|---|---|---|---|---|---|---|---|---|---|---|---|---|---|---|---|---|---|---|---|---|---|---|---|---|---|---|---|---|---|---|---|---|---|---|---|---|---|---|---|---|---|---|---|---|---|---|---|---|---|---|---|---|---|---|---|---|---|---|---|---|---|---|---|---|---|---|---|---|---|---|---|---|---|---|---|---|---|---|---|---|---|---|---|---|---|---|---|---|---|---|---|---|---|---|---|---|---|---|---|---|---|---|---|---|---|---|---|---|---|---|---|---|---|---|---|---|---|---|---|---|---|---|---|---|---|---|---|---|---|---|---|---|---|---|---|---|---|---|---|---|---|---|---|---|---|---|---|---|---|---|---|---|---|---|---|---|---|---|---|---|---|---|---|---|---|---|---|---|---|---|---|---|---|---|---|---|---|---|---|---|---|---|---|---|---|---|---|---|---|---|---|---|---|---|---|---|---|---|---|---|---|---|---|---|---|---|---|---|---|---|---|---|---|---|---|---|---|---|---|---|---|---|---|
| |||||||||||||||||||||||||||||||||||||||||||||||||||||||||||||||||||||||||||||||||||||||||||||||||||||||||||||||||||||||||||||||||||||||||||||||||||||||||||||||||||||||||||||||||||||||||||||||||||||||||||||||||||||||||||||||||||||||||||||||||||||||||||||||||||||||||||||||||||||||||||||
DescriptionThe HVAC Universal Interface allows you to connect a VRV, VRF or multi-split air conditioning system (HVAC system) to the Niko Home Control installation. This module acts as the interface between the air conditioning system and the Niko Home Control gateway and allows communication between both devices. Overview
Order numbers550-00550: HVAC universal interface for Daikin VRV, Sanyo (Panasonic) VRF, Toshiba VRF, Mitsubishi Electric VRF, LG VRF, Fujitsu (Atlantic) VRF, Mitsubishi Heavy VRF, Hitachi VRF The following order numbers are replaced by 550-00550 (HVAC universal interface): 550-00551: HVAC interface for Daikin VRV The 550-00550 (HVAC universal interface) comes with a default configuration for Daikin VRV. When using another HVAC, the interface needs to be configured accordingly (DIP switch setting, and HVAC line via its display). OperationThe HVAC interface allows you to control an HVAC system using a Niko Home Control HVAC thermostat. See Push buttons with display.
InstallationConnection diagrams
Connecting and mounting the HVAC interface
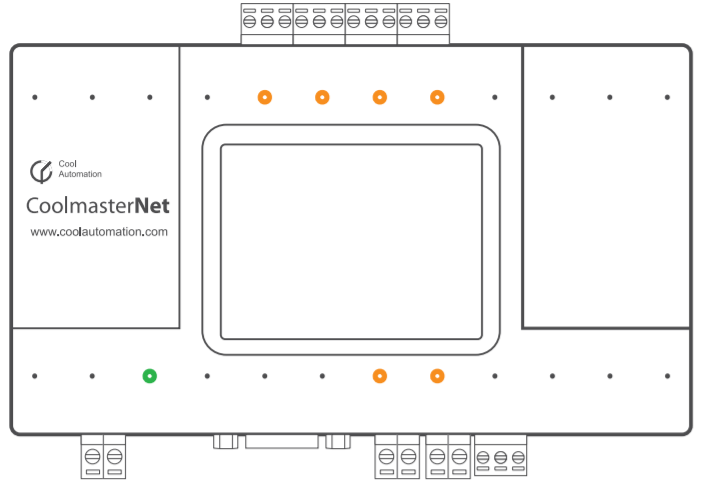
3. Press the HVAC interface anywhere onto the DIN rail until it clicks into place. 4. Connect the bus of the HVAC system to the green interface connector (included). Click the green interface connector at the bottom/top on the HVAC interface on line L1, L2, L3, L4, L5, L6 or L7, depending on the type of indoor unit that is used.
5. Connect the network cable to the LAN part of the connected controller. 6. Connect the power adapter to the HVAC interface and connect the adapter to the mains. The display and the green LED will light up.
The orange LEDs blink:
Information on the displayWhen there is communication with the HVAC system, the display provides extra information about the installation. Below,
Information shown on the display with the number of indoor units and zones:
Troubleshooting
Technical data
| |||||||||||||||||||||||||||||||||||||||||||||||||||||||||||||||||||||||||||||||||||||||||||||||||||||||||||||||||||||||||||||||||||||||||||||||||||||||||||||||||||||||||||||||||||||||||||||||||||||||||||||||||||||||||||||||||||||||||||||||||||||||||||||||||||||||||||||||||||||||||||||


| Sv translation | ||||||||||||||||||||||||||||||||||||||||||||||||||||||||||||||||||||||||||||||||||||||||||||||||||||||||||||||||||||||||||||||||||||||||||||||||||||||||||||||||||||||||||||||||||||||||||||||||||||||||||||||||||||||||||||||||||||||||||||||||||||||||||||||||||||||||||||||||||||||||||||||
|---|---|---|---|---|---|---|---|---|---|---|---|---|---|---|---|---|---|---|---|---|---|---|---|---|---|---|---|---|---|---|---|---|---|---|---|---|---|---|---|---|---|---|---|---|---|---|---|---|---|---|---|---|---|---|---|---|---|---|---|---|---|---|---|---|---|---|---|---|---|---|---|---|---|---|---|---|---|---|---|---|---|---|---|---|---|---|---|---|---|---|---|---|---|---|---|---|---|---|---|---|---|---|---|---|---|---|---|---|---|---|---|---|---|---|---|---|---|---|---|---|---|---|---|---|---|---|---|---|---|---|---|---|---|---|---|---|---|---|---|---|---|---|---|---|---|---|---|---|---|---|---|---|---|---|---|---|---|---|---|---|---|---|---|---|---|---|---|---|---|---|---|---|---|---|---|---|---|---|---|---|---|---|---|---|---|---|---|---|---|---|---|---|---|---|---|---|---|---|---|---|---|---|---|---|---|---|---|---|---|---|---|---|---|---|---|---|---|---|---|---|---|---|---|---|---|---|---|---|---|---|---|---|---|---|---|---|---|---|---|---|---|---|---|---|---|---|---|---|---|---|---|---|---|---|---|---|---|---|---|---|---|---|---|---|---|---|---|---|---|---|---|---|---|---|---|---|---|---|---|---|---|---|---|---|---|---|
| ||||||||||||||||||||||||||||||||||||||||||||||||||||||||||||||||||||||||||||||||||||||||||||||||||||||||||||||||||||||||||||||||||||||||||||||||||||||||||||||||||||||||||||||||||||||||||||||||||||||||||||||||||||||||||||||||||||||||||||||||||||||||||||||||||||||||||||||||||||||||||||||
BeschrijvingMet de HVAC Universal Interface koppel je een VRV-, VRF- of multisplit-airconditioningsysteem (HVAC-systeem) met de Niko Home Control installatie. Deze module vormt de interface tussen het airconditioningsysteem en de Niko Home Control gateway en zorgt voor de communicatie ertussen. Overzicht
Referentiecodes550-00550: Universele HVAC-interface voor Daikin VRV, Sanyo (Panasonic) VRF, Toshiba VRF, Mitsubishi Electric VRF, LG VRF, Fujitsu (Atlantic) VRF, Mitsubishi Heavy VRF, Hitachi VRF De volgende artikelnummers worden vervangen door 550-00550 (universele HVAC-interface): 550-00551: HVAC-interface voor Daikin VRV 550-00552: HVAC-interface voor Sanyo (Panasonic) VRF 550-00553: HVAC-interface voor Toshiba VRF 550-00554: HVAC-interface voor Mitsubishi Electric VRF 550-00556: HVAC-interface voor LG VRF 550-00557: HVAC-interface voor Fujitsu (Atlantic) VRF 550-00558: HVAC-interface voor Mitsubishi Heavy VRF 550-00559: HVAC-interface voor Hitachi VRF De 550-00550 (universele HVAC-interface) komt met een standaard configuratie voor Daikin VRV. Wanneer je een andere HVAC gebruikt, dient de interface op de gepaste manier geconfigureerd te worden (dipswitchinstelling en HVAC-lijn via het display). WerkingVia de HVAC-interface kun je een HVAC-systeem bedienen met een Niko Home Control HVAC-thermostaat. Zie Display controls. Voor de verschillende HVAC-systemen is slechts één HVAC-interface nodig. Met een HVAC-systeem kun je slechts één HVAC-interface verbinden. Om multisplit-airconditioningsystemen aan te sluiten, heb je een extra module in elke binnenunit nodig.
InstallatieAansluitschema’s
Aansluiting en bevestiging van de HVAC-interface
1. De HVAC-interface verbinden met een VRV- of VRF-airconditioningsysteem of een multisplit-airconditioningsysteem:
2.Open het klepje aan de rechterbovenkant van de HVAC-interface en controleer of de dipswitches als volgt ingesteld staan.
3. Klik de HVAC-interface vast op een vrije plaats op de DIN-rail. Zorg ervoor dat de module zich binnen het bereik van de gateway bevindt. 4. Sluit de bus van het HVAC-systeem aan op de bijgeleverde groene interfaceconnector. Klik de groene interfaceconnector onderaan/bovenaan op de HVAC-interface op lijn L1, L2, L3, L4, L5, L6 of L7, afhankelijk van het type binnenunit dat wordt gebruikt.
5. Sluit de netwerkkabel aan op het LAN-gedeelte van de connected controller. 6. Verbind de voedingsadapter met de HVAC-interface en sluit de adapter aan op de netspanning. De oranje leds knipperen:
7. Selecteer het juiste merk van HVAC-systeem op de HVAC-interface voor de gebruikte lijn. Zorg ervoor dat de dipswitches correct zijn ingesteld voor het merk (zie stap 2).
Informatie op het displayWanneer er communicatie is met het HVAC-systeem, geeft het display extra informatie over de installatie weer. Hieronder vindt u een voorbeeld van zo’n display. De waarden getoond in het voorbeeld zijn uiteraard slechts indicatief en kunnen dus afwijken van de reële waarden. Weergegeven informatie op het display met de status van de binnenunits:
Weergegeven informatie op het display met het aantal binnenunits en zones:
Problemen oplossen
Technische gegevens
| ||||||||||||||||||||||||||||||||||||||||||||||||||||||||||||||||||||||||||||||||||||||||||||||||||||||||||||||||||||||||||||||||||||||||||||||||||||||||||||||||||||||||||||||||||||||||||||||||||||||||||||||||||||||||||||||||||||||||||||||||||||||||||||||||||||||||||||||||||||||||||||||


| Sv translation | ||||||||||||||||||||||||||||||||||||||||||||||||||||||||||||||||||||||||||||||||||||||||||||||||||||||||||||||||||||||||||||||||||||||||||||||||||||||||||||||||||||||||||||||||||||||||||||||||||||||||||||||||||||||||||||||||||||||||||||||||||||||||||||||||||||||||||||||||||||||||||||||
|---|---|---|---|---|---|---|---|---|---|---|---|---|---|---|---|---|---|---|---|---|---|---|---|---|---|---|---|---|---|---|---|---|---|---|---|---|---|---|---|---|---|---|---|---|---|---|---|---|---|---|---|---|---|---|---|---|---|---|---|---|---|---|---|---|---|---|---|---|---|---|---|---|---|---|---|---|---|---|---|---|---|---|---|---|---|---|---|---|---|---|---|---|---|---|---|---|---|---|---|---|---|---|---|---|---|---|---|---|---|---|---|---|---|---|---|---|---|---|---|---|---|---|---|---|---|---|---|---|---|---|---|---|---|---|---|---|---|---|---|---|---|---|---|---|---|---|---|---|---|---|---|---|---|---|---|---|---|---|---|---|---|---|---|---|---|---|---|---|---|---|---|---|---|---|---|---|---|---|---|---|---|---|---|---|---|---|---|---|---|---|---|---|---|---|---|---|---|---|---|---|---|---|---|---|---|---|---|---|---|---|---|---|---|---|---|---|---|---|---|---|---|---|---|---|---|---|---|---|---|---|---|---|---|---|---|---|---|---|---|---|---|---|---|---|---|---|---|---|---|---|---|---|---|---|---|---|---|---|---|---|---|---|---|---|---|---|---|---|---|---|---|---|---|---|---|---|---|---|---|---|---|---|---|---|---|---|
| ||||||||||||||||||||||||||||||||||||||||||||||||||||||||||||||||||||||||||||||||||||||||||||||||||||||||||||||||||||||||||||||||||||||||||||||||||||||||||||||||||||||||||||||||||||||||||||||||||||||||||||||||||||||||||||||||||||||||||||||||||||||||||||||||||||||||||||||||||||||||||||||
DescriptionLa HVAC Universal Interface vous permet de raccorder un système de climatisation VRV, VRF ou multi-split (système HVAC) à l’installation Niko Home Control. Ce module constitue l'interface entre le système de climatisation et le module de contrôle à distance Niko Home Control et assure la communication entre ceux-ci. Synthèse | ||||||||||||||||||||||||||||||||||||||||||||||||||||||||||||||||||||||||||||||||||||||||||||||||||||||||||||||||||||||||||||||||||||||||||||||||||||||||||||||||||||||||||||||||||||||||||||||||||||||||||||||||||||||||||||||||||||||||||||||||||||||||||||||||||||||||||||||||||||||||||||||

| Note |
|---|
|
Installation
Schémas de raccordement
| Note |
|---|
|

Raccordement et fixation de l'interface HVAC
| Note |
|---|
Les fonctions "commande de la vitesse de ventilation" et "lecture de la température mesurée" ne sont pas disponibles si l'interface HVAC est connectée à un KRP Daikin doté d'une interface D3 DTA. Les modèles Hitachi ne transmettent pas la température au thermostat.
|
- Raccorder l'interface HVAC à un système de climatisation VRV ou VRF ou à un système de climatisation multisplit:
Pour raccorder l'interface HVAC à un système de climatisation VRV ou VRF, raccordez l'interface HVAC à l' (aux) unité(s) intérieure(s) à l'aide d'un câble bus HVAC bifilaire. Le tableau ci-dessous donne un aperçu du raccordement du bus à l' (aux) unité(s) intérieure(s), par type de système HVAC:
Système HVAC
Réseau de communication
Raccordement bus
Polarité
Nombre d'unités intérieures
Nombre d'unités extérieures
Câble réseau blindé
Daikin
D3 Net
F1 F2
Aucune
64
10
Pas obligatoire
Toshiba
TCC Link
U1 U2
Aucune
64
10
Obligatoire
Sanyo (Panasonic)
S3 Net
U1 U2
Aucune
64
10
Obligatoire
Mitsubishi Electric
Réseau M (TB3,TB7)
M1 M2
Aucune
50
10
Obligatoire
Fujitsu (Atlantic)
VRF transmission line
X1 X2
Aucune
64
10
Obligatoire
Mitsubishi Heavy
Super Link New Super Link
A B
Aucune
128
10
Obligatoire
Hitachi
H Link, H Link 2
1 2
Aucune
64
10
Obligatoire
LG
Inter A, Inter B (uniquement extérieur)
Aucune
128
10
Obligatoire
L'interface HVAC est dotée d'un port USB et de sept raccordements: L1 - L7. Cinq de ces sept raccordements peuvent être commandés simultanément ; ceci est toutefois impossible avec L2 et L6, parce qu'ils partagent le même système électronique. Le tableau suivant donne un aperçu des raccordements à utiliser sur l'interface HVAC par système.
Fabricant HVAC
Abréviation
USB
L1
L2
L3
L4
L5
L6
L7
Daikin
DK
Mitsubishi Electric
ME
Sanyo (Panasonic)
SA
Toshiba
TO
Hitachi
HT
Fujitsu (Atlantic)
LG
LG
Mitsubishi Heavy Industries
MH
Gree
GR
- Pour raccorder l'interface HVAC à un système de climatisation multi-split, installez d'abord un module supplémentaire (raccordement circuit imprimé) par unité intérieure. Vous ne pouvez pas raccorder une interface HVAC directement à l'unité intérieure (ou aux unités intérieures) d'un système de climatisation multi-split. Le fournisseur du système HVAC doit fournir le ou les modules supplémentaires à raccorder sur le câble bus HVAC bifilaire.
Ouvrez le clapet sur le côté supérieur droit de l'interface HVAC et vérifiez que les commutateurs miniatures soient réglés comme suit.

commutateur miniature P
Commutateur
ON
OFF
P3
L6 actif, L2 inactif
L2 actif, L6 inactif
P4
mode de production
mode de fonctionnement normal
commutateurs miniatures Q
Type HVAC
commutateur miniature Q - ligne HVAC L1
Q1
Q2
Q3
Q4
DK
ON
OFF
ON
OFF
ME
OFF
OFF
OFF
OFF
TO
OFF
ON
OFF
ON
SA
OFF
ON
OFF
ON
commutateurs miniatures R
Type HVAC
commutateur miniature R - ligne HVAC L2
R1
R2
R3
R4
DK
ON
OFF
ON
OFF
ME
OFF
OFF
OFF
OFF
TO
OFF
ON
OFF
ON
SA
OFF
ON
OFF
ON
Note Si tous les commutateurs miniatures R1, R2, R3 et R4 sont placés en position ON, l'interface HVAC passe en mode BOOT.
commutateurs miniatures S
Commutateur
ON
OFF
S1, S2
armement sortie dc sur ligne HVAC L1
désarmement sortie dc sur ligne HVAC L1
S3, S4
armement sortie dc sur ligne HVAC L2
désarmement sortie dc sur ligne HVAC L2
Note Le commutateur S1 doit toujours être dans la même position que S2 ; le commutateur S3 dans la même position que S4.
Ces réglages ne s'appliquent que si vous devez raccorder l'interface HVAC via un adaptateur KRP ou MAC sur un système non VRF.
- Encliquetez l'interface HVAC à un emplacement libre du rail DIN. Veillez à ce que le module se trouve dans la zone couverte par le module de contrôle à distance.
- Raccordez le bus du système HVAC au connecteur d'interface vert fourni. Encliquetez le connecteur d'interface vert en bas/en haut sur l'interface HVAC sur la ligne L1, L2, L3, L4, L5, L6 ou L7, selon le type d'unité intérieure utilisé.

Connectez le câble réseau à la partie LAN de l'unité de contrôle connectée.

Raccordez l'adaptateur de l'alimentation à l'interface HVAC, puis branchez-le sur la tension réseau.
L'écran et la LED verte s'allument.
Les LED orange clignotent :
- lors du transfert des données du thermostat HVAC vers l'interface HVAC
- uniquement si la ligne L1, L2, L3, L4, L5, L6, L7 est raccordée à une unité intérieure.LED
couleur
statut
statut
connexion
verte
activée
désactivée
bonne connexion
pas de connexion
activité
orange
clignote
transfert de données
- Sélectionnez la marque correcte de système HVAC sur l'interface HVAC pour la ligne utilisée. Assurez-vous que les commutateurs DIP sont correctement réglés pour la marque (voir étape 2).
- Allez à Réglages.

- Allez à ligne HVAC.

- Sélectionnez la ligne HVAC que vous souhaitez configurer.

- Configurez le type de ligne HVAC.

- Allez à Réglages.
Informations à l'écran
En cas de communication avec le système HVAC, l'écran affiche des informations supplémentaires sur l'installation. Vous trouverez ci-dessous un exemple d'un tel écran. Les valeurs affichées dans l'exemple ne sont bien sûr qu'indicatives et peuvent différer des valeurs réelles.
Informations et statut des unités intérieures affichés à l'écran:


Informations et nombre d'unités intérieures et de zones affichés à l'écran:

Valeur affichée | Symbole | Valeur dans l'écran d'exemple |
|---|---|---|
A. Nombre d'unités intérieures reconnues | U | 10 |
B. Nombre de groupes | G | 8 |
C. Code d'erreur | A3 | |
D. Code d'erreur | U4 |
Résolution des problèmes
Problème | Cause possible | Solution |
|---|---|---|
Aucune information n'apparaît à l'écran. | Mauvaise alimentation | Vérifiez si l'adaptateur d'alimentation fournit un signal 9 Vdc stable. |
Le nombre exact d'unités intérieures n'est pas affiché à l'écran. | La reconnaissance du système HVAC demande plusieurs minutes. |
|
La communication avec le système HVAC rencontre un problème. |
Données techniques
- tension d'alimentation: 9 – 24 Vdc
- Méthode d'installation: fixation murale ou sur rail DIN
- conditions de fonctionnement:
- température ambiante: 0 – 45 °C
- hygrométrie: moins de 85 % d'humidité relative
- dimensions: 90 x 155 x 33 mm (H x l x P)
- poids: 270 g
- nombre maximal d'unités intérieures et extérieures: selon le fabricant (voir tableau dans la section Raccordement et fixation de l'interface HVAC)
- marquage CE
| Sv translation | |||||||||||||||||||||||||||||||||||||||||||||||||||||||||||||||||||||||||||||||||||||||||||||||||||||||||||||||||||||||||||||||||||||||||||||||||||||||||||||||||||||||||||||||||||||||||||||||||||||||||||||||||||||||||||||||||||||||||||||||||||||||||||||||||||||||||||||||||||||||||||||
|---|---|---|---|---|---|---|---|---|---|---|---|---|---|---|---|---|---|---|---|---|---|---|---|---|---|---|---|---|---|---|---|---|---|---|---|---|---|---|---|---|---|---|---|---|---|---|---|---|---|---|---|---|---|---|---|---|---|---|---|---|---|---|---|---|---|---|---|---|---|---|---|---|---|---|---|---|---|---|---|---|---|---|---|---|---|---|---|---|---|---|---|---|---|---|---|---|---|---|---|---|---|---|---|---|---|---|---|---|---|---|---|---|---|---|---|---|---|---|---|---|---|---|---|---|---|---|---|---|---|---|---|---|---|---|---|---|---|---|---|---|---|---|---|---|---|---|---|---|---|---|---|---|---|---|---|---|---|---|---|---|---|---|---|---|---|---|---|---|---|---|---|---|---|---|---|---|---|---|---|---|---|---|---|---|---|---|---|---|---|---|---|---|---|---|---|---|---|---|---|---|---|---|---|---|---|---|---|---|---|---|---|---|---|---|---|---|---|---|---|---|---|---|---|---|---|---|---|---|---|---|---|---|---|---|---|---|---|---|---|---|---|---|---|---|---|---|---|---|---|---|---|---|---|---|---|---|---|---|---|---|---|---|---|---|---|---|---|---|---|---|---|---|---|---|---|---|---|---|---|---|---|---|---|---|---|
| |||||||||||||||||||||||||||||||||||||||||||||||||||||||||||||||||||||||||||||||||||||||||||||||||||||||||||||||||||||||||||||||||||||||||||||||||||||||||||||||||||||||||||||||||||||||||||||||||||||||||||||||||||||||||||||||||||||||||||||||||||||||||||||||||||||||||||||||||||||||||||||
OpisUniverzálne rozhranie HVAC umožňuje pripojiť VRV, VRF alebo multi-split klimatizačné systémy (systém HVAC) k inštalácii Niko Home Control. Tento modul funguje ako rozhranie medzi systémom klimatizácie a bránou Niko Home Control a umožňuje komunikáciu medzi oboma zariadeniami. Prehľad
Katalógové čísla550-00550: HVAC univerzálne rozhranie pre Daikin VRV, Sanyo (Panasonic) VRF, Toshiba VRF, Mitsubishi Electric VRF, LG VRF, Fujitsu (Atlantic) VRF, Mitsubishi Heavy VRF, Hitachi VRF Nasledujúce objednávacie čísla nahrádza číslo 550-00550 (HVAC univerzálne rozhranie): 550-00551: Rozhranie HVAC pre Daikin VRV 550-00552: Rozhranie HVAC pre Sanyo (Panasonic) VRF 550-00553: Rozhranie HVAC pre Toshiba VRF 550-00554: Rozhranie HVAC pre Mitsubishi Electric VRF 550-00556: Rozhranie HVAC pre LG VRF 550-00557: Rozhranie HVAC pre Fujitsu (Atlantic) VRF 550-00558: Rozhranie HVAC pre Mitsubishi Heavy VRF 550-00559: Rozhranie HVAC pre Hitachi VRF 550-00550 (HVAC univerzálne rozhranie) je predvolene nakonfigurované pre systém Daikin VRV. Ak používate iný systém HVAC, musíte rozhranie podľa toho nakonfigurovať (upraviť nastavenia DIP prepínača a HVAC linky prostredníctvom displeja). PrevádzkaRozhranie HVAC vám umožňuje ovládať systém HVAC pomocou Niko Home Control termostatu HVAC. Pozri Display controls. Pre jednotlivé HVAC systémy stačí použiť iba jedno HVAC rozhranie. K rozhraniu HVAC je možné pripojiť iba jeden systém HVAC. Ak chcete pripojiť multi-split klimatizačný systém, budete ku každej interiérovej jednotke potrebovať ďalší modul.
InštaláciaSchémy zapojenia
Pripojenie a montáž rozhrania HVAC
Informácia na displejiKeď prebieha komunikácia s HVAC systémom, displej zobrazí dodatočné informácie o inštalácii. Nižšie uvádzame príklad takéhoto typu displeja. Hodnoty uvedené v tomto príklade majú len informatívny charakter a môžu sa líšiť od skutočných hodnôt.
Informácie zobrazené na displeji s počtom interiérových jednotiek a zón:
Odstraňovanie problémov
| |||||||||||||||||||||||||||||||||||||||||||||||||||||||||||||||||||||||||||||||||||||||||||||||||||||||||||||||||||||||||||||||||||||||||||||||||||||||||||||||||||||||||||||||||||||||||||||||||||||||||||||||||||||||||||||||||||||||||||||||||||||||||||||||||||||||||||||||||||||||||||||


| Sv translation | |||||||||||||||||||||||||||||||||||||||||||||||||||||||||||||||||||||||||||||||||||||||||||||||||||||||||||||||||||||||||||||||||||||||||||||||||||||||||||||||||||||||||||||||||||||||||||||||||||||||||||||||||||||||||||||||||||||||||||||||||||||||||||||||||||||||||||||||||||||||||||||
|---|---|---|---|---|---|---|---|---|---|---|---|---|---|---|---|---|---|---|---|---|---|---|---|---|---|---|---|---|---|---|---|---|---|---|---|---|---|---|---|---|---|---|---|---|---|---|---|---|---|---|---|---|---|---|---|---|---|---|---|---|---|---|---|---|---|---|---|---|---|---|---|---|---|---|---|---|---|---|---|---|---|---|---|---|---|---|---|---|---|---|---|---|---|---|---|---|---|---|---|---|---|---|---|---|---|---|---|---|---|---|---|---|---|---|---|---|---|---|---|---|---|---|---|---|---|---|---|---|---|---|---|---|---|---|---|---|---|---|---|---|---|---|---|---|---|---|---|---|---|---|---|---|---|---|---|---|---|---|---|---|---|---|---|---|---|---|---|---|---|---|---|---|---|---|---|---|---|---|---|---|---|---|---|---|---|---|---|---|---|---|---|---|---|---|---|---|---|---|---|---|---|---|---|---|---|---|---|---|---|---|---|---|---|---|---|---|---|---|---|---|---|---|---|---|---|---|---|---|---|---|---|---|---|---|---|---|---|---|---|---|---|---|---|---|---|---|---|---|---|---|---|---|---|---|---|---|---|---|---|---|---|---|---|---|---|---|---|---|---|---|---|---|---|---|---|---|---|---|---|---|---|---|---|---|---|
| |||||||||||||||||||||||||||||||||||||||||||||||||||||||||||||||||||||||||||||||||||||||||||||||||||||||||||||||||||||||||||||||||||||||||||||||||||||||||||||||||||||||||||||||||||||||||||||||||||||||||||||||||||||||||||||||||||||||||||||||||||||||||||||||||||||||||||||||||||||||||||||
BeskrivelseMed HVAC Universal interface kan du tilslutte et VRV, VRF eller et multi-split klimaanlæg (HVAC-system) på Niko Home Control installationen. Dette modul optræder som interface imellem klimaanlægget og Niko Home Control-gateway og muliggør kommunikation imellem disse enheder. Oversigt
Bestillingsnumre550-00550: HVAC universalinterface til Daikin VRV, Sanyo (Panasonic) VRF, Toshiba VRF, Mitsubishi Electric VRF, LG VRF, Fujitsu (Atlantic) VRF, Mitsubishi Heavy VRF og Hitachi VRF Følgende ordrenumre er erstattet af 550-00550 (HVAC universalinterface): 550-00551: HVAC-interface til Daikin VRV 550-00550 (HVAC universalinterface) leveres med en standard konfiguration til Daikin VRV. Når du anvender en anden HVAC, skal interfacet konfigureres i overensstemmelse hermed (DIP-switchindstilling, og HVAC-linje displayet). DriftMed HVAC-interfacen kan du styre et HVAC-system med en Niko Home Control HVAC-termostat. Se Display controls.
InstallationForbindelsesdiagrammer
Tilslutning og montering af HVAC-interface
3. Tryk HVAC-interfacen et sted på DIN-skinnen, indtil den klikker på plads. 4. Tilslut HVAC-systemets bus til det grønne interfacestik (inkluderet). Klik det grønne interfacestik i bunden/toppen af HVAC-interfacen på linje L1, L2, L3, L4, L5, L6 eller L7, afhængigt af den type indendørs enheder, der er brugt.
5. Tilslut netværkskablet på LAN-delen af controlleren. 6. Tilslut strømadapteren på HVAC-interfacen og tilslut adapteren på lysnettet. Displayet og det grønne LED vil lyse.
De orange LED blinker:
7. Vælg det korrekte mærke af HVAC-systemet på HVAC-interfacet for den anvendte linje. Sørg for at DIP-switchene er indstillet rigtigt til mærket (se trin 2).
Information på displayetNår der er kommunikation med HVAC-systemet, giver displayet ekstra information om installationen. Herunder
Information vist på displayet med status for de udendørs enheder og zoner:
Fejlfinding
Tekniske data
| |||||||||||||||||||||||||||||||||||||||||||||||||||||||||||||||||||||||||||||||||||||||||||||||||||||||||||||||||||||||||||||||||||||||||||||||||||||||||||||||||||||||||||||||||||||||||||||||||||||||||||||||||||||||||||||||||||||||||||||||||||||||||||||||||||||||||||||||||||||||||||||
| Sv translation | |||||||||||||||||||||||||||||||||||||||||||||||||||||||||||||||||||||||||||||||||||||||||||||||||||||||||||||||||||||||||||||||||||||||||||||||||||||||||||||||||||||||||||||||||||||||||||||||||||||||||||||||||||||||||||||||||||||||||||||||||||||||||||||||||||||||||||||||||||||||||||||
|---|---|---|---|---|---|---|---|---|---|---|---|---|---|---|---|---|---|---|---|---|---|---|---|---|---|---|---|---|---|---|---|---|---|---|---|---|---|---|---|---|---|---|---|---|---|---|---|---|---|---|---|---|---|---|---|---|---|---|---|---|---|---|---|---|---|---|---|---|---|---|---|---|---|---|---|---|---|---|---|---|---|---|---|---|---|---|---|---|---|---|---|---|---|---|---|---|---|---|---|---|---|---|---|---|---|---|---|---|---|---|---|---|---|---|---|---|---|---|---|---|---|---|---|---|---|---|---|---|---|---|---|---|---|---|---|---|---|---|---|---|---|---|---|---|---|---|---|---|---|---|---|---|---|---|---|---|---|---|---|---|---|---|---|---|---|---|---|---|---|---|---|---|---|---|---|---|---|---|---|---|---|---|---|---|---|---|---|---|---|---|---|---|---|---|---|---|---|---|---|---|---|---|---|---|---|---|---|---|---|---|---|---|---|---|---|---|---|---|---|---|---|---|---|---|---|---|---|---|---|---|---|---|---|---|---|---|---|---|---|---|---|---|---|---|---|---|---|---|---|---|---|---|---|---|---|---|---|---|---|---|---|---|---|---|---|---|---|---|---|---|---|---|---|---|---|---|---|---|---|---|---|---|---|---|---|
| |||||||||||||||||||||||||||||||||||||||||||||||||||||||||||||||||||||||||||||||||||||||||||||||||||||||||||||||||||||||||||||||||||||||||||||||||||||||||||||||||||||||||||||||||||||||||||||||||||||||||||||||||||||||||||||||||||||||||||||||||||||||||||||||||||||||||||||||||||||||||||||
BeskrivningHVAC-universalgränssnittet gör det möjligt att ansluta ett VRV-, VRF- eller mångfördelande luftkonditioneringssystem (HVAC-system) till Niko Home Control-installationen. Denna modul fungerar som ett gränssnitt mellan luftkonditioneringssystemet och Niko Home Control-gatewayen och möjliggör kommunikation mellan båda enheterna. Översikt
Beställningsnummer550-00550: Universellt HVAC-gränssnitt för Daikin VRV, Sanyo (Panasonic) VRF, Toshiba VRF, Mitsubishi Electric VRF, LG VRF, Fujitsu (Atlantic) VRF, Mitsubishi Heavy VRF, Hitachi VRF Följande ordernummer ersätts av 550-00550 (Universellt HVAC-gränssnitt): 550-00551: HVAC-gränssnitt för Daikin VRV 550-00550 (Universellt HVAC-gränssnitt) levereras med standardkonfiguration för Daikin VRV. Vid användning av annan HVAC behöver gränssnittet konfigureras därefter (DIP-strömställarinställning, och HVAC-ledning via dess skärm). DriftMed HVAC-gränssnittet kan du styra ett HVAC-system med en Niko Home Control HVAC-termostat. Se Display controls.
InstallationKopplingsscheman
Ansluta och montera HVAC-gränssnittet
3. Tryck fast HVAC-gränssnittet på valfri plats på DIN-skenan tills den klickar på plats. 4. Anslut HVAC-systemets buss till den gröna gränssnittskontakten (medföljer). Klicka på den gröna gränssnittskontakten nederst/överst på HVAC-gränssnittet på ledning L1, L2, L3, L4, L5, L6 eller L7, beroende på typen av inomhusenhet som används.
5. Anslut nätverkskabeln till LAN-delen av den anslutna kontrollenheten.
6. Anslut nätadaptern till HVAC-gränssnittet och anslut adaptern till elnätet.
De orange indikatorlamporna blinkar:
7. Välj korrekt märke för HVAC-systemet på HVAC-gränssnittet för den ledning som används. Kontrollera att dip-strömställarna är korrekt inställda för märket (se steg 2).
Information på displayenNär det finns kommunikation med HVAC-systemet ger displayen extra information om installationen. Nedan
Information som visas på displayen med antalet inomhusenheter och zoner:
Felsökning
Tekniska data
| |||||||||||||||||||||||||||||||||||||||||||||||||||||||||||||||||||||||||||||||||||||||||||||||||||||||||||||||||||||||||||||||||||||||||||||||||||||||||||||||||||||||||||||||||||||||||||||||||||||||||||||||||||||||||||||||||||||||||||||||||||||||||||||||||||||||||||||||||||||||||||||
| Sv translation | |||||||||||||||||||||||||||||||||||||||||||||||||||||||||||||||||||||||||||||||||||||||||||||||||||||||||||||||||||||||||||||||||||||||||||||||||||||||||||||||||||||||||||||||||||||||||||||||||||||||||||||||||||||||||||||||||||||||||||||||||||||||||||||||||||||||||||||||||||||||||||||
|---|---|---|---|---|---|---|---|---|---|---|---|---|---|---|---|---|---|---|---|---|---|---|---|---|---|---|---|---|---|---|---|---|---|---|---|---|---|---|---|---|---|---|---|---|---|---|---|---|---|---|---|---|---|---|---|---|---|---|---|---|---|---|---|---|---|---|---|---|---|---|---|---|---|---|---|---|---|---|---|---|---|---|---|---|---|---|---|---|---|---|---|---|---|---|---|---|---|---|---|---|---|---|---|---|---|---|---|---|---|---|---|---|---|---|---|---|---|---|---|---|---|---|---|---|---|---|---|---|---|---|---|---|---|---|---|---|---|---|---|---|---|---|---|---|---|---|---|---|---|---|---|---|---|---|---|---|---|---|---|---|---|---|---|---|---|---|---|---|---|---|---|---|---|---|---|---|---|---|---|---|---|---|---|---|---|---|---|---|---|---|---|---|---|---|---|---|---|---|---|---|---|---|---|---|---|---|---|---|---|---|---|---|---|---|---|---|---|---|---|---|---|---|---|---|---|---|---|---|---|---|---|---|---|---|---|---|---|---|---|---|---|---|---|---|---|---|---|---|---|---|---|---|---|---|---|---|---|---|---|---|---|---|---|---|---|---|---|---|---|---|---|---|---|---|---|---|---|---|---|---|---|---|---|---|---|
| |||||||||||||||||||||||||||||||||||||||||||||||||||||||||||||||||||||||||||||||||||||||||||||||||||||||||||||||||||||||||||||||||||||||||||||||||||||||||||||||||||||||||||||||||||||||||||||||||||||||||||||||||||||||||||||||||||||||||||||||||||||||||||||||||||||||||||||||||||||||||||||
BeschreibungDie HLK-Universalschnittstelle ermöglicht es Ihnen, ein VRV-, VRF- oder Multisplit-Klimasystem (HLK-System) an die Niko Home Control-Installation anzuschließen. Dieses Modul dient als Schnittstelle zwischen der Klimaanlage und dem Niko Home Control-Gateway und ermöglicht die Kommunikation zwischen beiden Geräten. Übersicht
Bestellnummern550-00550: HLK-Universalschnittstelle für Daikin VRV, Sanyo (Panasonic) VRF, Toshiba VRF, Mitsubishi Electric VRF, LG VRF, Fujitsu (Atlantic) VRF, Mitsubishi Heavy VRF, Hitachi VRF 550-00551: HLK-Schnittstelle für Daikin VRV Nummer 550-00550 (HLK-Universalschnittstelle) wird mit einer Standardkonfiguration für Daikin VRV geliefert. Bei Verwendung einer anderen HLK muss die Schnittstelle entsprechend konfiguriert werden (DIP-Schaltereinstellung und HLK-Leitung über ihr Display). BetriebDie HLK-Schnittstelle ermöglicht es Ihnen, ein HLK-System mit einem Niko Home Control-HLK-Thermostaten zu steuern. Siehe Display controls.
InstallationAnschlusspläne
Anschließen und Montieren der HLK-Schnittstelle
3. Drücken Sie die HLK-Schnittstelle an beliebiger Stelle auf die DIN-Schiene, bis sie einrastet. 4. Verbinden Sie den Bus der HLK-Anlage mit dem grünen Schnittstellenstecker (im Lieferumfang enthalten). Klicken Sie auf den grünen Schnittstellenstecker unten/oben an der HLK-Schnittstelle auf die Leitung L1, L2, L3, L4, L5, L6 oder L7, je nach Typ der verwendeten Inneneinheit.
5. Schließen Sie das Netzwerkkabel an den LAN-Teil des Connected Controller an.
6. Schließen Sie das Netzteil an die HLK-Schnittstelle an und verbinden Sie das Netzteil mit dem Stromnetz. Das Display und die grüne LED leuchten auf.
Die orangefarbenen LEDs blinken:
7. Schließen Sie das Netzwerkkabel an den LAN-Teil des Connected Controller an.
Informationen auf dem DisplayWenn eine Kommunikation mit dem HLK-System besteht, liefert das Display zusätzliche Informationen über die Installation. Unten
Auf dem Display angezeigte Informationen mit der Anzahl der Innengeräte und Zonen:
Fehlersuche
Technische Daten
| |||||||||||||||||||||||||||||||||||||||||||||||||||||||||||||||||||||||||||||||||||||||||||||||||||||||||||||||||||||||||||||||||||||||||||||||||||||||||||||||||||||||||||||||||||||||||||||||||||||||||||||||||||||||||||||||||||||||||||||||||||||||||||||||||||||||||||||||||||||||||||||