Configuration
Before using the connected dimmer, configure the correct dimmer profile and minimum dimming level.
A connected dimmer, Zigbee® that is used in stand-alone mode will not use the mesh networking capability and will not be upgraded automatically. For more details, refer to Zigbee® network principle.
Select dimmer profile
Select the dimmer profile according to the lamp type that you wish to dim. Consult the below overview for more information on the correct settings.
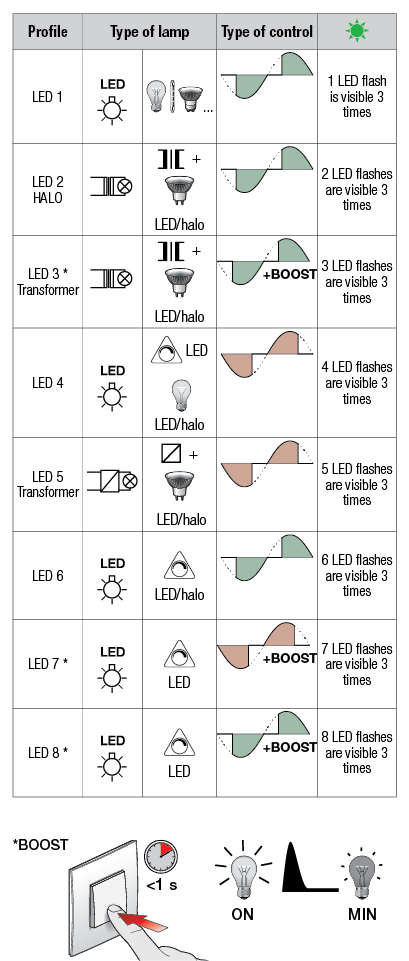
* These dimmer profiles are equipped with a boost function. This means that upon switching on, the lamp will briefly shine brightly before going to the desired dimming level. These profiles are specifically made for lamps which cannot be switched on again when dimmed low.
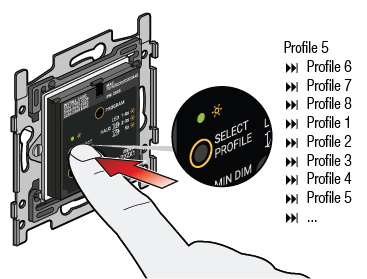
To change the dimmer profile, press the button Select Profile. A green LED will blink several times to indicate the dimmer profile number. These LED flashes are repeated 3 times. The LED flashes are incremented by 1 each time the button Select Profile is pressed when the green LEDs are flashing. This makes it possible to scroll through the 8 dimmer profiles LED 1 to LED 8. To save the selected dimmer profile, release the Select Profile button when the LED flashes are repeated 3 x. The default dimmer profile is Profile 5.
Example
When the button Select Profile is pressed, the green LED will first blink 5 times (dimmer profile LED 5 is active). When the button Select Profile is pressed again, the green LED will blink 6 times. Dimmer profile LED 6, useable for LED and halogen lamps with leading edge dimming, is saved when the button Select Profile is released when the LED flashes are repeated 3 x.
Set the minimum dimming level
Set the minimum light intensity by adjusting the minimum dimming level to make use of the optimal dimming range of the lamp wired to the dimmer. The minimum dimming level is set as follows:
-
Switch on the connected dimmer and dim the lamp to the minimum level via the dimming button (long press) in the middle of the base
-
Check the intensity of the lamp:
-
If the lamp is on at the desired minimum light level, the dimmer is correctly configured
-
If the lamp still shines too bright, reduce the minimum dimming level using the MIN DIM LEVEL button. Continue to dim the lamp to a point where it does not flash or switch off
-
If the lamp is flashing or is completely switched off, increase the minimum dimming level in the same way as in step 2 b.
-
-
Save the new setting by switching the dimmer off and back on.
If the lamp does not switch on, configure a dimming profile with boost function (LED 3, LED 7, or LED 8).

The dimmer can now be used in stand-alone mode . If you briefly press the button, it will switch its own contact and activate the corresponding lighting circuit. Briefly press the button again to switch off the built-in contact. A long press on the same push button will trigger the dim up function. Another long press will reverse the dim direction (dim down).
Memory function
The memory function is always active in stand-alone mode with the light intensity level being stored when the dimmer is switched off. The memory function cannot be disabled in stand-alone mode.
Feedback LED
A white feedback LED visualises the state of the built-in contact. This feedback LED can be disabled manually.

|
Disable the white feedback LED |
|
|
Enable the white feedback LED (after it has been disabled) |
|
Stand-alone use
See Connected dimmer, Zigbee®, 3 - 200 W, 2-wire