SituationDans ce plan par étapes, une lampe est allumée manuellement au moyen d'un bouton-poussoir et elle s'éteint automatiquement si durant un certain temps aucun mouvement n'est détecté par un mini détecteur. Ce plan par étapes fonctionne aussi pour une prise de courant commutée, la logique de programmation est identique. | Note |
|---|
| Détecter l'absence sans présence précédente est impossible. Ce scénario fonctionnera donc uniquement si le mini détecteur détecte aussi réellement quelqu'un dès que l'action a démarré. Lorsque quelqu'un est détecté à l'allumage de la lumière (ex. lorsque la lumière est allumée à distance au moyen d'un smartphone alors que quelqu'un se trouve dans la pièce), la lampe ne s'éteindra pas automatiquement. |
Point de départLe point de départ de ce plan par étapes est un projet pour lequel l'onglet Informations projet est déjà complété, qui dispose déjà d'un plan dessiné ou téléchargé et auquel une commande d’éclairage a déjà été ajoutée. Ajouter un Mini détecteur- Cliquez sur Création en haut de l'écran.
- Cliquez sur ajoutez une sortie.
- Cliquez sur mini détecteur dans la liste déroulante de la partie droite de l'écran. La sortie apparaît sur le plan.
- Faites glisser le mini détecteur au bon endroit et donnez-lui un nom reconnaissable.
- Choisissez un lieu existant dans la liste déroulante ou cliquez sur ajoutez un lieu si celui-ci n'a pas encore été défini.
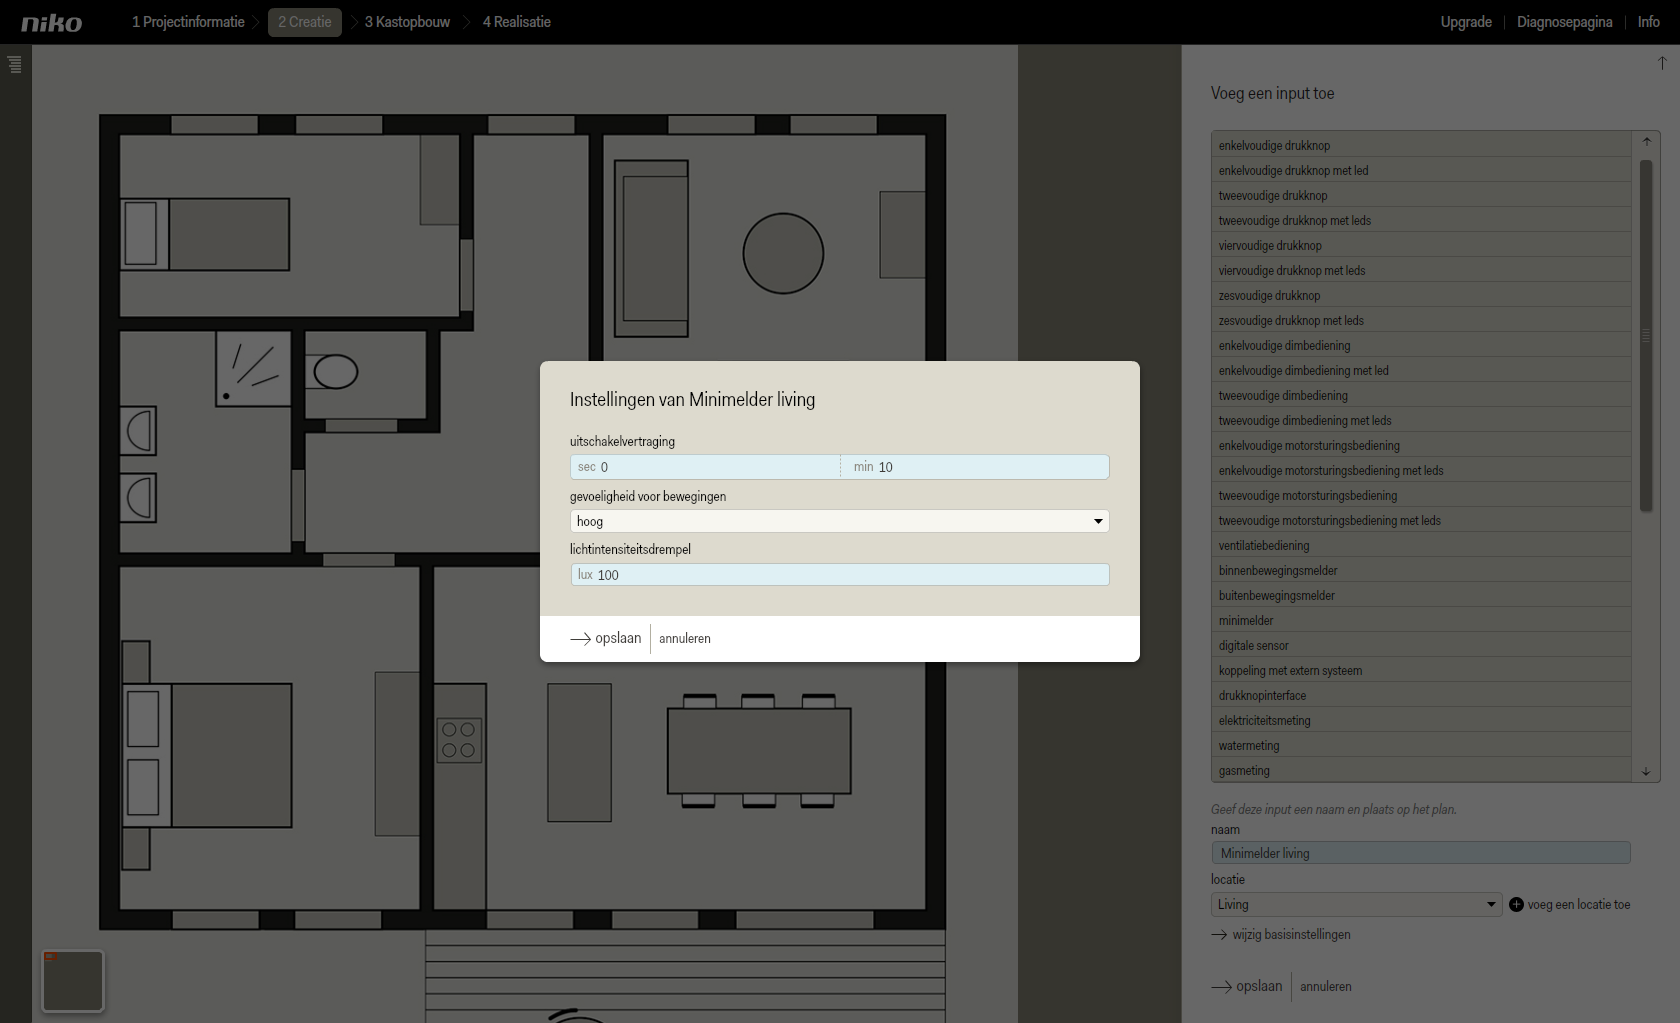
- Cliquez sur modifiez les réglages de base. Une fenêtre contextuelle s'affiche.
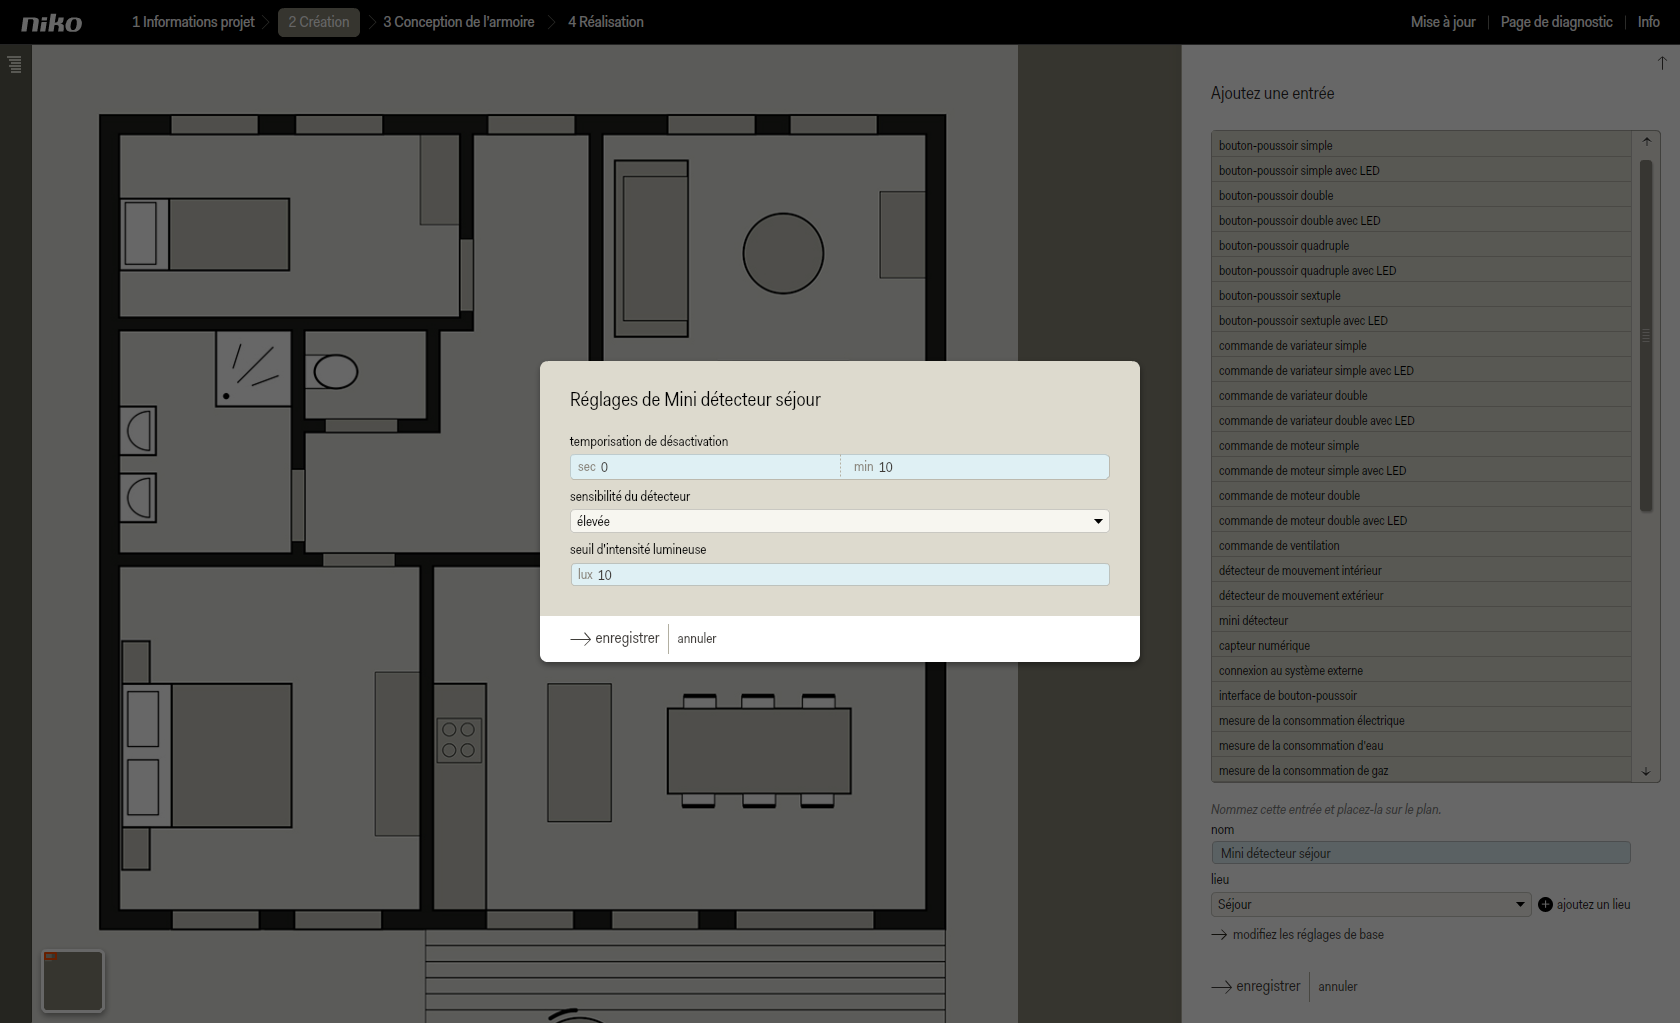
- Si nécessaire, modifiez la temporisation de désactivation et la sensibilité au mouvement.
| Info |
|---|
La temporisation de désactivation est le temps écoulé entre le dernier mouvement détecté et l'activation du comportement d'arrêt. Le réglage d'usine de la temporisation de désactivation est 5 minutes et peut être adapté (plage: 1 s à 59 min 59 s). Dans cet exemple, la temporisation de désactivation est réglée sur 10 minutes.
La sensibilité au mouvement est expliquée dans ce scénario.
Dans ce scénario, le seuil d’intensité lumineuse n'est pas applicable. |
- Cliquez sur Enregistrer pour fermer la fenêtre contextuelle
- Cliquez sur enregistrer pour revenir à l'écran d'accueil de l'étape Création.
Ajouter une sortie virtuelle 'Est-ce qu'il y a du mouvement?'- Cliquez sur Ajoutez une sortie virtuelle. La sortie virtuelle représente un drapeau sur le plan de l'habitation.
- Faites glisser l'icône vers un emplacement qui vous semble logique et clair sur le plan.
- Donnez à la sortie virtuelle un nom clair, par exemple, 'est-ce qu'il y a du mouvement?'
| Info |
|---|
| Conseil : utilisez les questions oui/non telles que « Y a-t-il un mouvement? » ou « La lampe doit-elle rester allumée? ». |
- Choisissez un lieu dans la liste à choix multiple ou ajoutez un lieu si ce lieu n'a pas encore été défini (par exemple, Séjour).
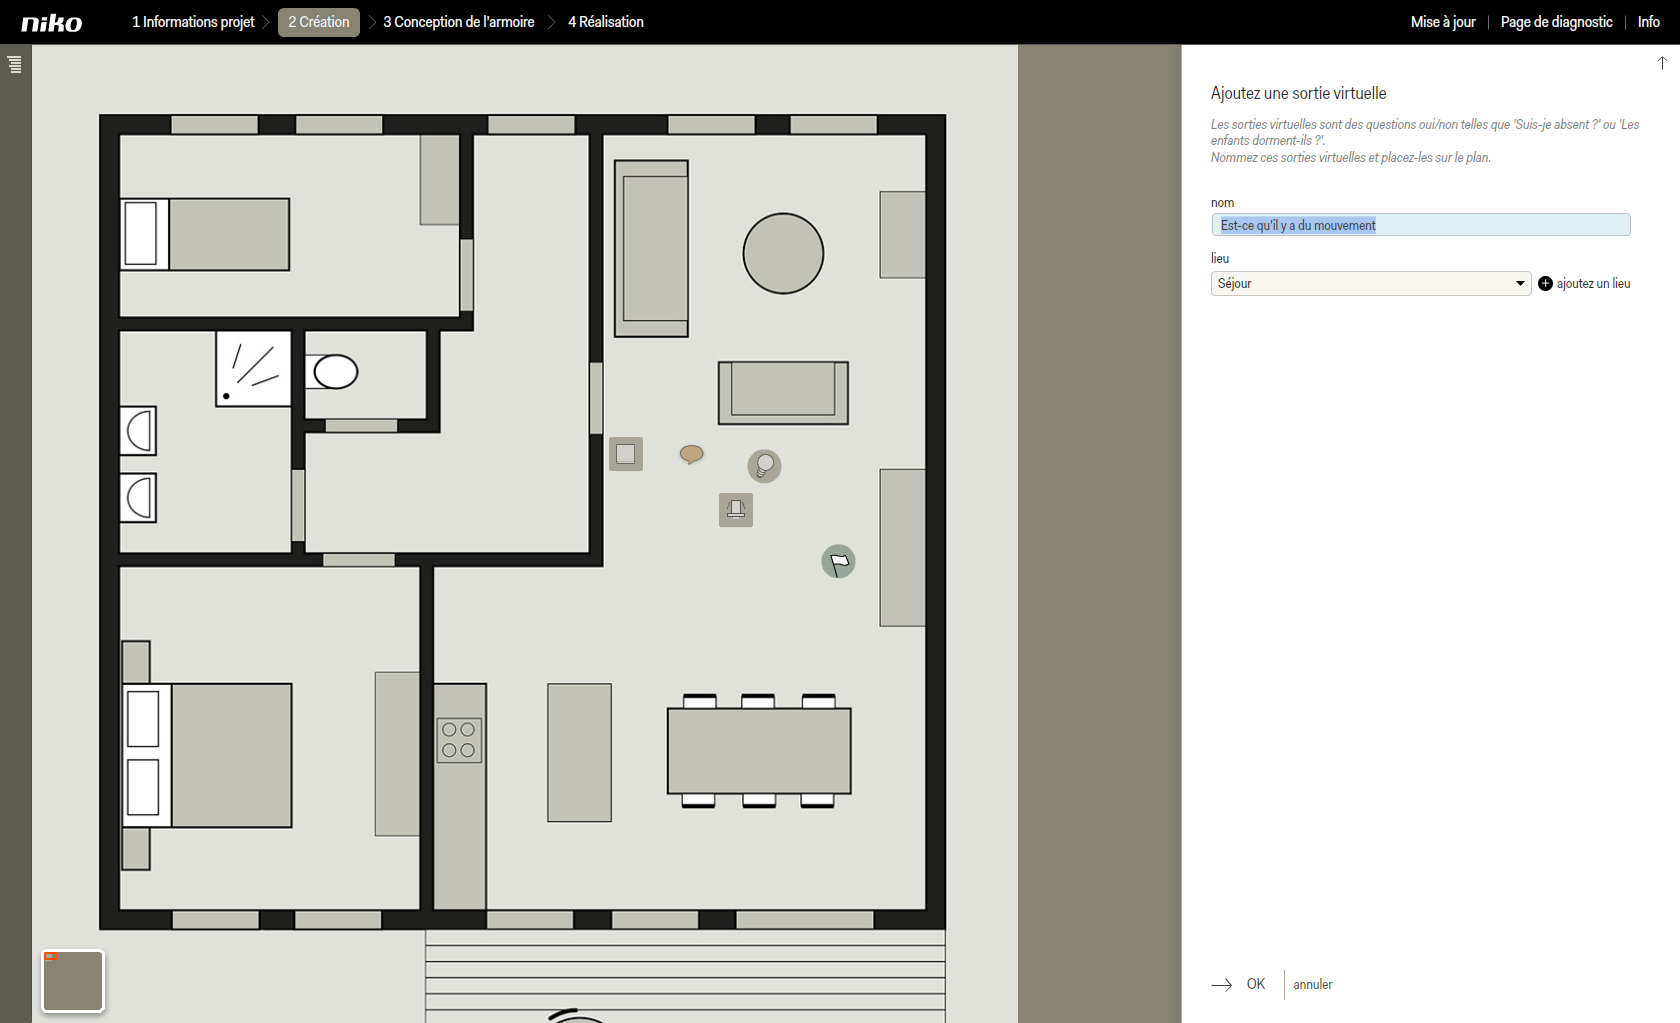
- Cliquez sur OK pour revenir à l'écran d'accueil Création.
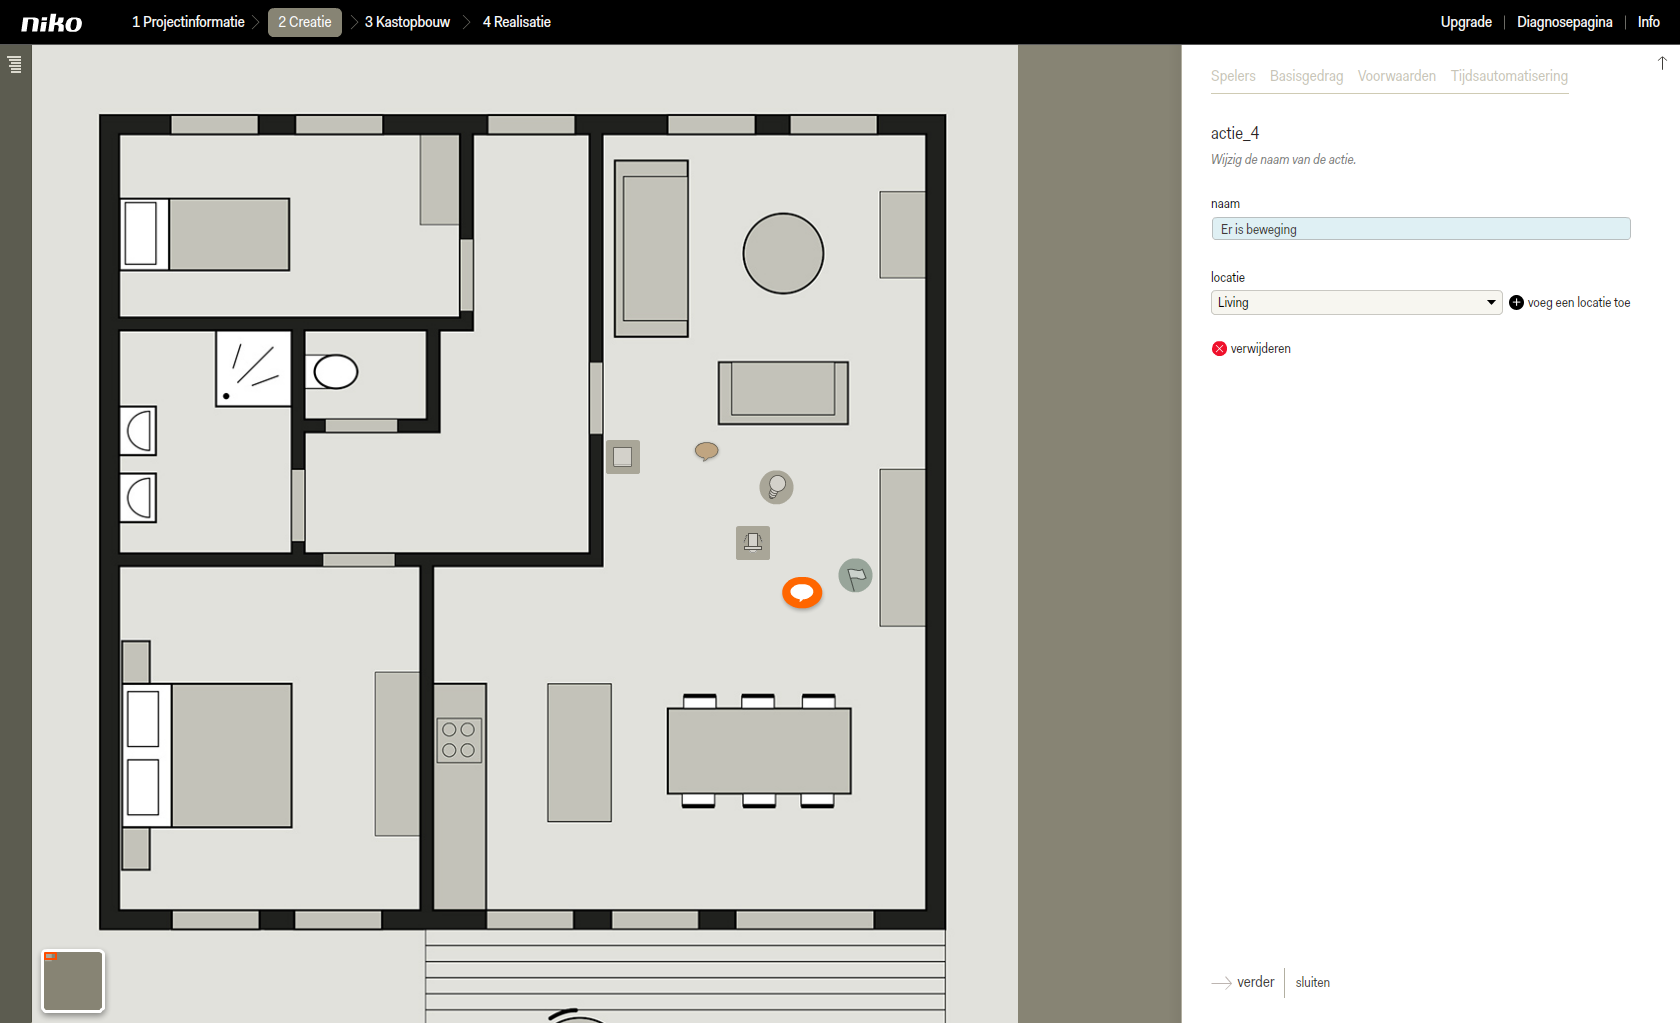
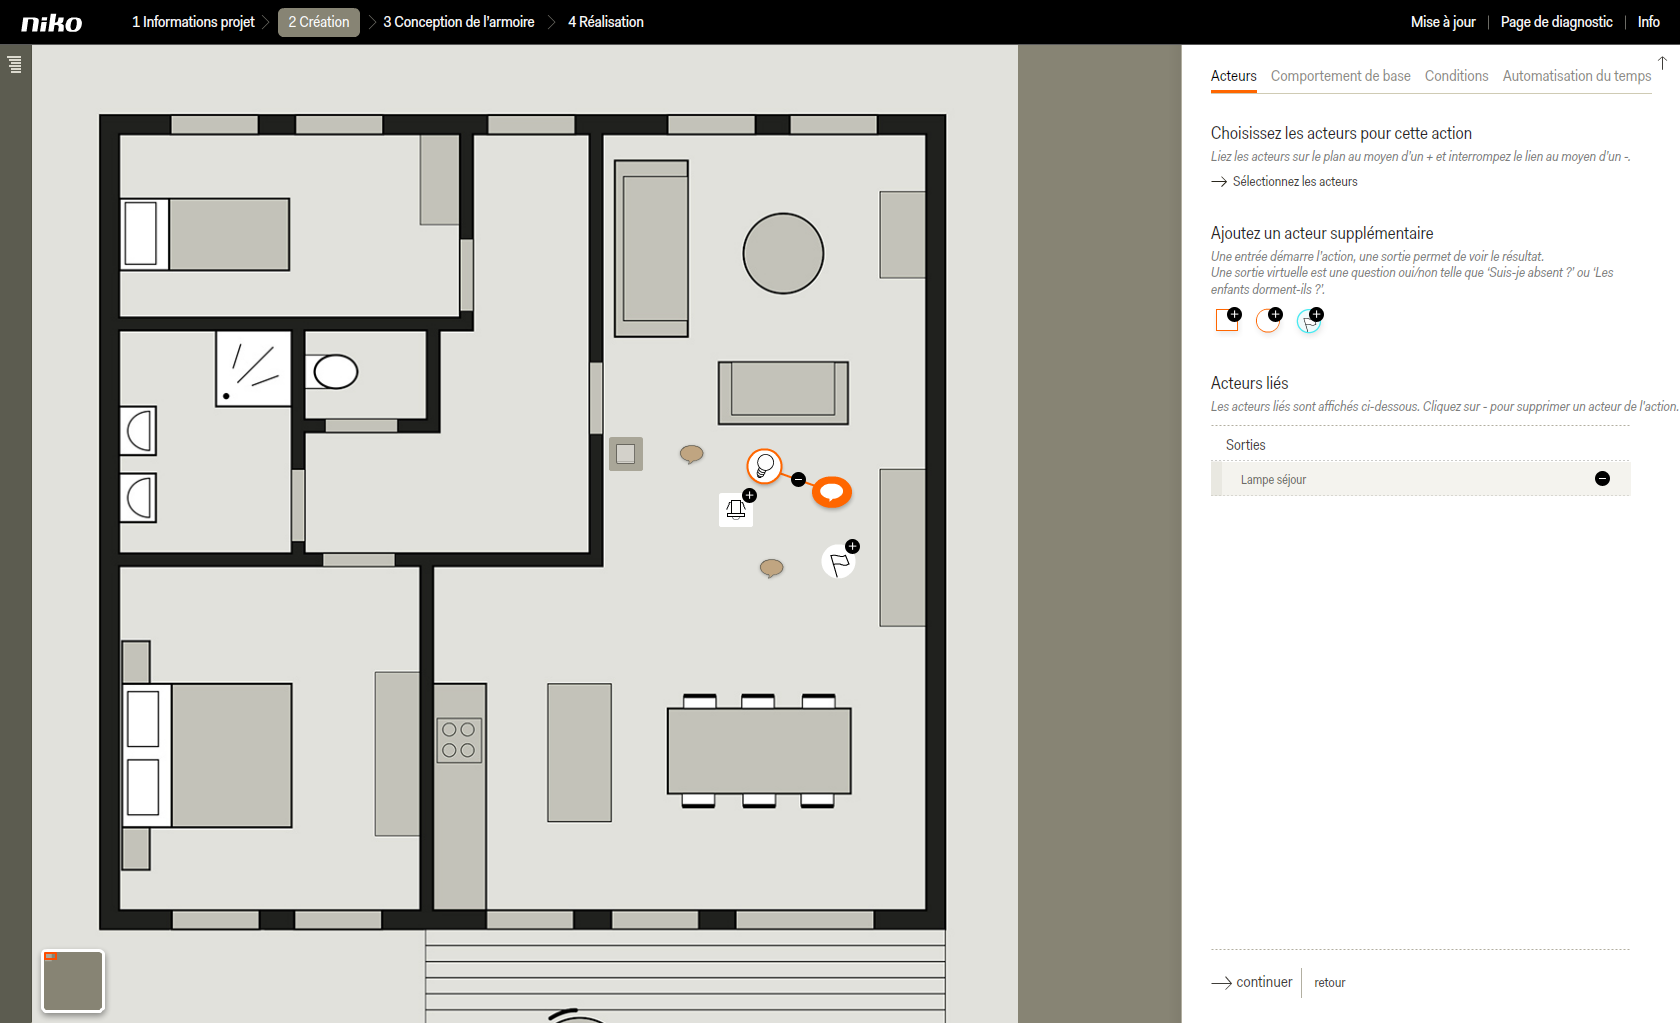
Créer une action 'Il y a du mouvement'- Cliquez sur ajoutez une action. L'action apparaît sous forme d'info-bulle dans le plan.
- Faites glisser l'action vers un lieu logique et clair pour vous, par exemple au niveau de l'entrée ou sortie pertinente.
- Donnez un nom à l'action.
- Choisissez un lieu existant dans la liste déroulante ou cliquez sur ajoutez un lieu si celui-ci n'a pas encore été défini.
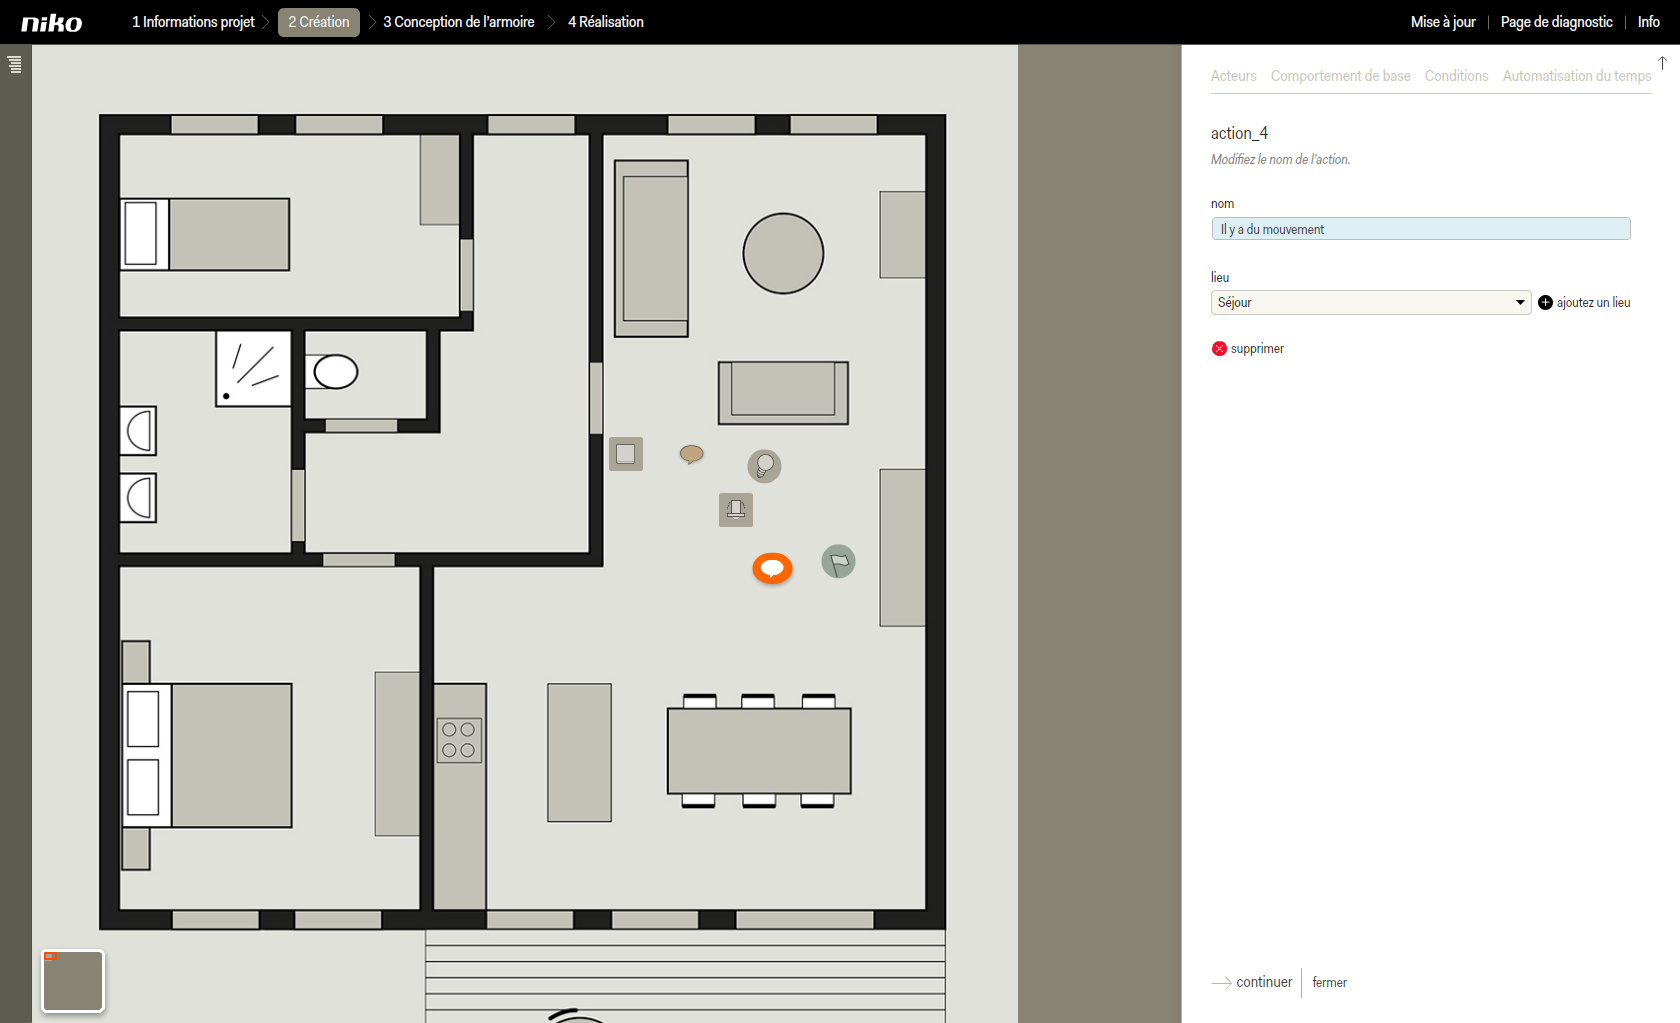
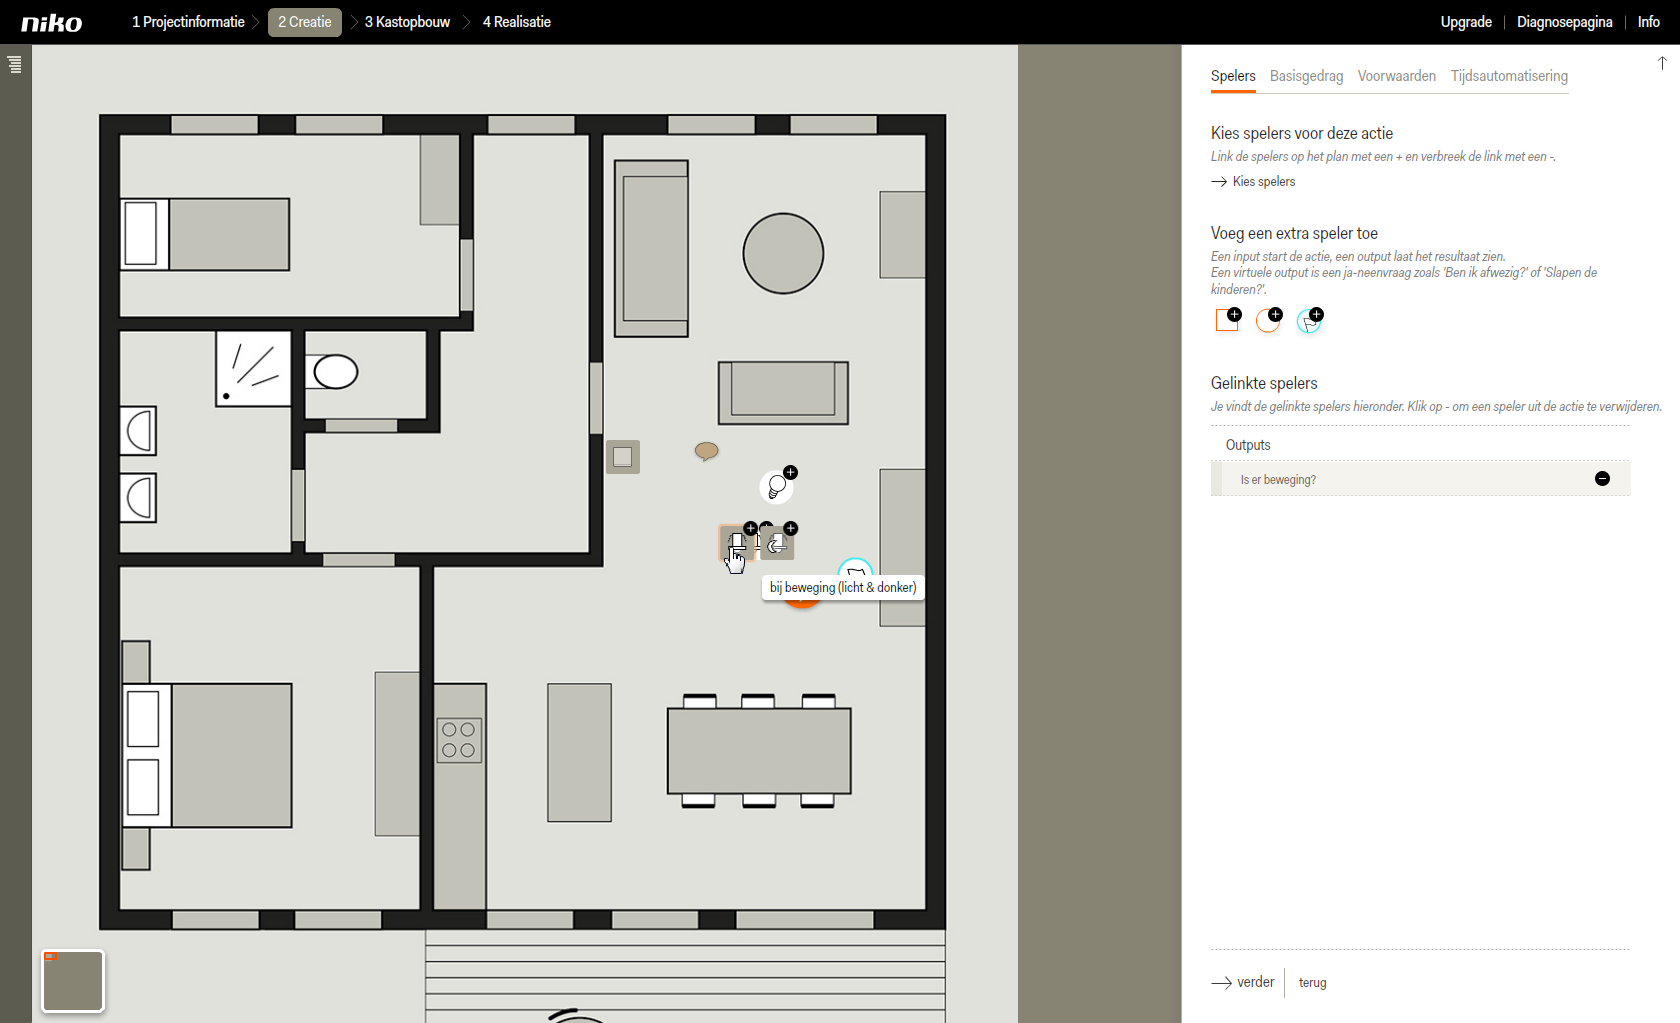
- Cliquez sur continuer pour accéder à l'onglet Acteurs.
- Cliquez sur la sortie virtuelle dans le plan pour la lier à l'action.
- Cliquez sur le mini détecteur dans le plan. Deux modes s'affichent.
- Cliquez sur l'application lorsqu’un mouvement est détecté (clarté et obscurité).
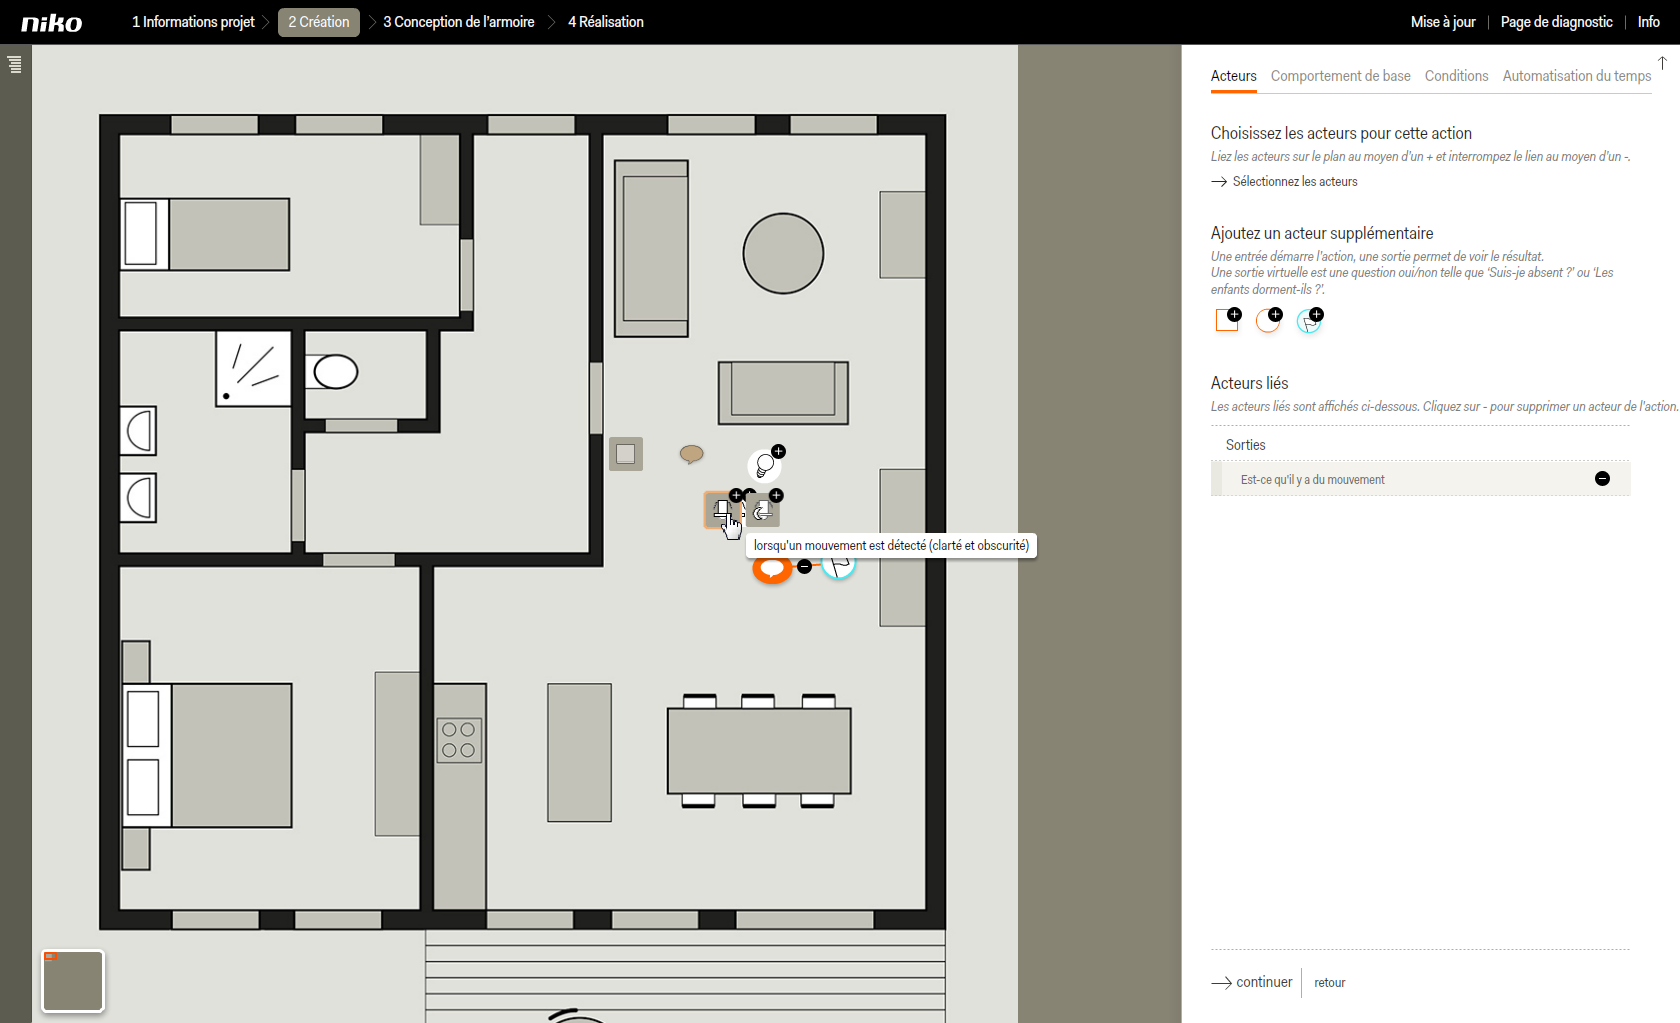
- Cliquez sur continuer pour accéder à l'onglet Comportement de base.
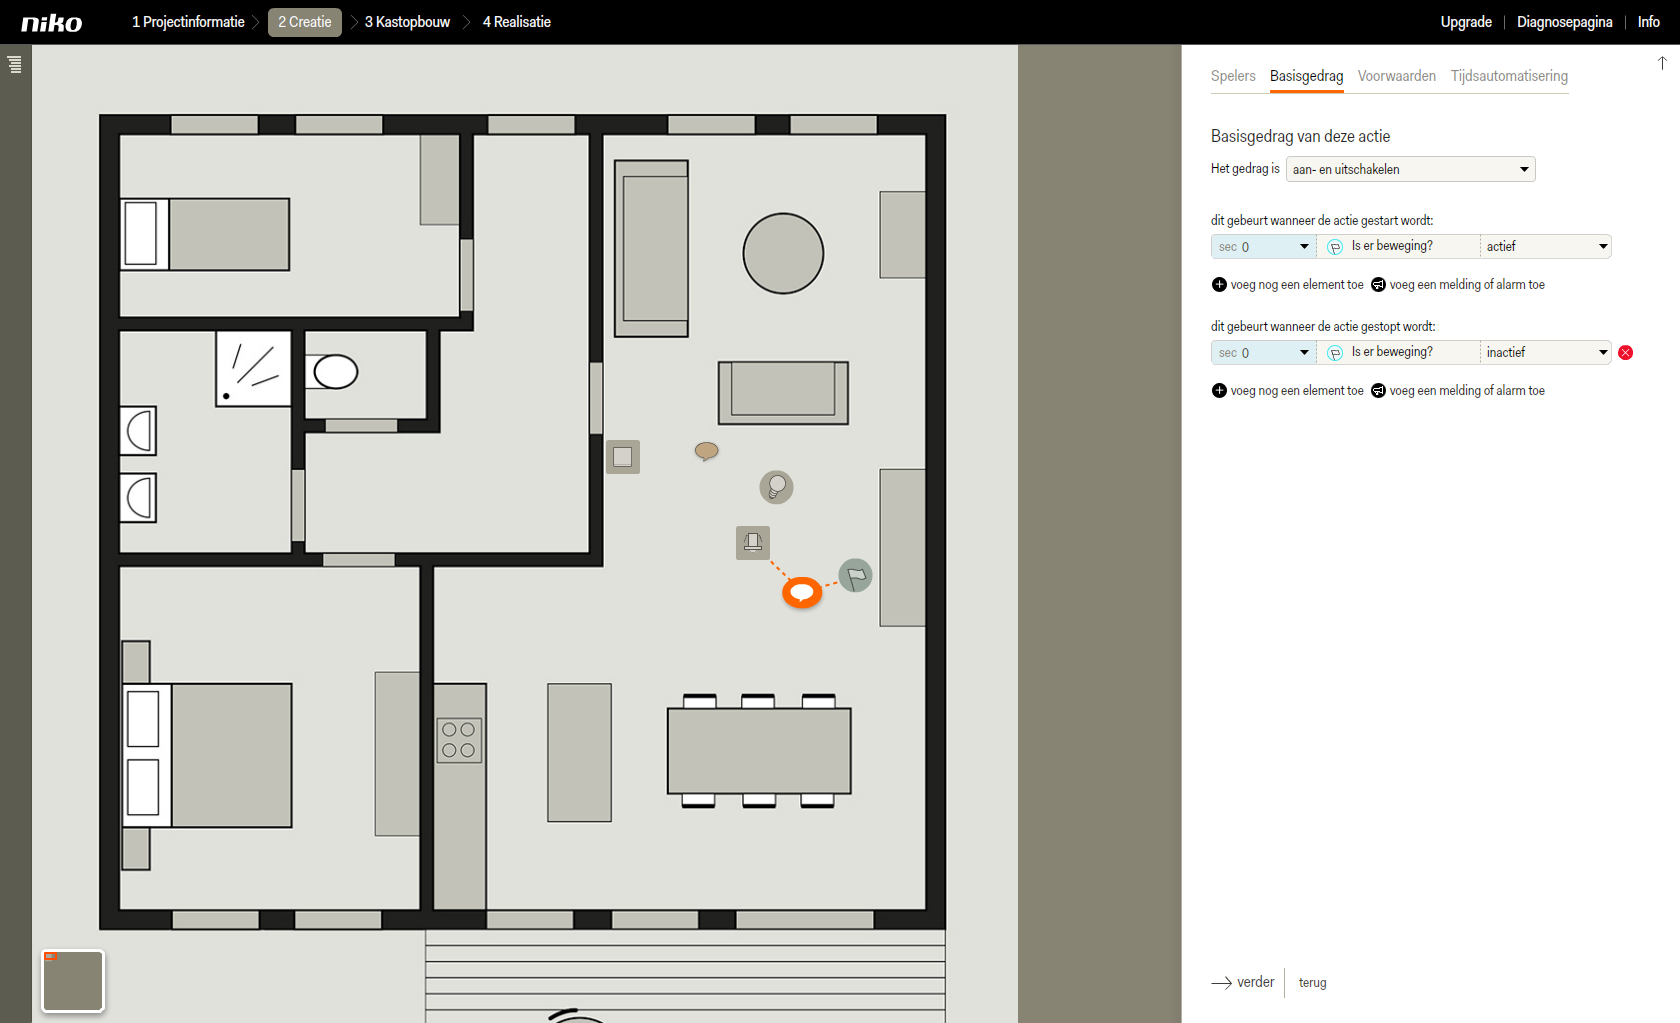
Étant donné que vous avez paramétré une temporisation de désactivation dans les réglages de base du mini détecteur, vous ne devez pas dans l'onglet comportement de base paramétrer de temporisation pour le comportement d’arrêt. - Le comportement de démarrage et d'arrêt standard est correct. Vous ne devez pas le modifier.

- Cliquez sur continuer pour accéder à l'onglet Conditions.
- Cliquez sur continuer pour accéder à l'onglet Automatisation du temps.
- Cliquez sur Enregistrer pour revenir à l'écran d'accueil de l'étape Création.
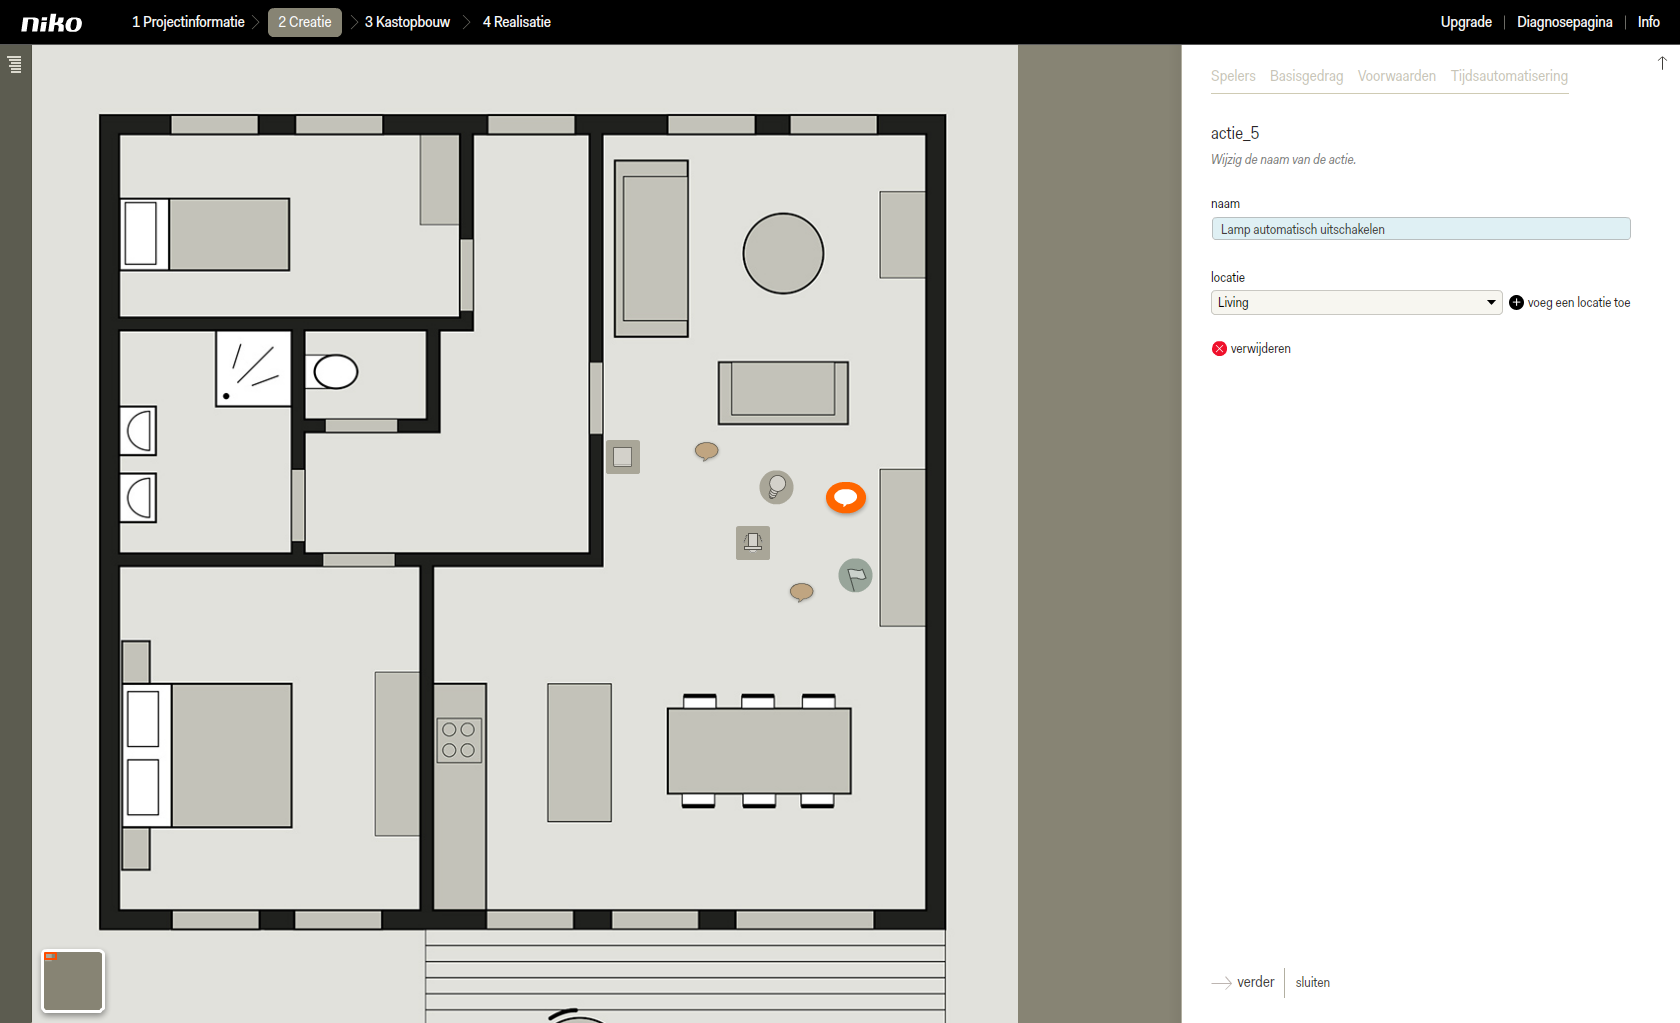
Créer une action 'Eteindre lampe automatiquement'- Cliquez sur ajoutez une action. L'action apparaît sous forme d'info-bulle dans le plan.
- Faites glisser l'action vers un lieu logique et clair pour vous, par exemple au niveau de l'entrée ou sortie pertinente.
- Donnez un nom à l'action.
- Choisissez un lieu existant dans la liste déroulante ou cliquez sur ajoutez un lieu si celui-ci n'a pas encore été défini.

- Cliquez sur continuer pour accéder à l'onglet Acteurs.
- Cliquez sur la lampe sur le plan pour l'ajouter à l'action en tant qu'acteur.
| Info |
|---|
| Ce type d'automatisation ne contient pas d'entrées en tant qu'acteurs. Vous vous limitez donc ici à sélectionner les sorties qui doivent être commandées. |
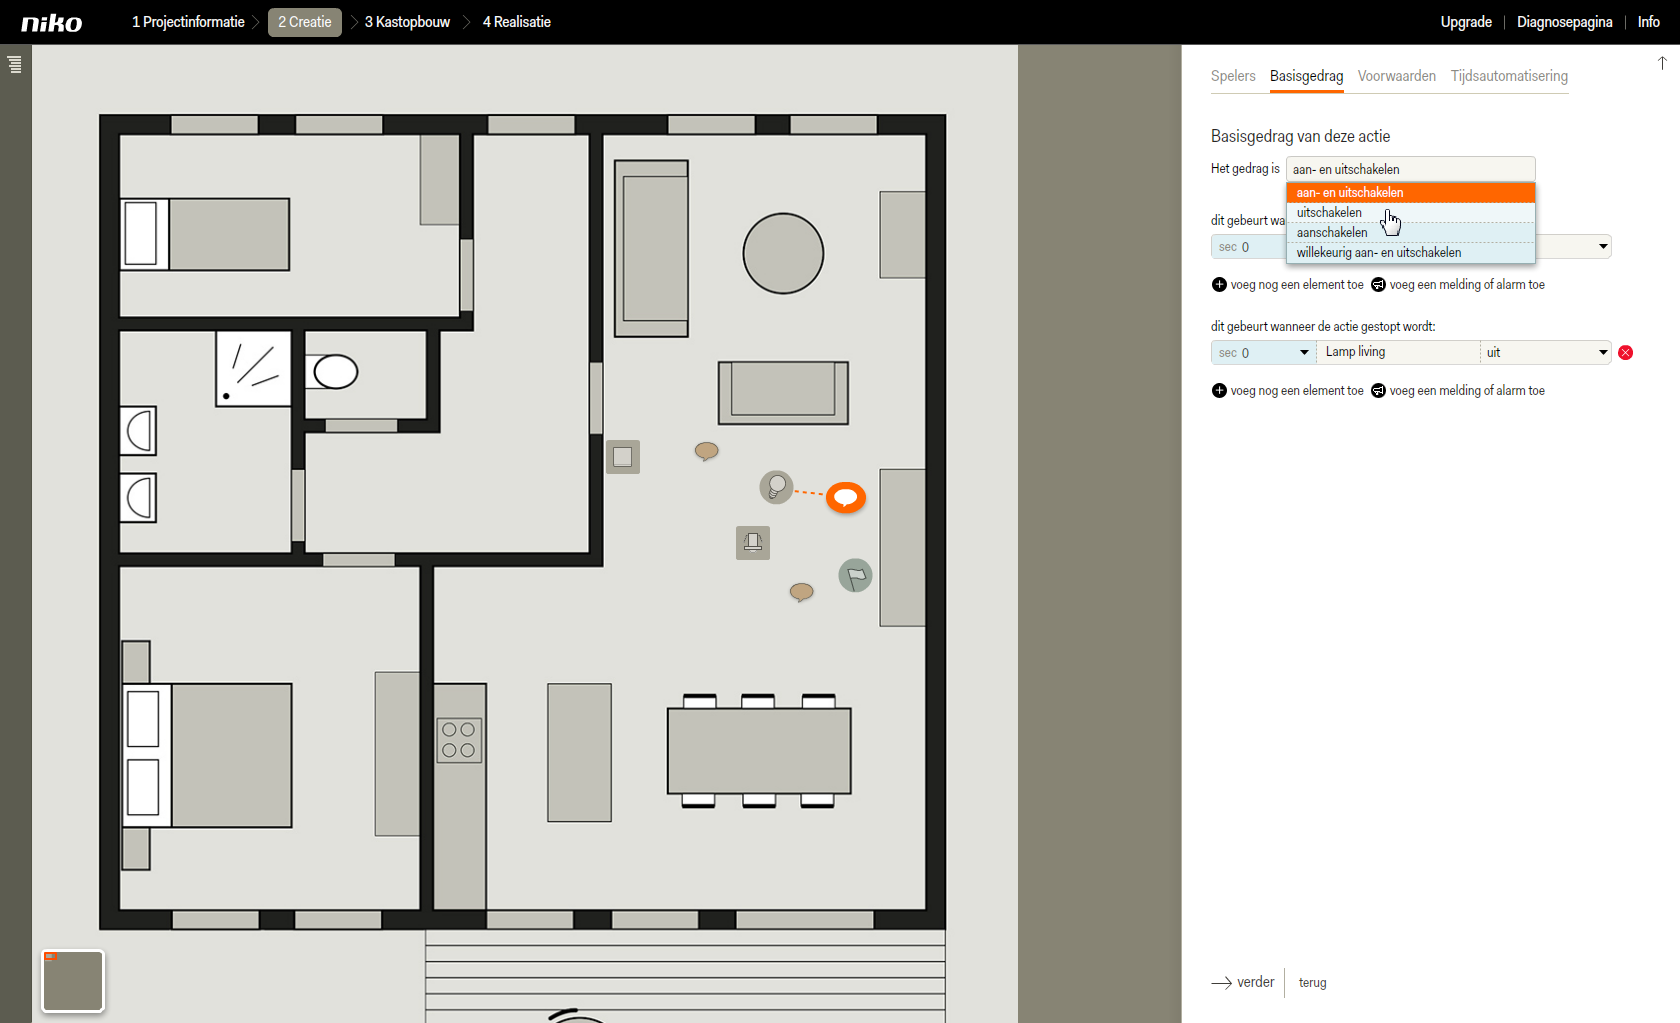
- Cliquez sur continuer pour accéder à l'onglet Comportement de base.
- Modifiez ici le comportement de base en éteindre en cliquant sur la flèche dans l'encadré de la liste déroulante.
Une fenêtre contextuelle s'ouvre.
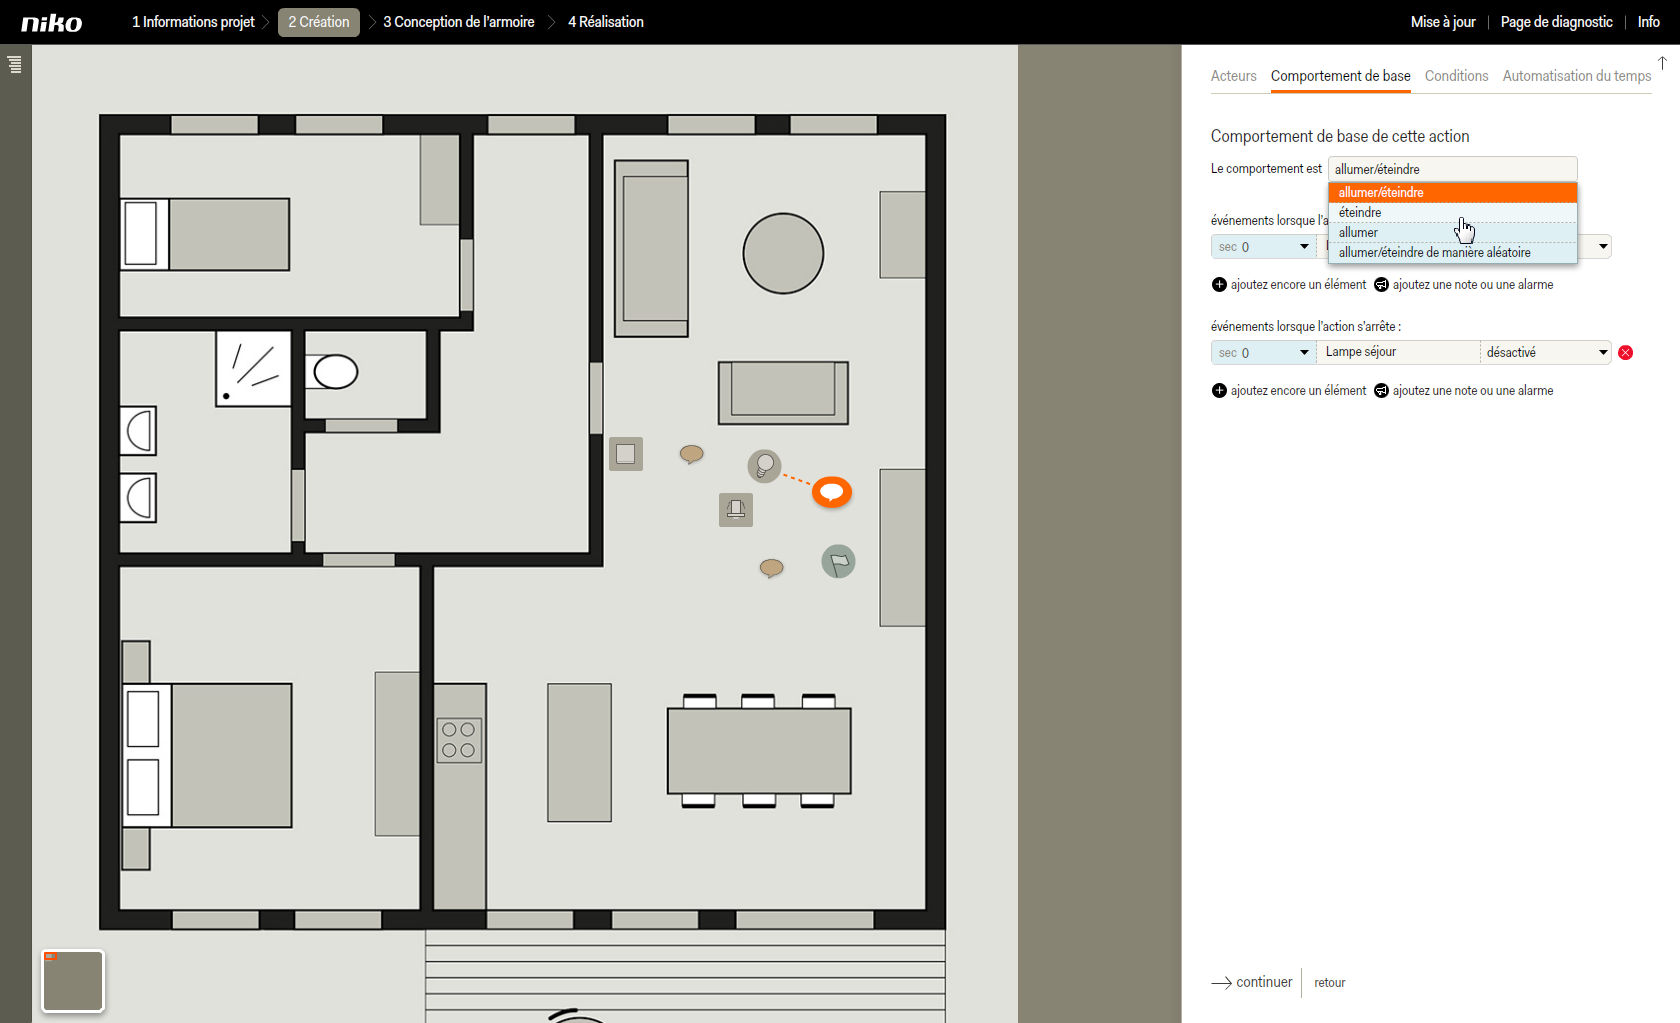
- Cliquez sur OK pour fermer la fenêtre contextuelle.
- Cliquez sur continuer pour accéder à l'onglet Conditions.
- Cliquez sur ajoutez une condition.
- Donnez un nom à la condition, par exemple 'Il n'y a pas de mouvement'.
| Info |
|---|
| Veillez à ajouter un nom évident à la condition pour pouvoir l'identifier immédiatement en cas de modification ultérieure éventuelle. |
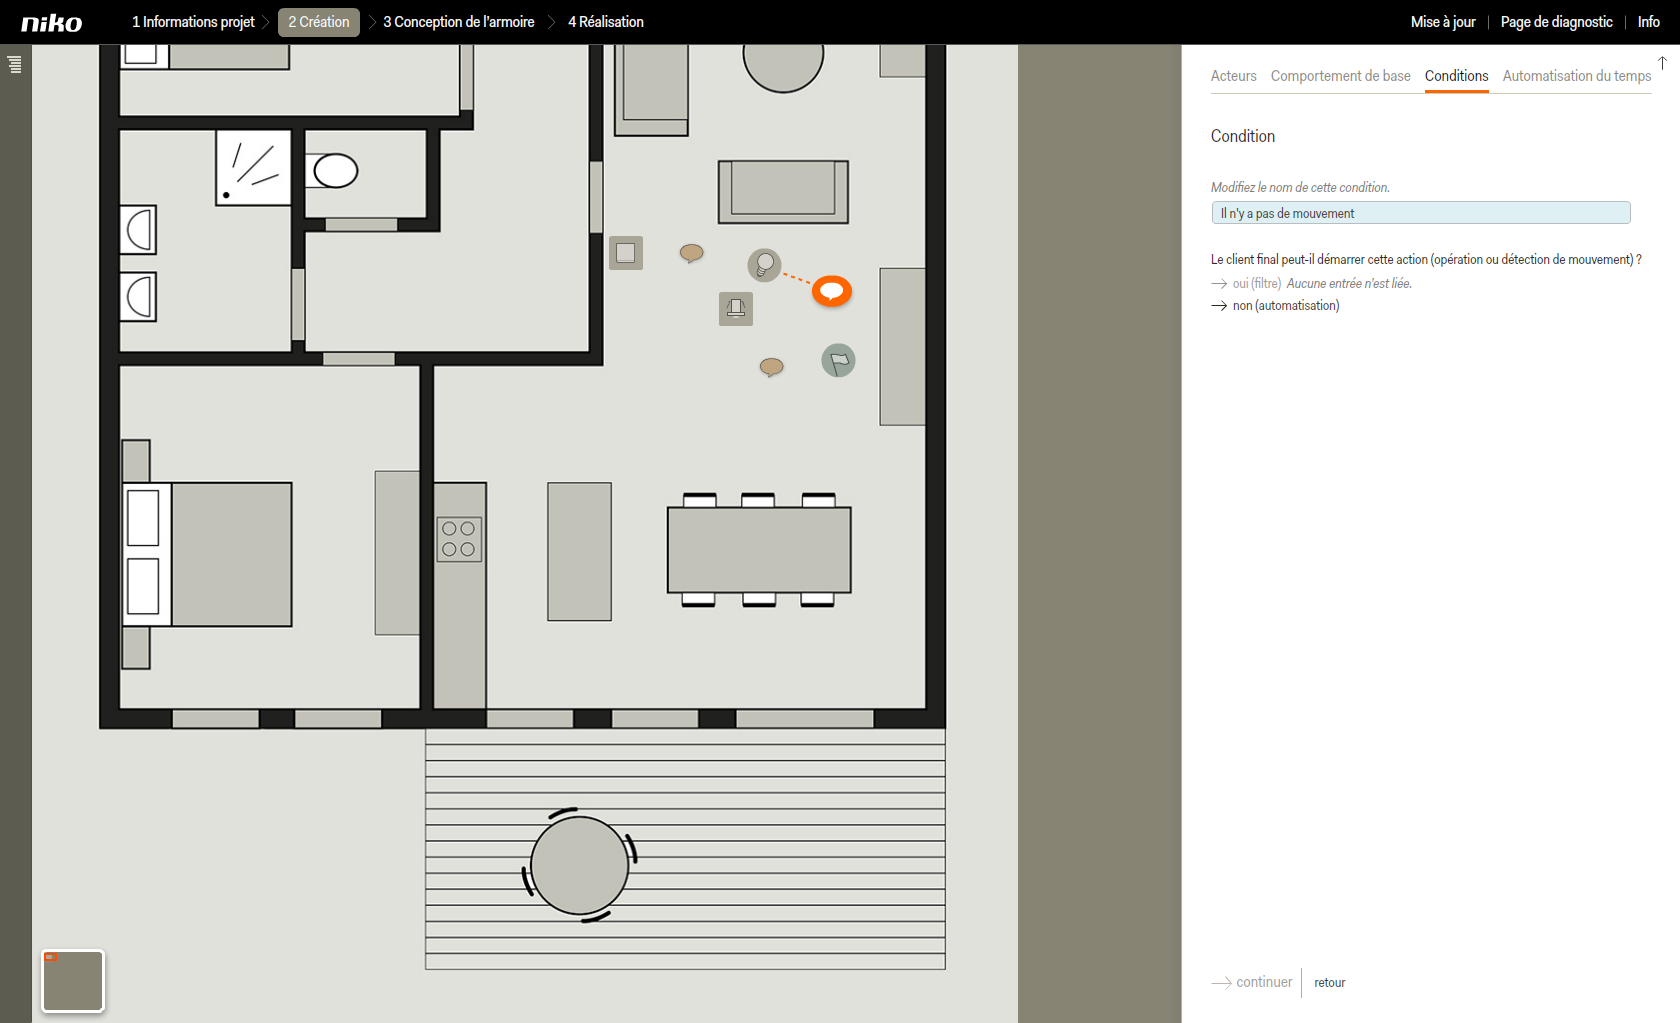
- Cliquez sur non (automatisation).
| Info |
|---|
| Vous n'avez pas ajouté d'entrées à cette action, le client ne peut donc pas la démarrer lui-même. |
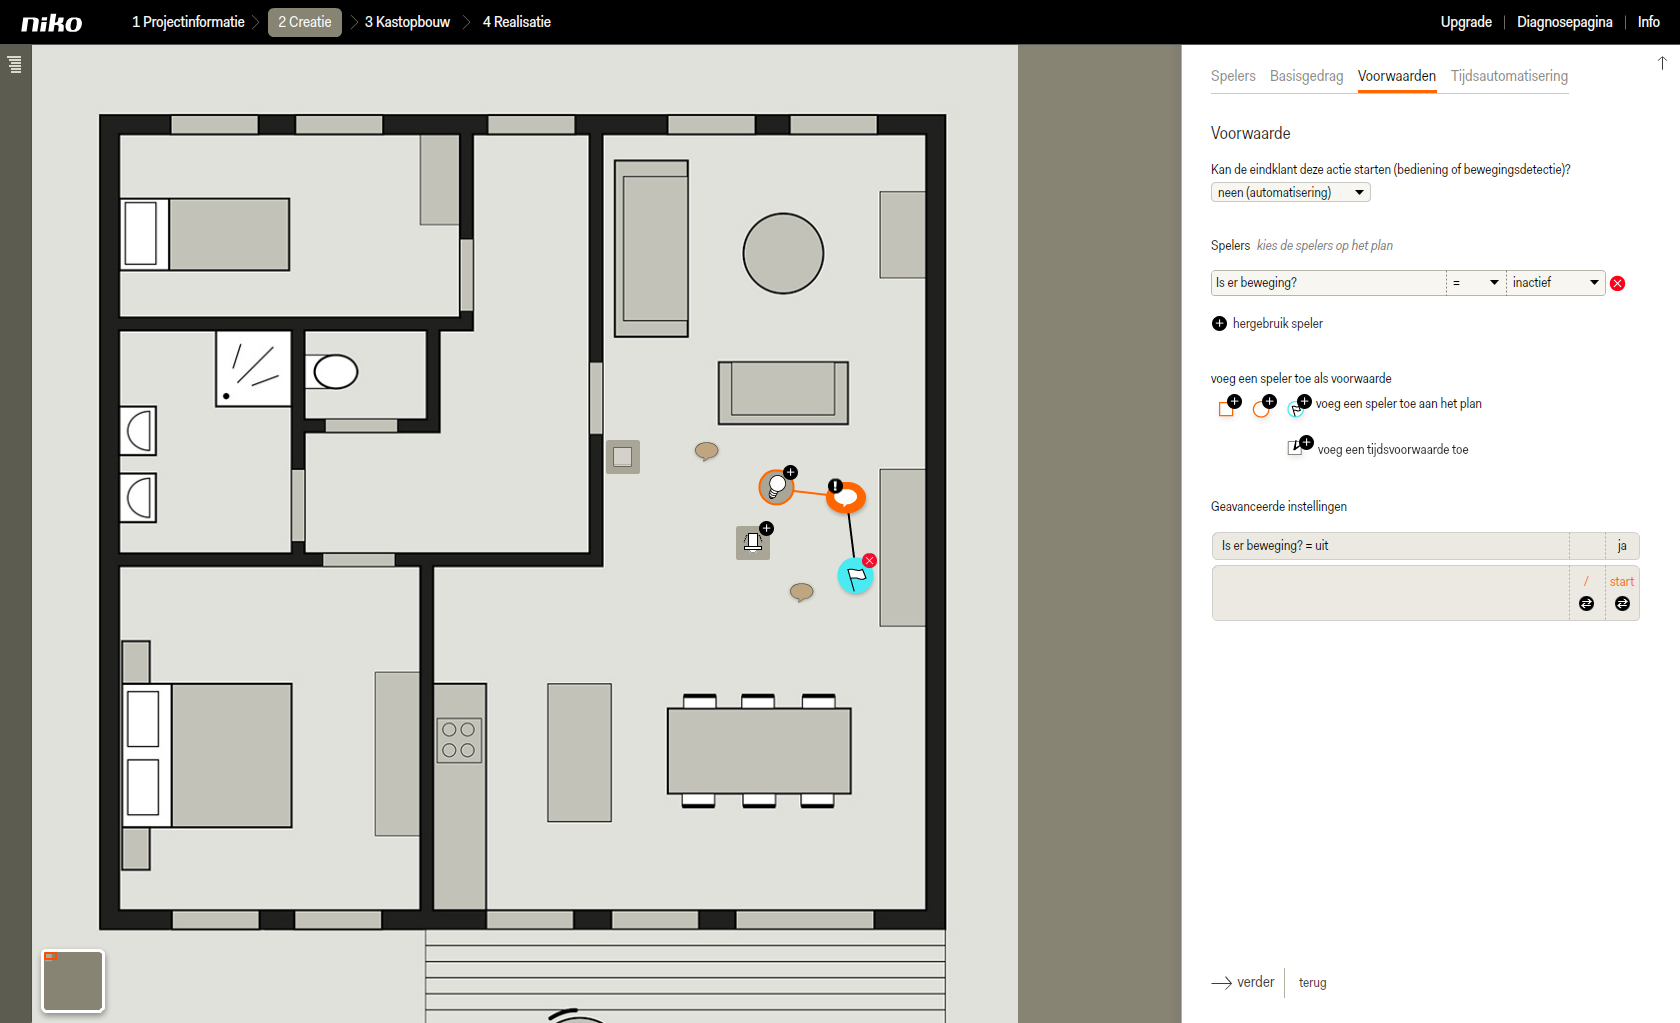
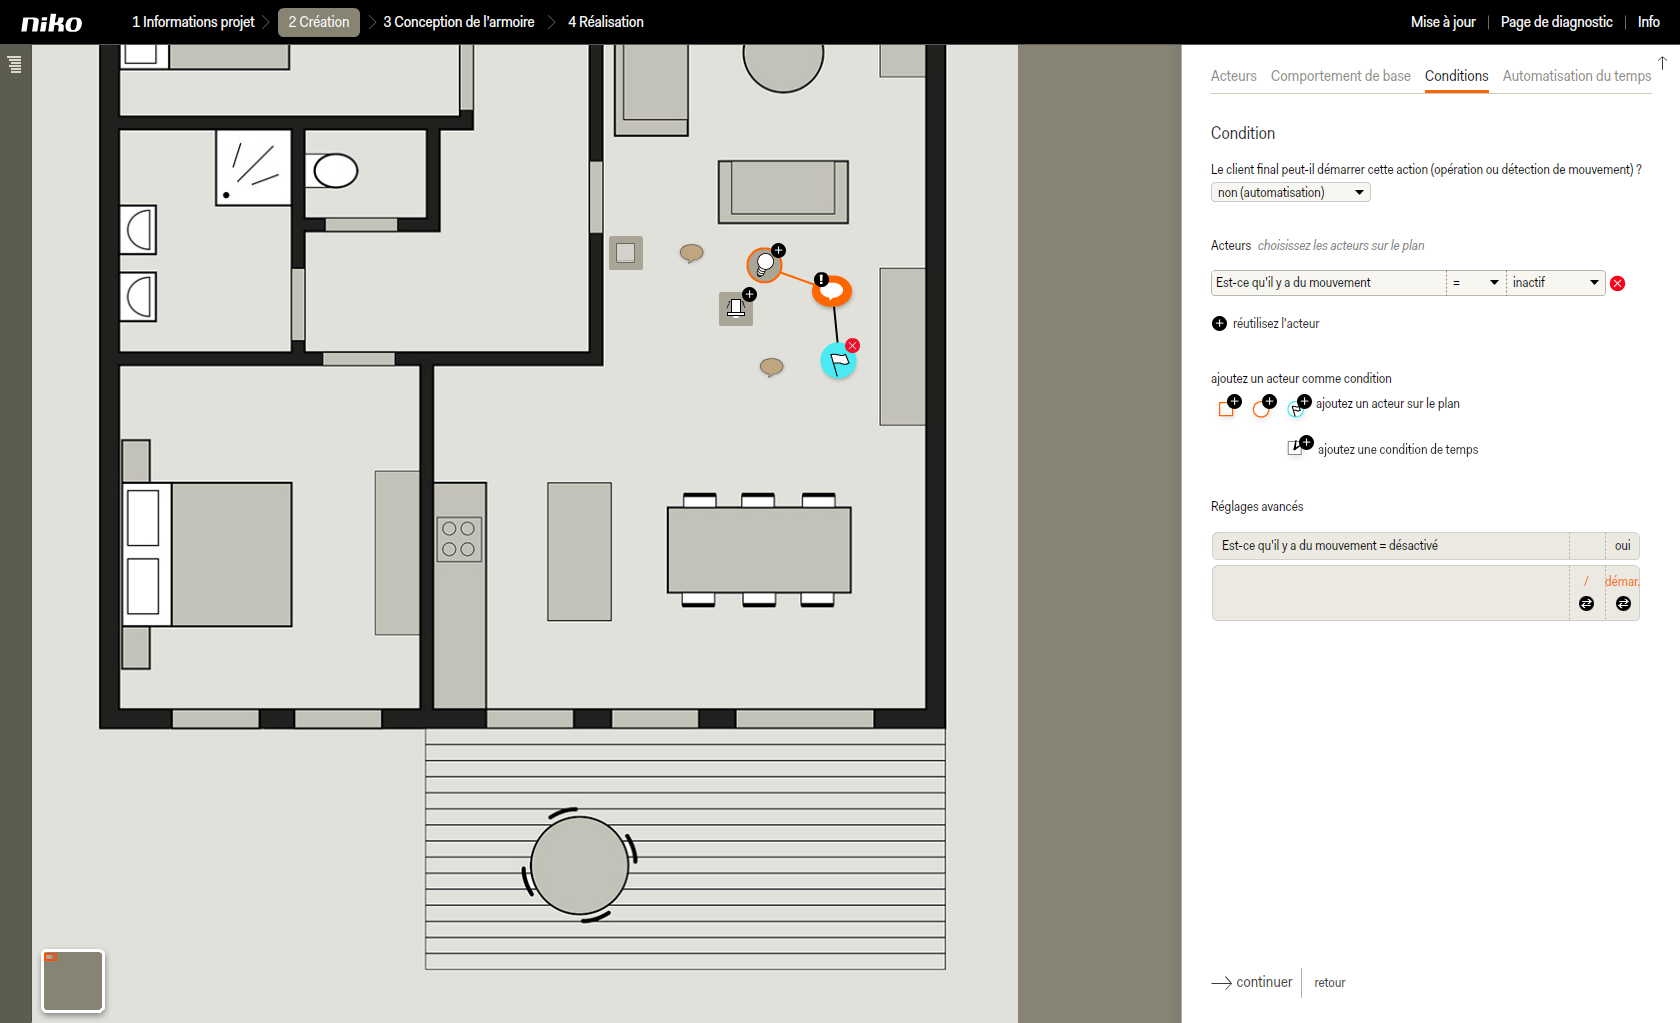
- Cliquez sur la sortie virtuelle dans le plan pour la lier à l'action en tant qu'acteur de condition.
La sortie virtuelle est liée à l'action par une ligne noire. - Adaptez les réglages de l'acteur de condition sur = & inactif.
- Vous trouverez sous les réglages avancés un tableau reprenant toutes les combinaisons possibles entre les différents acteurs de condition.
- Parcourez chaque colonne et cliquez sur le bouton noir en dessous pour indiquer ce qu'il doit se passer dans ce cas. Vous avez le choix entre démarrer, arrêter ou slash (/). L'option / (slash) signifie qu'il ne doit rien se passer.
- Paramétrez l'action démarrer lorsqu'il n'y a pas de mouvement (oui) et qu'il ne se passe rien (/) lorsqu'il y a un mouvement.
- Cliquez sur continuer pour accéder à l'onglet Automatisation du temps.
- Cliquez sur Enregistrer pour revenir à l'écran d'accueil de l'étape Création.
RésultatVous pouvez maintenant poursuivre avec l'étape Disposition de l'armoire et Réalisation. |